Search This Blog and The Web

Showing posts with label Blouses. Show all posts

KNITTED SLEEVELESS LACE BLOUSE - Size Medium

I find myself often looking at all different yarns, thick and thin, colorful or natural, single color, hand painted. I find the artistry behind yarn-making fascinating. I also love variegated yarns - the ones that appeal to my eye and style.

About half a year ago I was scrolling through some websites with yarns and came across Lana Grossa, Gomitolo Puno. There were several very pretty variegated balls on display. So I bought 4 different skeins. Among them, I added to my cart one that was semi-neutral, in a sage/gray color.

Unfortunately, this yarn is now discontinued (what else is new), but you may still find it somewhere on the world wide web. 

If it is out of your reach, you could substitute this yarn with another one - but make sure it is #2 weight (sock yarn thickness). You could use THIS link to find a similar yarn. Or see THIS sparkly yarn from Amazon (an affiliate link).

Please, consider supporting my blog and YouTube Channel by shopping on Amazon via MY AFFILIATE LINK. Thank you if you purchase anything. And I mean anything. Just click on the link and purchase anything you need. It won't cost you anything extra.


Material:

  • Approximately 200g of Lana Grossa, Gomitolo Puno; color 003; 70% Cotton, 19% Merino, 11% Alpaca; 570m/150 g per ball
  • DPNs, Circulars Knitting Needles, Long Knitting Needles - US size #5 (3.75 mm)
  • Hook 3.75 mm 
  • Scissors
  • Yarn Needle (for weaving in the tails)

Size:
  • Women US Medium

Gouge (stockinette stitch):

  • on US knitting needles #5 (3.75 mm) - 1"x1" = 6 sts x 8 rows


Abbreviation:

DPN(s) - double-pointed needle(s)
CO - cast on
K - knit
P - purl
m1 - increase by making one stitch (I used m1R; you could also increase by knitting below your next stitch)
YO - yarn over
SSK - slip knit-wise, slip knit-wise, and then knit them together through the back loop
K2tog - knit two stitches together
M - stitch marker
eM - edge marker
bobble = 2hdc bobble - with crochet hook pull a loose loop through the next stitch, YO, pull a 2nd loop, YO, pull a 3rd loop (5 loops on the hook), pull yarn through all 5 loops; bring the hook behind your bobble and pick up the stitch just below the bobble and pull this stitch through the stitch on the hook; lastly, transfer the stitch from the hook onto the working needle
CDD - slip the next two stitches from the left knitting needle to the right knitting needle as if to knit; knit the next stitch; insert the left knitting needle into the two slipped stitches and pull them over the knitted stitch
KTBL - knit through the back loop
SLS - slip last stitch purl-wise with yarn in front
m1R - make one right (increase)
m1L - make one left (increase)
CCO - cable cast-on
RS - right side
WS - wrong side

NOTE:
While knitting this blouse I used 3 types of knitting needles - long needles, DPNs, and circular needles, each time switching to the best type to knit with.


Step-by-Step Directions
:

SECTION #1

Foundation: to start knitting yoke cast on 112 stitches

Rnd 1          *[K1, P1]* - to end of the row, then distribute the stitches evenly, among 4 DPNs (or use either 2 pairs of short circular needles or circular needles with a long cable), without twisting your knitted row, join needles into a circle
Rnd 2-6       *[K1, P1]* - to end of each row
Rnd 7          *[K7, m1]* - repeat 16x (to end of the row)
Rnd 8-9       K128
Rnd 10        *[K8, m1]* - repeat 16x (to end of the row)
Rnd 11-12    K144
Rnd 13        *[K9, m1]* - repeat 16x (to end of the row)
Rnd 14-16   K160
Rnd 17        *[K10, m1]* - repeat 16x (to end of the row) - total 176 sts

SECTION #2 - PATTERN PART
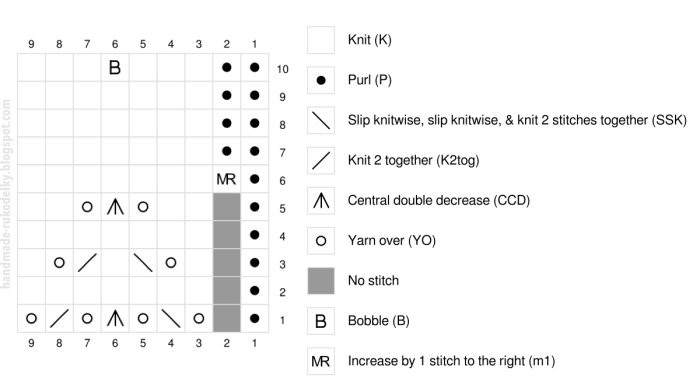

Work the "8 stitch/10 rows" pattern (the bobble could be substituted with K1 instead):

Rnd 1        *[YO, SSK, K3, K2tog, YO, K1, M]* - 22x
Rnd 2        K176
Rnd 3        *[YO, SSK, K3, K2tog, YO, K1, M]* - 22x
Rnd 4        K176
Rnd 5        *[YO, SSK, K1, bobble, K1, K2tog, YO, K1, M]* - 22x
Rnd 6        K176
Rnd 7        *[K1, YO, SSK, K1, K2tog, YO, K2, M]* - 22x
Rnd 8        K176
Rnd 9        *[K2, YO, CDD, YO, K3, M]* - 22x
Rnd 10       K176; remove your markers

SECTION #3

Continue working the yoke; start counting from 1

Rnd 1        *[K11, m1]* - repeat 16x (to end of the row) - total 192 sts
Rnd 2-4     K192
Rnd 5        *[K12, m1]* - repeat 16x (to end of the row) - total 208 sts
Rnd 6-7     K208

SECTION #4

At this point organize your stitches by placing markers as such:

Rnd 8        (back part) K10, eM, K44, eM, K10, M; (first sleeve) K43, M; (front part) K10, eM, K38, eM, K10, M; (the second sleeve) K43, M (end of the row)

Rnd 9      (back part) *[K1, P1] - 5x, eM, K44, eM, [P1, K1] - 5x, M; (sleeve) *[P1, K1]* - 21x, P1, M; (front part) *[K1, P1] - 5x, eM, K38, eM, [P1, K1] - 5x, M;  (the second sleeve) *[P1, K1]* - 21x, P1, M

Rnd 10      (back part) *[K1, P1] - 5x, eM, K44, eM, [P1, K1] - 5x, M; (sleeve) *[P1, K1]* - 21x, P1, M; (front part) *[K1, P1] - 5x, eM, K16, increase in each of next 6 sts as such: *[K1, YO, K1]*, K16, eM, [P1, K1] - 5x, M;  (the second sleeve) *[P1, K1]* - 21x, P1, M (total 220 sts)

Rnd 11-13  (back part) *[K1, P1] - 5x, eM, K44, eM, [P1, K1] - 5x, M; (sleeve) *[P1, K1]* - 21x, P1, M; (front part) *[K1, P1] - 5x, eM, K50, eM, [P1, K1] - 5x, M;  (the second sleeve) *[P1, K1]* - 21x, P1, M

In the next row bind off your sleeves, and place your front part on the holder (a thick string of yarn); when finished with your 14th round start working on your back part

Rnd 14       (back part) *[K1, P1] - 5x, eM, K44, eM, [P1, K1] - 5x; BO 43 sleeve sts; (front part) *[K1, P1] - 5x, eM, K50, eM, [P1, K1] - 5x, M; BO 43 sleeve sts; do not fasten off your yarn.

SECTION #5 - BACK PART

Keep working back and forth - odd rows on the right side, even rows on the wrong side, start counting from 1

Row 1       *[K1, P1]* - 5x, eM, K44, eM, *[P1, K1]* - 4x, P1, SLS, turn (64 sts)
Row 2       KTBL, K1, *[P1, K1]* - 4x, eM, P 44, eM, *[K1, P1]* - 4x, K1, SLS, turn

Row 3       KTBL, P1, *[K1, P1]* - 4x, eM, m1R, K44, m1L, eM, *[P1, K1]* - 4x, P1, SLS, turn (66 sts)
Row 4       KTBL, K1, *[P1, K1]* - 4x, eM, P46, eM, *[K1, P1]* - 4x, K1, SLS, turn
Row 5       KTBL, P1, *[K1, P1]* - 4x, eM, K46, eM, *[P1, K1]* - 4x, P1, SLS, turn 
Row 6       KTBL, K1, *[P1, K1]* - 4x, eM, P46, eM, *[K1, P1]* - 4x, K1, SLS, turn

Row 7       KTBL, P1, *[K1, P1]* - 4x, eM, m1R, K46, m1L, eM, *[P1, K1]* - 4x, P1, SLS, turn (68 sts)
Row 8       KTBL, K1, *[P1, K1]* - 4x, eM, P48, eM, *[K1, P1]* - 4x, K1, SLS, turn
Row 9       KTBL, P1, *[K1, P1]* - 4x, eM, K48, eM, *[P1, K1]* - 4x, P1, SLS, turn 
Row 10     KTBL, K1, *[P1, K1]* - 4x, eM, P48, eM, *[K1, P1]* - 4x, K1, SLS, turn

Row 11      KTBL, P1, *[K1, P1]* - 4x, eM, m1R, K48, m1L, eM, *[P1, K1]* - 4x, P1, SLS, turn (70 sts)
Row 12      KTBL, K1, *[P1, K1]* - 4x, eM, P50, eM, *[K1, P1]* - 4x, K1, SLS, turn
Row 13      KTBL, P1, *[K1, P1]* - 4x, eM, K50, eM, *[P1, K1]* - 4x, P1, SLS, turn 
Row 14      KTBL, K1, *[P1, K1]* - 4x, eM, P50, eM, *[K1, P1]* - 4x, K1, SLS, turn

Row 15      KTBL, P1, *[K1, P1]* - 4x, eM, m1R, K50, m1L, eM, *[P1, K1]* - 4x, P1, SLS, turn (72 sts)
Row 16      KTBL, K1, *[P1, K1]* - 4x, eM, P52, eM, *[K1, P1]* - 4x, K1, SLS, turn

Rows 17-34    Repeat rows 15 & 16 nine more times, where you increase by 2 sts in each odd row.  In row 35 you should have 90 sts total. Fasten off your yarn.

SECTION #5 - FRONT PART

Work back and forth just like you worked "the back part" starting on the right side (odd rows on the right side, even rows on the wrong side), and start counting from 1

Row 1       *[K1, P1]* - 5x, eM, K50, eM, *[P1, K1]* - 4x, P1, SLS, turn (70 sts)
Row 2       KTBL, K1, *[P1, K1]* - 4x, eM, P 50, eM, *[K1, P1]* - 4x, K1, SLS, turn

Row 3       KTBL, P1, *[K1, P1]* - 4x, eM, m1R, K50, m1L, eM, *[P1, K1]* - 4x, P1, SLS, turn (72 sts)
Row 4       KTBL, K1, *[P1, K1]* - 4x, eM, P52, eM, *[K1, P1]* - 4x, K1, SLS, turn
Row 5       KTBL, P1, *[K1, P1]* - 4x, eM, K52, eM, *[P1, K1]* - 4x, P1, SLS, turn 
Row 6       KTBL, K1, *[P1, K1]* - 4x, eM, P52, eM, *[K1, P1]* - 4x, K1, SLS, turn

Row 7       KTBL, P1, *[K1, P1]* - 4x, eM, m1R, K52, m1L, eM, *[P1, K1]* - 4x, P1, SLS, turn (74 sts)
Row 8       KTBL, K1, *[P1, K1]* - 4x, eM, P54, eM, *[K1, P1]* - 4x, K1, SLS, turn
Row 9       KTBL, P1, *[K1, P1]* - 4x, eM, K54, eM, *[P1, K1]* - 4x, P1, SLS, turn 
Row 10     KTBL, K1, *[P1, K1]* - 4x, eM, P54, eM, *[K1, P1]* - 4x, K1, SLS, turn

Row 11      KTBL, P1, *[K1, P1]* - 4x, eM, m1R, K54, m1L, eM, *[P1, K1]* - 4x, P1, SLS, turn (76 sts)
Row 12      KTBL, K1, *[P1, K1]* - 4x, eM, P56, eM, *[K1, P1]* - 4x, K1, SLS, turn
Row 13      KTBL, P1, *[K1, P1]* - 4x, eM, K56, eM, *[P1, K1]* - 4x, P1, SLS, turn 
Row 14      KTBL, K1, *[P1, K1]* - 4x, eM, P56, eM, *[K1, P1]* - 4x, K1, SLS, turn

Row 15      KTBL, P1, *[K1, P1]* - 4x, eM, m1R, K56, m1L, eM, *[P1, K1]* - 4x, P1, SLS, turn (78 sts)
Row 16      KTBL, K1, *[P1, K1]* - 4x, eM, P58, eM, *[K1, P1]* - 4x, K1, SLS, turn

Rows 17-34    Repeat rows 15 & 16 nine more times, where you increase by 2 sts in each odd row.  In row 35 you should have 96 sts total. Do not fasten off your yarn.

SECTION #5 - BODY

From now on work in the round on the right side, and start counting from 1

Rnd 1       (front part) KTBL, P1, *[K1, P1]* - 4x, eM, m1R, K76, m1L, eM, *[P1, K1]* - 5x; (underarm space) turn your work to WS to CCO 7 sts; turn your work to knit on RS and to join the back part: *[K1, P1]* - 5x, eM, m1R, K70, m1L, eM, *[P1, K1]* - 5x; (underarm space) turn your work to WS to CCO 7 sts; turn your work to knit on RS; join your knit to work in the round (204 sts)

Rnd 2-6     (front part) *[K1, P1]* - 5x, eM, K78, eM, *[P1, K1]* - 5x; (underarm space) *[P1, K1]* - 3x, P1; (back part) *[K1, P1]* - 5x, eM, K72, eM, *[P1, K1]* - 5x;  (underarm space) *[P1, K1]* - 3x, P1; (204 sts)

Rnd 7-?     K204 (remove all eMs) - after you knit your desired length, finish your blouse with a few rows of *[K1, P1]* edging, and then weave in all your ends.


Copyright:
You may not sell my written pattern to anyone, and you may not publish it as your own.
However, you may sell a finished product (any item) made by you. Credit me, please.

Thank you.
***

DID YOU FIND ERRORS? Let me know on what page of my blog, and in which row by clicking HERE, and I will fix it as soon as I get to it. You can PM me on my FB Page HERE as well. Txs!
Also if you haven't subscribed to my HandmadeRukodelky Channel, you can do it HERE. There are many videos to be seen, too.

*******************************************************************************


Copyright page - click HERE


PLEASE, COMMENT ON YOUTUBE BELOW MY VIDEOS, AND/OR SHARE YOUR IMAGES OF YOUR RECREATED WORKS ON MY FB PAGE HERE :-)


TANGERINE TOP

ENJOY MY LATEST PROJECT - AN AIRY TOP (BLOUSE OR SWEATER) KNITTED FROM A LACY FUZZY YARN WITH LARGER-SIZED KNITTING NEEDLES, WITH 3D SLEEVES.


Please, consider supporting my blog and YouTube Channel by shopping on Amazon via MY AFFILIATE LINK. Thank you if you purchase anything.


Material:

  • Yarn - DIABLO; Colors: 4 balls of Yellow Ochre (#18); Lace (#1); 30% Mohair, 30% Nylon, 40% Acrylic; 0.9 oz/25g; 246 yds/225 m; 
  • Knitting needles #9 (5.5 mm)
  • Markers
  • Yarn needle (to weave in the ends)
  • Scissors


Abbreviations:
CO - cast on
K - knit
P - purl
st/sts - stitch/stitches
K2tog - knit two stitches together (decrease)
SSK - slip 2 stitches (one at a time), place them back on the needle and knit them through the back loop (decrease)
CO extra st - cast on an extra stitch between short rows to close the hole
PM - place marker
K1B - increase by knitting 1 stitch below the next stitch (then knit next st)
YO - yarn over
BO - bind off

Gauge (stockinette st):
4" x 4" = 16 sts x 22 rows

Size:
Oversized small, or regular medium women's size

Measurements (measured flat): 


Step-by-Step Directions:

This blouse is knitted from bottom to top. 

BODY PART

CO 140 sts. Knit in the round.

Row 1-12             *[K1, P1]* - repeat to end of row (70x)
Row 13-80            K140

Divide 140 stitches into 2 halves - 70 sts for your back, and 70 sts for the front. Knit back and forth. Work your back first, then the front. 

BACK PART OF THE BODY

Row 81               K68
Row 82               P66, put the first 2 sts and last 2 sts on the stitch holder made from yarn, they will be part of the sleeves
Row 83               K66
Row 84               P66

Repeat Rows 83 & 84 thirteen more times, up to Row 110.

Row 111              BO 7 sts, K to end
Row 112              BO 7 sts, P to end

Repeat Rows 111 & 112 two more times, up to Row 116.

Row 117              K24
Row 118              P24


FRONT PART OF THE BODY

Row 81               put the first 2 sts on the stitch holder made from yarn, start the new ball, and K66; put the last 2 sts on the stitch holder made from yarn, they will be part of the sleeves
Row 82               P66
Row 83               K66
Row 84               P66

Repeat Rows 83 & 84 nine more times, up to Row 102.

We will make a "U" shaped neck area, and then BO for the shoulders. Start on the first side of the front on the RIGHT (KNIT) side.

FIRST HALF OF THE UPPER FRONT

Row 103              K28, do not work with the last 38 sts on the needle (you may put them on the stitch holder)
Row 104              P28
Row 105              K25, three stitches left on the needle
Row 106              P25
Row 107              K23, three + two stitches left on the needle
Row 108              P23
Row 109              K21, three + two + two stitches left on the needle
Row 110              P21
Row 111              K21
Row 112              P21
Row 113              BO 7 sts, K13
Row 114              P14
Row 115              BO 7 sts, K6
Row 116              P7
Row 117              BO 7 sts, leave a long tail for sewing the shoulder area together

SECOND HALF OF THE UPPER FRONT

Start on the second side of the front on the RIGHT (KNIT) side; from the middle.

Row 103              Leave the first 10 sts on the stitch holder, then K28 to end
Row 104              P25, three stitches left on the needle
Row 105              K25
Row 106              P23, three + two stitches left on the needle (total 5 sts)
Row 107              K23
Row 108              P21, three + two + two stitches left on the needle  (total 7 sts)
Row 109              K21
Row 110              P21
Row 111              K21
Row 112              BO 7 sts, P13
Row 113              K14
Row 114              BO 7 sts, P6
Row 115              K 7
Row 116              BO 7 sts, do not fasten off the yarn, use it for knitting the edge

Sew the front and back shoulder areas together (on both sides). Knit a neckband/edge in the round as such:

Row 1                  Starting at your back part and on the RIGHT side of the knit, K24; CO 8 sts along straight side; K2; CO extra st; K2; CO extra st; K3; CO extra st; K10; CO extra st; K3;  CO extra st; K2;  CO extra st; K2; CO 8 sts along straight side; (total 70 sts = 24+8+2+1+2+1+3+1+10+1+3+1+2+1+2+8)
Row 2-6               *[K1, P1]* - to end (35x)
Row 7                   BO


SLEEVES - make two

Start in the underarm area. 

Row 1                    CO 24 stitches along the front (or back) arm area, then CO 24 stitches along the back (or front) area, and K4 (stitchers that are on your stitch holder) - make sure there are no holes between the CO stitches and 4 underarm stitches, PM
Row 2                    K2tog, K44, SSK, K4 (50 sts total)
Row 3-10               *[K7, P3]* - 5x (total 50 sts)

Row 11                   *[K1; then increase by K1B & K1 regularly - 5x; K1, P3]* - 5x (total 75 sts)
Row 12-19             *[K12, P3]* - 5x (total 75 sts)
Row 20                  *[K1; then decrease by K2tog - 5x; K1, P3]* - 5x (total 50 sts)
Row 21-30             *[K7, P3]* - 5x (total 50 sts)

Repeat Rows 11-30 three more times (90 rows more)

Finish with 10 more rows (or as many as you need)

Row 121-130        *[K7, P3]* - 5x (total 50 sts)
Row 131                BO all sts

When you knit both sleeves, weave in all the ends. 


Copyright:
You may not sell my written pattern to anyone, and you may not publish it as your own.
However, you may sell a finished product (sweater/blouse/top) made by you.

Thank you.

***

DID YOU FIND ERRORS? Let me know on what page of my blog, and in which row by clicking HERE, and I will fix it as soon as I get to it. You can PM me on my FB Page HERE as well. Txs!
Also if you haven't subscribed to my HandmadeRukodelky Channel, you can do it HERE. There are many videos to be seen, too.

*******************************************************************************


Copyright page - click HERE


PLEASE, COMMENT ON YOUTUBE BELOW MY VIDEOS, AND/OR SHARE YOUR IMAGES OF YOUR RECREATED WORKS ON MY FB PAGE HERE :-)


Note: Most of the time I work as fast as I can to keep up with knitting and crocheting requests. I have to videotape, edit videos, then convert them & upload them to my channel. After that often I post on my blog patterns. I answer many questions, which means that often I work up to 16 hours a day. I would tremendously appreciate it IF anyone of you finds an error in the written pattern, so please, let me know - where (what rows) and what may be the problem. Many future knitters & crocheters from our artsy and crafty virtual world will thank you for your good deed, including myself.

CROCHETED SEA FOAM BEACH BLOUSE AND SKIRT

I have a passion for knitting and crocheting, and thus I love to browse all different websites and marvel at all the beautiful and "yummy" yarns people spin and color. However, since I am on a budget, I tend to buy yarns when there is a good buy (sale, clearance). If the yarn has a great content (alpaca, merino, silk...) then that is an added bonus.

Italy is well known for its wonderful products - by design and by quality, so when I saw LANA GROSSA at such a great price on "Yarn website", I bought several balls. As I was looking at different colors, I was at the same time designing and knitting or crocheting in my head. I looked at the yarn and was thinking: "I could make myself a nice blouse from this color. And maybe crochet something cool from this color. I could use this color for my YouTube channel.

So today, let me present to you my crocheted blouse and skirt for the beach I designed for myself (and my  virtual crochet friends). I will wear this set with a camisole and tights while having my evening walks on the beach. 

This set is for a women's size medium, but you can size it very easily to any width by increasing or decreasing 8-stitch repeats. Each of my "8-stitch repeat" is 2 inches wide. Therefore, if you need let's say an increase of 6 inches, you would add 24 extra chain stitches [(6/2) x 8] to my initial chain count (the skirt - 149 sts, or the blouse - 77 sts). If you need to make the set for someone small and you need to make it let's say 2 inches narrower (blouse or skirt) you just need to deduct 8 sts from my initial chain count.

The length (of either a blouse or skirt) can be controlled by crocheting number of rows. Crochet yourselves a mini-, midi- or maxidress. Your imagination is the limit. Make it your size and your style.

Do you prefer crocheting along my videos? No problem:

VIDEO FOR RIGHTIES - CLICK HERE

VIDEO FOR LEFTIES: CLICK HERE

PLEASE BE ADVISED - IF SOMETHING IN MY WRITTEN PATTERN IS NOT RIGHT CONTACT ME VIA SOCIAL MEDIA - I DIDN'T HAVE ANYONE TO DO A "TEST DRIVE" - I MAY HAVE OVERLOOKED SOME OF MY WRITTEN NOTES - I HAVE NO TIME TO DO A VERY DETAILED CHECK UP FOR ERROR. I AM WORKING ON ANOTHER PROJECT AS THIS IS BEING PUBLISHED. THANK YOU!!!
ALSO,YOU CAN ALWAYS COMMENT UNDER THE VIDEOS (LINKS ARE ABOVE).

Material:

  • 2 balls of Lana Grossa, Gomitolo Puno; color 001; 70% Cotton, 19% Merino, 11% Alpaca; 570m/150 g per ball for both garments (one ball for each) - FOR YARN REVIEW CLICK HERE
  • Hook 5 mm
  • Scissors
  • Yarn Needle (for weaving in the tails)
Lana Grossa - Gomitolo Puno


Size:
Women US Medium (chest 36")

Gouge:
2" = 8 sts
1.5" = 3 double crochet rows

Abbreviations:
ch - chain
dc - double crochet
sc - single crochet
3dctog - 3 double crochet stitches together (decrease)
ch1sp - chain 1 space
ch3sp - chain 3 space
ch5sp - chain 5 space
fpdc - front post double crochet stitch
bpdc - back post double crochet stitch

Step-by-Step Directions:

BLOUSE - make 2 panels


Foundation:  77 chain stitches - these will produce 75 sts you will work with

3 ROW PATTERN:
Row 1            1 dc in 4th ch from hook, then 1 dc in each ch to end
Row 2            ch4, skip 1 st, *[1 dc in next st, ch1, skip 1 sts]*  - to last st, 1 dc in last st
Row 3            ch3, 1 dc in each st to end

4 ROW PATTERN:
Row 4            ch4, skip 1 st, *[1 dc in next st, ch1, skip 1 sts]*  - to last st, 1 dc in last st
Row 5            ch2, 1 sc in ch1sp, ch3, skip 3 sts (including ch1sp); *[in next ch1sp: (1dc, ch1, 1dc), ch3, then skip 3 sts (including ch1sp), 1 sc in next ch1sp, ch3, skip 3 sts (including ch1sp)]* - repeat 8x, then in next ch1sp: (1dc, ch1, 1dc), ch3, then skip 3 sts (including ch1sp), 1 sc in last ch1sp, 1 sc in last st (total 9 "V" shaped dc sts)
Row 6            ch3, 1 dc in next st, skip ch3sp, *[7 dc in ch1sp, skip ch3sp, 1 dc in sc st, skip ch3sp]* - repeat 8x, finish with 7 dc in ch1sp, skip ch3sp, and 1 dc in each of last 2 sts
Row 7            ch4, skip 1 st, *[1 dc in next st, ch1, skip 1 sts]*  - to last st, 1 dc in last st

Crochet 3 ROW PATTERN (see Rows 1-3 above) = Rows 8-10

5 ROW PATTERN:
Row 11           ch4, skip 1 st, *[1 dc in each of next 3 sts, ch1, skip 1 st]* - repeat total 18x, 1 dc in last st
Row 12           ch6, skip 1 st, *[3dctog, ch5, skip 1 st]* - repeat 17x, then 3dctog, ch3, skip 1 st, 1 dc in last st
Row 13           ch5, 1 sc in  ch3sp, *[ch5, 1 sc  in ch5sp]* - repeat 17x, ch5, 1 sc in ch2sp, ch2, 1 dc in last st
Row 14           ch4; work in each 3rd ch of ch5sp: *[3 dc, ch1]* - repeat 18x, 1 dc in last st
Row 15           
ch4, skip 1 st, *[1 dc in each of next 3 sts, ch1, skip 1 st]* - repeat 18x, 1 dc in last st

Repeat Rows 1-15 one more time (Row 16-30)

Continue to Crochet

  • 3 ROW PATTERN (see Rows 1-3 above) = Rows 31-33
  • and then 4 ROW PATTERN (see Rows 4-7 above) = Rows 34-37

Row 36            ch3, 1 dc in each st to end

Shoulder Part

Row 37            ch4, skip 1 st, *[1 dc in next st, ch1, skip 1 sts]*  - 9x, 1 dc in last st, turn
Row 38            ch3, 1 dc in each st to end

Repeat Row 37 & 38 on the other side of the shoulder.

Finishing:
Either  sew back a front shoulders together, or connnect them togheter with a cable joint (see my video for that joint - link for right handed crocheters and for left handed crocheters is above). Weave in the ends. Crochet long strings (use 2 strands of yarn) - one for your waist and 2 for your tie of the blouse sides - and then attach to each end a tassel (total 6 tassels). 

My waist string is aprox. 56" long. My sting for each side of my blouse is aprox. 22" long.

SKIRT


Foundation:  149 chain stitches - these will produce 147 sts

3 ROW PATTERN:
Row 1            1 dc in 4th ch from hook, then 1 dc in each ch to end
Row 2            ch4, skip 1 st, *[1 dc in next st, ch1, skip 1 sts]*  - to last st, 1 dc in last st
Row 3            ch3, 1 dc in each st to end

4 ROW PATTERN:
Row 4            ch4, skip 1 st, *[1 dc in next st, ch1, skip 1 sts]*  - to last st, 1 dc in last st
Row 5            ch2, 1 sc in ch1sp, ch3, skip 3 sts (including ch1sp); *[in next ch1sp: (1dc, ch1, 1dc), ch3, then skip 3 sts (including ch1sp), 1 sc in next ch1sp, ch3, skip 3 sts (including ch1sp)]* - repeat 17x, then in next ch1sp: (1dc, ch1, 1dc), ch3, then skip 3 sts (including ch1sp), 1 sc in last ch1sp, 1 sc in last st (total 18 "V" shaped dc sts)
Row 6            ch3, 1 dc in next st, skip ch3sp, *[7 dc in ch1sp, skip ch3sp, 1 dc in sc st, skip ch3sp]* - repeat 17x, finish with 7 dc in ch1sp, skip ch3sp, 1 dc in each of last 2 sts
Row 7            ch4, skip 1 st, *[1 dc in next st, ch1, skip 1 sts]*  - to last st, 1 dc in last st

Crochet 3 ROW PATTERN (see Rows 1-3 above) = Rows 8-10

5 ROW PATTERN:
Row 11           ch4, skip 1 st, *[1 dc in each of next 3 sts, ch1, skip 1 st]* - repeat 36x, 1 dc in last st
Row 12           ch6, skip 1 st, *[3dctog, ch5, skip 1 st]* - repeat 35x, then 3dctog, ch3, skip 1 st, 1 dc in last st
Row 13           ch5, 1 sc in  ch3sp, *[ch5, 1 sc  in ch5sp]* - repeat 35x, ch5, 1 sc in ch2sp, ch2, 1 dc in last st
Row 14           ch4; work in each 3rd ch of ch5sp: *[3 dc, ch1]* - repeat 36x, 1 dc in last st
Row 15           
ch4, skip 1 st, *[1 dc in each of next 3 sts, ch1, skip 1 st]* - repeat 36x, 1 dc in last st

Repeat Rows 1-15 one more time (Row 16-30)

Continue to Crochet

  • 3 ROW PATTERN (see Rows 1-3 above) = Rows 31-33
  • and then 4 ROW PATTERN (see Rows 4-7 above) = Rows 34-37

Row 35            ch3, 1 dc in each st to end
Row 36            ch3, *[1 fpdc, 1 bpdc]* - repeat to end, last st  will be 1 dc

Repeat Row 36 as many times as needed (front post dc stitches into fpdc, and back post dc stitches into bpdc) for your waistband.

Finishing:

Row 1            Crochet along the side as many single crochet stitches as needed (I usually crochet 2 sc sts into each of dc or ch3, and 1 sc into sc)
Row 2            ch1, *[skip 1 st, 5 dc in next st, skip 1 st, sl st in next st]* - repeat to end, finish with sl st in the last st (you may skip an extra stitch or two at the end to fit your last shell  or two sts well)

Lastly, make 2 tassels, then crochet a long string (crochet a long chain from doubled or tripled strands), attach the first tassel to one end, weave the other end through the waistband, then attach the second tassel. Weave in all the ends and wear your beutiful garment.

****************************

Copyright:
You may not sell my written pattern to anyone, and you may not publish it as your own.
However, you may sell a finished product made by you, BUT you HAVE TO GIVE me a credit.

Thank you.


***

DID YOU FIND ERRORS? Let me know on what page of my blog, and in which row by clicking HERE, and I will fix it as soon as I get to it. You can PM me on my FB Page HERE as well. Txs!
Also if you haven't subscribed to my HandmadeRukodelky Channel, you can do it HERE. There are many videos to be seen, too.

*******************************************************************************


Copyright page - click HERE


PLEASE, COMMENT ON YOUTUBE BELOW MY VIDEOS, AND/OR SHARE YOUR IMAGES OF YOUR RECREATED WORKS ON MY FB PAGE HERE :-)


Note: Most of the time I work as fast as I can to keep up with knitting and crocheting requests. I have to videotape, edit videos, then convert them & upload them to my channel. After that often I post on my blog patterns. I answer many questions, which means that often I work up to 16 hours a day. I would tremendously appreciate it IF anyone of you finds an error in the written pattern, so please, let me know - where (what rows) and what may be the problem. Many future knitters & crocheters from our artsy and crafty virtual world will thank you for your good deed, including myself.