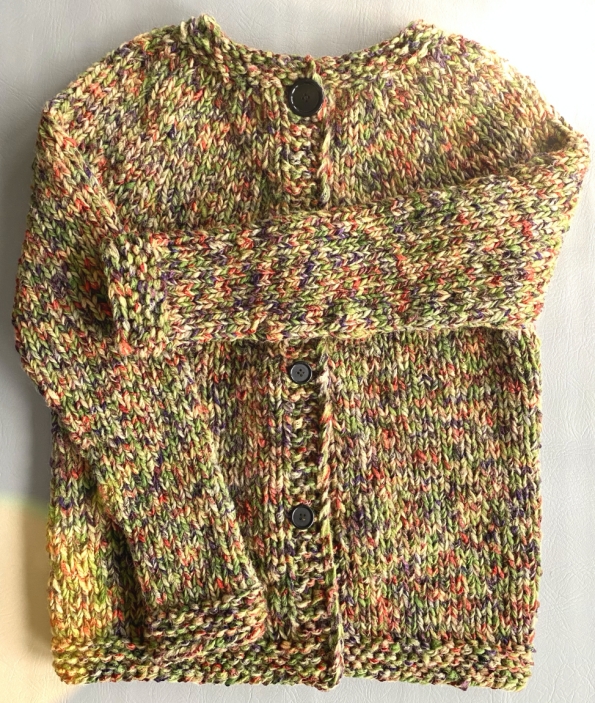
I bought this extravagant-looking yarn about five years ago. Four bags. Twenty balls of a greenish and twenty balls of a pinkish color. About two weeks ago, I pulled out the yummy green one with orange and purple speckles. I thought: "This will make a nice warm sweater for my petite daughter."
Here we are today - let me share a finished written pattern of the top-down sweater for XS/S women. Although the company discontinued this yarn, you may opt for another super bulky one, which yields 8 sts and 11 rows in 4", and you should be fine. Yes, the sweater will look different, but it will be your design knitted with my pattern.
f you are interested in watching my video about this sweater where I am presenting how to start a sleeve, you may click on one of the links below.
Please, consider supporting my blog and YouTube Channel by shopping on Amazon via MY AFFILIATE LINK. Thank you if you purchase anything.
Enjoy.

Materials:
16 balls of ARTFUL YARNS, Palace; 48% wool, 45% acrylic, 7% nylon; Color: 366; 50g/1.75 oz; 27 yds/ 24.7 m;
Knitting needles - circular and DPNs, US size #15, 10 mm
Hook 9mm (see the sleeve part in the video)
Yarn needle
Buttons
Abbreviations:
CO - cast on
KE - knit edge (= knit 4 sts for edge)
K - knit
K1tbl - knit one stitch through the back loop
sl1wyf - slip one (last) stitch with yarn in front
P - purl
M1 - increase by making 1 st between the stitches
K2tog - knit 2 stitches together
YO - yarn over
SSK - slip knitwise, slip knitwise, knit both stitches through the back loop
BO - bind of your stitches
Size:
women XS/S
Measurements:

YOKE
CO 48 sts
Note: place buttonholes every 20, 22, or 24 rows after the first initial buttonhole in the seventh row. Your choice of how close/far together you would like to have them.
Row 1-4 K48
Row 5 K1tbl, K3; *[M1, K4]* - 10x, M1; K3, sl1wyf
Row 6 K1tbl, K3; P51; K3, sl1wyf
Row 7 K1tbl, K3; *[M1, K5]* - 10x, M1, K1; K2tog, YO (button hole), K1, sl1wyf
Row 8 K1tbl, K3; P62; K3, sl1wyf
Row 9 K1tbl, K3; K1, *[M1, K6]* - 10x, M1, K1; K3, sl1wyf
Row 10 K1tbl, K3; P73; K3, sl1wyf
Row 11 K1tbl, K3; K2, *[M1, K7]* - 10x, M1, K1; K3, sl1wyf
Row 12 K1tbl, K3; P84; K3, sl1wyf
Row 13 K1tbl, K3; K6, *[M1, K8]* - 9x, M1, K6; K3, sl1wyf
Row 14 K1tbl, K3; P94; K3, sl1wyf
Row 15 K1tbl, K3; K94; K3, sl1wyf
Row 16 K1tbl, K3; P94; K3, sl1wyf
Row 17 K1tbl, K3; K6, *[M1, K9]* - 9x, M1, K7; K3, sl1wyf
Row 18 K1tbl, K3; P104; K3, sl1wyf
Row 19 K1tbl, K3; K104; K3, sl1wyf
Row 20 K1tbl, K3; P104; K3, sl1wyf
Row 21 K1tbl, K3; K7, *[M1, K10]* - 9x, M1, K7; K3, sl1wyf
Row 22 K1tbl, K3; P114; K3, sl1wyf
Row 23 K1tbl, K3; K114; K3, sl1wyf
Row 24 K1tbl, K3; P114; K3, sl1wyf
Row 25 K1tbl, K3; K114; K3, sl1wyf
Row 26 K1tbl, K3; P114; K3, sl1wyf
Row 27 K1tbl, K3; K8, *[M1, K11]* - 9x, M1, K7; K3, sl1wyf
Row 28 K1tbl, K3; P124; K3, sl1wyf
Row 29 K1tbl, K3; K124; K3, sl1wyf
Row 30 K1tbl, K3; P124; K3, sl1wyf
Row 31 K1tbl, K3; K124; K3, sl1wyf
Row 32 K1tbl, K3; P124; K3, sl1wyf
Row 33 K1tbl, K3; K19 ( front #1), move 24 sts on holder/string - stitches on your holder will be knitted later (sleeve #1), CO 2 sts, connect the front part to the back part by knitting next 38 sts, move 24 sts on holder/string - stitches on your holder will be knitted later (sleeve #2), CO 2 sts, connect the back part to the front part by knitting next 19 stitches (front #2); K3, sl1wyf
Note: you should have stitches as such:
EDGE: 4 sts;
FRONT: 19 sts; plus 2 extra sts for underarm;
BACK: 38 sts; plus 2 extra sts for underarm;
FRONT: 19 sts; EDGE: 4 sts;
Also - if your arms' circumference is bigger add more underarm stitches, but remember to change the stitch count below.

BODY - repeat Row 1 & Row 2 many times until you have desired length. I knitted 14 inches (40 rows) measured from the underarm.
Row 1 K1tbl, K3; P80; K3, sl1wyf
Row 2 K1tbl, K3; K80; K3, sl1wyf
BOTTOM BODY EDGE
Row 1-6 K88 (After knitting your desired length of the body, knit 6 rows of garter stitch), BO your last row and weave in the tail
SLEEVES
Work in the round. Start with the underarm area (for reference RIGHTIES can watch my video HERE, and LEFTIES can watch the video HERE). There are 2 extra stitches (but it looks like there are 4 sts).
Rnd 1 Start in the middle of your underarm area - CO one stitch of the 2 underarm sts, then CO one extra stitch to close the gap between your CO stitch and the first stitch of the sleeve; then K24; then CO 2 more sts - again closing the gap between the sleeve stitches and underarm stitches - total 28 stitches (4 CO + 4 sleeve sts)
Rnd 2-10 K28
Rnd 11 K2tog, K24, SSK
Rnd 12-20 K26
Rnd 21 K2tog, K22, SSK
Rnd 22-30 K24
Rnd 31 K2tog, K20, SSK
Rnd 32-40 K22
Rnd 41 K2tog, K18, SSK
Rnd 42-52 K20
Rnd 53 P20
Rnd 54 K20
Rnd 55 P20
Rnd 56 K20
Rnd 57 P20
Rnd 58 K20
Rnd 59 BO 20sts and weave in the tail
Copyright:
You may not sell my written pattern to anyone, and you may not publish it as your own.
However, you may sell a finished product (socks) made by you.
Thank you.
*******************************************************************************