Search This Blog and The Web

Showing posts with label Ponchos & Shrugs. Show all posts

QUICK KNITTED CAPLET


Capelet
- a small cape covering the shoulders and part of the arms. 

I decided to knit a capelet for myself to cover my shoulders and arms when I feel chilly - such as when I am dining in very cold restaurants, or sitting outside on our deck during the cold nights, or walking along the beach on a windy cool evening. I am sure there will be other situations/places where I can wear my capelet. If you use a very fine yarn you could knit it even as a cover over a wedding gown, and/or have capelets made for your bridesmaids over their dresses to keep them warm in a church.

The length of your capelet will depend on how much of your arms you would like to cover. My capelet reaches to elbows, but you could also alter rows between the patterns "A" and "B" and make the capelet longer or shorter. You can also decide on a different pattern that fits the number of stitches after you are finished with increases, however before you will start any pattern of your choice, you may have to add few extra (1+) stitches to accommodate the number of needed stitches for your repeats.

For my capelet I used worsted yarn and a bigger size knitting needles than recommended by the manufacturer. My yarn is Casablanka by Cascade Yarns - a blend of wool, silk and mohair. I used this yarn for my husband's sweater which he loves and wears often. You can see my husband's raglan sweater in the video as well. I had two skeins left over from my husband's sweater project and wanted to make a good use of it. Although it is a little itchy, so you may have to substitute this yarn for a different, softer yarn.

Beware: I used both 2 skeins in their entirety. If you are loose knitter you may either use 5.5 mm knitting needles, or make 1-2 row less between the patterns, or purchase one extra skein.

FOR A VIDEO CLICK HERE (it will be published 7-14-21 @ 8am EST)

Please, consider supporting my blog and YouTube Channel by shopping on Amazon via MY AFFILIATE LINK. Thank you if you purchase anything.


Materials:

  • 2 skeins of Cascade Yarns, Casablanca;
    Fiber Content: 60% Wool, 25% Silk, 15% Mohair;
    Color: 10, Seaside;
    Weight: Medium / Worsted / Aran (4);
    Weight/Yardage: 100g / 218 yards;
    Care: Hand Wash, Dry Flat;
  • Circular Knitting Needles (or DPNs) Size: #10 (6 mm)
  • Yarn needle (to weave in the ends)
  • Scissors

Abbreviations:
CO - cast on
K - knit
P - purl
M1R - pick a leading strand between the stitches by inserting a needle back to front and knit a stitch leaning to the right
YO - yarn over
K2tog - knit 2 stitches together
BO - bind off

Gauge (stockinette st):
4" x 4" = 16 sts x 20 rows

Measurements (measured flat): 


Step-by-Step Directions:


This caplet is knitted top-down. CO 78 sts.

Row 1                *[K1, P1]* - repeat to end,  join without twisting
Row 2-6             *[K1, P1]* - repeat to end
Rnd 7                 *[K7, M1R]* - 10x, K8 (Note: do not increase after last 8 sts, as you already have 1 extra stitch for the repeat)
Rnd 8                 K88
Rnd 9                 *[K8, M1R]* - 11x
Rnd 10               K99
Rnd 11               *[K9, M1R]* - 11x
Rnd 12               K110
Rnd 13               K110
Rnd 14               *[K10, M1R]* - 11x
Rnd 15               K121
Rnd 16               K121
Rnd 17               K121
Rnd 18               *[K11, M1R]* - 11x
Rnd 19               K132
Rnd 20               K132
Rnd 21               K132
Rnd 22               K132
Rnd 23               *[K12, M1R]* - 11x
Rnd 24               K143
Rnd 25               K143
Rnd 26               K143
Rnd 27               K143

Note: Keep increasing in this manner (increase in one row, knit 4 rows with no increases) until you have 187 sts on your needles (Rows 28-47). Then:

Rnd 48               *[K17, M1R]* - 11x 
Rnd 49-53          K198

PATTERN "A"

Rnd 54                P198
Rnd 55                *[K2tog, YO, K4] - 33x
Rnd 56                K198
Rnd 57                P198

Rnd 58-62          K198

Rnd 63-71         Repeat  your last 9 rows again (as in Rnd 54 - 62)

PATTERN "B"
Rnd 72                P198
Rnd 73                *[K2tog, YO] - to end
Rnd 74                K198
Rnd 75                P198

Rnd 76-78          K198

Rnd 79-85         Repeat  your last 7 rows again (as in Rnd 72 - 78)

Rnd 86            BO with purl stitch

Weave in all the ends.


***

DID YOU FIND ERRORS? Let me know on what page of my blog, and in which row by clicking HERE, and I will fix it as soon as I get to it. You can PM me on my FB Page HERE as well. Txs!
Also if you haven't subscribed to my HandmadeRukodelky Channel, you can do it HERE. There are many videos to be seen, too.

*******************************************************************************


Copyright page - click HERE


PLEASE, COMMENT ON YOUTUBE BELOW MY VIDEOS, AND/OR SHARE THE IMAGES OF YOUR RECREATED WORKS ON MY FB PAGE HERE :-)


Note: Most of the time I work as fast as I can to keep up with knitting and crocheting requests. I have to videotape, edit videos, then convert them & upload them to my channel. After that often I post on my blog patterns. I answer many questions, which means that often I work up to 16 hours a day. I would tremendously appreciate IF anyone of you who finds an error in the written pattern, so please, let me know - where (what rows) and what may be the problem. Many future knitters & crocheters from our artsy and crafty virtual world will thank you for your good deed, including myself.

A Simple Lap Blanket Or Scarf/Shawl/Poncho - Free Pattern And Video Tutorial

Crochet this beautiful blanket by using only one-row repeat. I made this lap blanket for a Cancer Center in my town, but you can make it for a child too. The pattern is a very simple, no stress pattern. If you are fairly new to crocheting art, and if you can do a chain, single crochet, and double crochet stitches, then you can make this blanket - an easy fun project. All you have to do a couple of rows for the edge, then one row of the setup row, and after that, you repeat just one row over-and-over until the desired length. Use your leftovers or buy one or two/three big skeins of yarn, and turn this pattern into your own personalized blanket or a scarf. Or a shawl, or a poncho. You can buy several different colors of skeins and make a temperature blanket. (A while back I knitted "SKY SCARF".)

This pattern requires multiples of 5 stitches plus 2 extra edge stitches - one stitch on each side. But you could add 2 extra stitches to your multiples and have 2 stitches on each side. For the blanket, I did 29 repeats (145+edge stitches). For the scarf, I personally would do 9 repeats (45+edge stitches), but if you would like the scarf to be 12" wide and 60" long then you may do 11 repeats and crochet to your desired length. If you would like to do a shawl (28" wide and 80" long) then you may need approximately 24 repeats and again crochet until your desired length.

Keep in mind that the tension is important too - if your tension is different from mine, then you may add or decrease your stitches. Also if you use thinner yarn and smaller hook then you need to add more stitches.

MY VERY DETAILED TUTORIAL VIDEOS:

Two different edges - tan-colored example with single crochet edge & blue-colored example with double crochet edge

Size:
Width - 35"
Length - 54"
145 sts will give you 29 repeats

Material:
Yarn - leftover yarns (such as Lion Brand "Pound Of Love", and Loops & Threads "Snuggly Wuggly"); 100% acrylic; weight worsted #4; yardage - unknown
Hook - H, 5 mm
Yarn needle
Scissors

Abbreviations:
ch - chain stitch
st/sts - stitch/stitches
sc - single crochet
dc - double crochet
ch sp - chain stitch space
prev - previous


  • Blanket With Single Crochet Edge


Foundation for the blanket:
If you are working with single crochet stitches for your edge you need to chain 145+2 (total 147 sts).

Row 1          1 sc into second st from hook, then 1 sc into each consecutive st to end, turn
Row 2          1 sc through the front loop into each st to end, turn
Row 3          ch3 (edge st), skip 2 sts, make 2 dc + ch1 + 2 dc into 3rd st, *[skip 4 sts, make 2 dc + ch1 + 2 dc into 5th st]* - repeat until 2 sts are left, skip 1 st, 1 dc into last st (edge st), turn
Row 4          ch3, *[make 2 dc + ch1 + 2 dc into ch sp from prev. row]* - repeat to end, finish with 1 dc in the last st, turn

Repeat Row 4 as many times as needed. 

Finish the blanket with 2 last rows as such:

Row 1          1 sc into each consecutive st to end, turn
Row 2          1 sc through the front loop into each st to end

Weave in all the tails (ends).

  • Blanket With Double Crochet Edge
Foundation for the blanket:
If you are working with double crochet stitches for your edge, then you will need 145+4 stitches (total 149 sts).


Row 1          1 dc into fourth st from hook, then 1 dc into each consecutive st to end, turn
Row 2          ch3, then1 dc through the front loop into each st to end, turn
Row 3          ch3 (edge st), skip 2 sts, make 2 dc + ch1 + 2 dc into 3rd st, *[skip 4 sts, make 2 dc + ch1 + 2 dc into 5th st]* - repeat until 2 sts are left, skip 1 st, 1 dc into last st (edge st), turn
Row 4          ch3, *[make 2 dc + ch1 + 2 dc into ch sp from prev. row]* - repeat to end, finish with 1 dc in the last st, turn

Repeat Row 4 as many times as needed. 

Finish the blanket with 2 last rows as such:

Row 1          ch3, then 1 dc into each consecutive st to end, turn
Row 2          ch3, then 1 dc through the front loop into each st to end

Weave in all the tails (ends).


***

DID YOU FIND ERRORS? Let me know on what page of my blog, and in which row by clicking HERE, and I will fix it as soon as I get to it. You can PM me on my FB Page HERE as well. Txs!
Also if you haven't subscribed to my HandmadeRukodelky Channel, you can do it HERE. There are many videos to be seen, too.

*******************************************************************************


Copyright page - click HERE


PLEASE, COMMENT ON YOUTUBE BELOW MY VIDEOS, AND/OR SHARE YOUR IMAGES OF YOUR RECREATED WORKS ON MY FB PAGE HERE :-)


Note: Most of the time I work as fast as I can to keep up with knitting and crocheting requests. I have to videotape, edit videos, then convert them & upload them to my channel. After that often I post on my blog patterns. I answer many questions, which means that often I work up to 16 hours a day. I would tremendously appreciate IF anyone of you who finds an error in the written pattern, so please, let me know - where (what rows) and what may be the problem. Many future knitters & crocheters from our artsy and crafty virtual world will thank you for your good deed, including myself.

Knitted Poncho Shrug

Easy Poncho Shrug
I believe that many of you saw a lot of different knitted or crocheted ponchos and shrugs in magazines, books, and these days even on-line. But have you ever thought about knitting (or crocheting) a combination of both? They are quite popular these days. In front (or on one side) it looks like a poncho, but in the back (or the other side) it looks like a shrug.

In today's post, I will introduce you to my newest idea, how to knit an easy "Poncho Shrug." It is easy because you use only knit stitch and few simple increases on one side only. Nothing elaborate. The beauty lays in the knit being knitted on thick knitting needles. All you will need is about 310+ yards of yarn (depending on your size), large size knitting needles, hook or yarn needle and scissors. And in a couple of days you will have an outfit that you can wear over your bikini on the beach, or over the tank top to a restaurant and still look fashionable. Especially, if you make it from a fancy yarn purchased on sale, just like I did.

First, draw a rectangle on the paper similar to mine (see below), then measure yourself from your neck across the shoulder down your arm to your elbow/or below the elbow (depending on how low over your arms you want your shrug to be). Then hold your arms at your sides and measure yourself around the chest and arms combined. Write down the measurements (purple arrows in my graph). If you do not want your Poncho Shrug fitted, add a couple of inches to your chest/arms length.

Next cast on about 20 stitches and knit a sample 4" long. Figure out how many stitches and how many rows fit into 1". Multiply your measurements (width and length) with stitches and rows that fit into 1." When I knitted about 1/2 of my length, I started to increase on one side every ten rows. The side with more stitches will be wider at the end, and when you sew the sides together, your opening for the head will not be too large. See written pattern below.


Click on this image to enlarge it


VIDEO FOR RIGHTIES IS HERE

VIDEO FOR LEFTIES IS HERE

Copyright page - click HERE


Size:
small/medium


Materials I used:
Noro, Kibou; weight - varies (combination of #3 and #4); 54% Cotton, 34% wool, 12% silk; 100g/270m; 3.52 oz/295 yds; or any yarn of your choice, OR similar yarn that varies in thickness
Knitting needles - 10mm
Hook - 5mm
Scissors
Yarn needle (optional)


Abbreviation:
CO - cast on
K - knit
P - purl
m1 - make 1 st into the stitch below the next stitch (then continue knitting next st in a regular manner)
K2tog - knit two together

st(s) - stitch(es)


Gauge:
will vary on a type of yarn and needles you will use, but my gauge is 4"x4" = 7 sts x 12 rows; if you will have a different gauge, you will have to use different number of stitches and rows


Step-by-Step Directions:

Foundation: CO 44 stitches

RED COLOR YARN

Row 1-76               K44
Row 77                  K1, incr, K43 (total 45 sts)
Row 78-86             K45
Row 87                  K1, incr, K44 (total 46 sts)
Row 88-96             K46
Row 97                  K1, incr, K45 (total 47 sts)
Row 98-106          K47
Row 107               K1, incr, K46 (total 48 sts)
Row 108-116        K48
Row 117               K1, incr, K47 (total 49 sts)
Row 118-126        K49
Row 127               K1, incr, K48 (total 50 sts)
Row 128-136        K50
Row 137               K1, incr, K49 (total 51 sts)
Row 138-146        K51
Row 147               K1, incr, K50 (total 52 sts)
Row 148-162        K52
Row 163               BO all stitches


Finishing:

Fold the rectangle diagonally and sew or crochet bind off side to a long side starting in the corner of a short side -  for a reference see the image of a graph, or my video - see above.


If you find any errors, please let me know - click HERE

***

DID YOU FIND ERRORS? Let me know on what page of my blog, and in which row by clicking HERE, and I will fix it as soon as I get to it. You can PM me on my FB Page HERE as well. Txs!
Also if you haven't subscribed to my HandmadeRukodelky Channel, you can do it HERE. There are many videos to be seen, too.

*******************************************************************************


Copyright page - click HERE


PLEASE, COMMENT ON YOUTUBE BELOW MY VIDEOS, AND/OR SHARE YOUR IMAGES OF YOUR RECREATED WORKS ON MY FB PAGE HERE :-)


Note: Most of the time I work as fast as I can to keep up with knitting and crocheting requests. I have to videotape, edit videos, then convert them & upload them to my channel. After that often I post on my blog patterns. I answer many questions, which means that often I work up to 16 hours a day. I would tremendously appreciate IF anyone of you who finds an error in the written pattern, so please, let me know - where (what rows) and what may be the problem. Many future knitters & crocheters from our artsy and crafty virtual world will thank you for your good deed, including myself.

Red Black Furry Shrug

A shrug or a scarf, or even a hat (can be seen in my video)
Not too long ago I treated myself to a very furry Italian yarn. It was on sale, so I splurged.

This Jaeger yarn is made up of an equal combination of wool and kid mohair with a polyamide thread holding these precious "eyelash like" strands together. Although, one has to be careful while knitting each stitch because those short wooly pieces woven into polyamide threads can be deceiving. However, this yarn knits quick. You can have a shrug, or a scarf, in one or two days. That is if you knit with a very bulky yarn. If you decide to use a less bulky yarn, you will have to alter the pattern written below. You can use my graph (also below) to do mathematical calculations of your stitches and rows. Also, keep in mind that your knitting may take a bit longer. Also, you could do few more increases and consequently also decreases for a longer back.

And of course, I have videos to go with this pattern as well. If you are a right-handed knitter, click HERE; and if you are a left-handed knitter, click HERE.

Of course, since I most of the time I have to work as fast as I can, to keep up with the requests, I would appreciate if any of you find a mistake in the written pattern, please, to let me know - where (what rows) and what is the problem. Many future knitters & crocheters from our artsy and crafty virtual world will thank you for your good deed.


Materials:
  • 2 balls of Jaeger "FUR" Yarn 47% Wool, 47% Kid Mohair, 6% Polyamide; 22 yds (20 m); 1.75 oz (50 gr), color "Red"
  • 5 balls of Jaeger "FUR" Yarn 47% Wool, 47% Kid Mohair, 6% Polyamide; 22 yds (20 m); 1.75 oz (50 gr), color "Black"
  • Knitting needles US #15 (10mm) - pattern calls for double pointed, but you can use circular needles instead
  • Scissors
  • yarn needle (for thin yarn) to perform Kitchener stitch 

Gouge (stockinette stitch):

1"x1" = approximately 2 sts x 2.25 rows


Abbreviation:

CO - cast on
K - knit
P - purl
m1 - make 1 st into the stitch below the next stitch (then continue knitting next st in the regular manner)
K2tog - knit two together

st(s) - stitch(es)

The graph for knitting shrug sideways - from sleeve to sleeve


Step-by-Step Directions
:

Foundation: CO 20 stitches

RED COLOR YARN

Row 1-6          K20

Row 7             K20
Row 8             P20

Repeat Rows 7 & 8 seven more times (total 16 rows, including Rows 7 & 8)

BLACK COLOR YARN

Row 23          K20
Row 24          P20

Repeat Rows 23 & 24 - fourteen more times (total 30 rows, including Rows 23 & 24)

Row 53          K1, m1, K18, m1, K1 - PM in this row (total 22 sts)
Row 54          P22
Row 55          K22
Row 56          P22
Row 57          K22
Row 58          P22

Row 59          K1, m1, K20, m1, K1 - PM in this row (total 24 sts)
Row 60          P24
Row 61          K24
Row 62          P24
Row 63          K24
Row 64          P24

Row 65          K1, m1, K22, m1, K1 - PM in this row (total 26 sts)
Row 66          P26

Row 67          K26
Row 68          P26

Repeat Rows 67 & 68 - sixteen more times (total 36 rows, counting from Row 65)

Row 101        K1, K2tog, K20, K2tog, K1 - PM in this row (total 24 sts)
Row 102        P24
Row 103        K24
Row 104        P24
Row 105        K24
Row 106        P24

Row 107        K1, K2tog, K18, K2tog, K1 - PM in this row (total 22 sts)
Row 108        P22
Row 109        K22
Row 110        P22
Row 111        K22
Row 112        P22

Row 113        K1, K2tog, K16, K2tog, K1 - PM in this row (total 220 sts)
Row 114        P20

Row 115        K20
Row 116        P20

Repeat Rows 115 & 116 twelve more times (total 30 rows, counting from Row 113)

RED COLOR YARN

Row 143        K20
Row 144        P20

Repeat Row 143 & 144 seven more times (total 16 rows, including Rows 143 & 144)

Row 159-164 K20
Row 165        BO all sts

Fold your knit lengthwise in half and sew the sleeves along the side to the second marker from each end of the sleeve - leaving back part open. Weave in all the tails.


***

DID YOU FIND ERRORS? Let me know on what page of my blog, and in which row by clicking HERE, and I will fix it as soon as I get to it. You can PM me on my FB Page HERE as well. Txs!
Also if you haven't subscribed to my HandmadeRukodelky Channel, you can do it HERE. There are many videos to be seen, too.

*******************************************************************************


Copyright page - click HERE


PLEASE, COMMENT ON YOUTUBE BELOW MY VIDEOS, AND/OR SHARE YOUR IMAGES OF YOUR RECREATED WORKS ON MY FB PAGE HERE :-)


Note: Most of the time I work as fast as I can to keep up with knitting and crocheting requests. I have to videotape, edit videos, then convert them & upload them to my channel. After that often I post on my blog patterns. I answer many questions, which means that often I work up to 16 hours a day. I would tremendously appreciate IF anyone of you who finds an error in the written pattern, so please, let me know - where (what rows) and what may be the problem. Many future knitters & crocheters from our artsy and crafty virtual world will thank you for your good deed, including myself.

Knit Poncho In Any Size - Free Pattern & Ideas

Poncho knitted from two rectangles
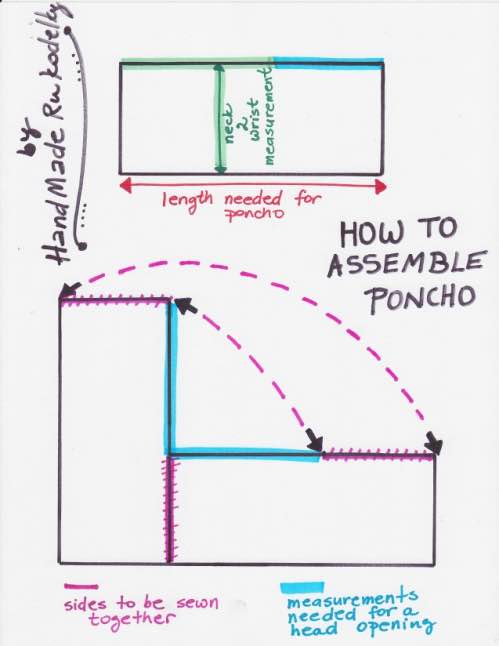
When I decided to make a poncho that is constructed of two rectangular panels, I thought about it really hard, because I read somewhere that when knitting or crocheting a poncho one should double the width. So if, for example, I want to make a poncho that is wide 20 inches (which would be a length from neck to the wrist of a person) then my length of each panel should be 40 inches before I start sewing it together.  Now, if one has to sew the short side to the long side - that person would be shortening the length by half,  leaving us with remaining 20 inches. Then we would do the same with other panel and therefore we would have 20 more inches left - which these 20 inch measurements combined would give us 40 inches and that would be our opening for head - a little too big, IMHO, since a regular head circumference is somewhere between 21-25 inches for adults. I can clearly imagine that I would be pushing such poncho up my shoulder all the time. Very uncomfortable.
The same thing would happen to a small baby. If the width would be 10" and length would be 20", then by calculation the opening for the head would be 20". I can just see a baby running around playground and poncho slipping of the shoulders to her/his hips or knees.

So, I arrived at the conclusion that the "best" (hopefully) measurements are perhaps combination of the length from the neck to the wrist (or up to knuckles on a hand) plus the circumference of a head + a little bit more just to be on the safe side. That makes sense right? I think that first the poncho has to cover the arms, and second has to go over the head, BUT this opening for a person's head cannot be too big (because a poncho would be slipping of one's shoulders) nor too small so the person can pull the poncho comfortably over the head.

I think I will experiment with this formula I thought of so hard:
(Note: I didn't put it into a use yet, so be careful when using my "formula" - it is not completely checked out by me yet)

Width of a poncho = measurement from a neck area to a wrist (arm length)
Length of a poncho = measurement from a neck area to a wrist + 1/2 of a head circumference + 1 or 2 extra inches (depending on a person's upper body size around the neck and shoulder area)

Diagram Of "How To Assemble A Poncho"


In the meantime see my free written pattern (below) for a poncho for 10" width & 16" head circumference - most likely to fit a year old baby.

Also, I made videos:

  1. how to knit this beautiful, simple and easy (woven) stitch - RIGHTIES CLICK HERE, and LEFTIES CLICK HERE
  2. how to assemble the poncho and how to crochet around the edges  - RIGHTIES CLICK HERE, and LEFTIES CLICK HERE


Baby poncho from variegated yarn


Materials (if you shop via affiliated links below you could help fund my future projects TXS):
Michaels on line store, OR Hobby Lobby, OR Jo-Ann Fabrics, OR Walmart

Yarn - worsted #4 thickness, 220 yds/200m, 100g/3.5oz, (I used Cascade Yarns, Casablanca - wool/silk/mohair) - buy more yarn if fringe or tassels are desired
Knitting needles - US size #8 (5.0 mm)
Hook - size F (3.75mm) and G (4.0 mm)
Scissors

Gauge:
4"x4" = 18 sts x 24 rows (stockinette stitch with 4.5mm needles)

Size:
about 12-18 months old

Abbreviations:
CO - cast on
st(s) - stitch, (stitches)
K - knit
P - purl
sl st - slip st
SSP - slip stitch purlwise from left needle onto right needle without knitting
sc - single crochet
BO - bind off


Step-by-Step:

Make 2 identical rectangles

CO any number of odd stitches that you need per your measurements (Note: for my project I casted on 41 sts = 10 inches)

Row 1               *[K1, SSP]* - repeat from * to *, K last st
Row 2               P all sts;  (Note: I usually knit first st)
Row 3               K2, *[SSP, K1]* - repeat from * to *, K last st
Row 4               P all sts; (Note: I usually knit first st)

Repeat Row 1 & Row 2 until desired length (Note: for my project I knitted 16" long panel)

BO all stitches and after you assemble your poncho (see image above). Crochet or knit around the edges and/or add some fringe or tassels. Weave in all ends.


DID YOU FIND ERRORS? Let me know on what page and in which row by clicking
 HERE, and I will fix it as soon as I get to it. You can PM me on my FB Page HERE as well. Txs!
Also if you haven't subscribed to my HandmadeRukodelky Channel, you can do it HERE. There are many videos to be seen, too.

*******************************************************************************

Free knitting patterns/videos you may enjoy checking out:

Baby Blue Blanket and Green Scarf (lacy pattern)
Knitted Poncho-Shrug
Reversible Knitted Holiday Scarf
"Summer Rain" Halter Top (M size)
Cerulean Hat
Poncho
Knitted Long Basic Mittens (adult)
Basic Knitted Fingerless Gloves (adult)
Knitted Striped Fingerless Gloves (adult)
Charcoal Hat With Rolled Up Edge (youth/adult)
Spring To Fall Lacy Hat (youth/adult)

Other crocheted items you may want to check out if you crochet too

Easy Lacey Bracelet With Pearl Beads
Crocheted Boobies (Prosthetics)
Crocheted Fingerless Gloves (adult)
Three Summer Crocheted Hats For Babies
Crocheted Spring Hat (youth/adult)
Crocheted Hat With Raised Design (Youth)
Chicken Placemat For Kids
Simple Crocheted Headband
Simple Crocheted Coasters

Crocheted or Knitted Baby Crowns

Crocheted Crown For a Child (easy free pattern)
Crown Knitted On Straight needles (pattern & video)

*********************************************************

Copyright page - click HERE

PLEASE, COMMENT ON YOUTUBE BELOW MY VIDEOS, AND/OR SHARE YOUR IMAGES OF YOUR RECREATED WORKS ON MY FB PAGE HERE :-)