Search This Blog and The Web

Showing posts with label Youth. Show all posts

KNITTED SLEEVELESS LACE BLOUSE - Size Medium

I find myself often looking at all different yarns, thick and thin, colorful or natural, single color, hand painted. I find the artistry behind yarn-making fascinating. I also love variegated yarns - the ones that appeal to my eye and style.

About half a year ago I was scrolling through some websites with yarns and came across Lana Grossa, Gomitolo Puno. There were several very pretty variegated balls on display. So I bought 4 different skeins. Among them, I added to my cart one that was semi-neutral, in a sage/gray color.

Unfortunately, this yarn is now discontinued (what else is new), but you may still find it somewhere on the world wide web. 

If it is out of your reach, you could substitute this yarn with another one - but make sure it is #2 weight (sock yarn thickness). You could use THIS link to find a similar yarn. Or see THIS sparkly yarn from Amazon (an affiliate link).

Please, consider supporting my blog and YouTube Channel by shopping on Amazon via MY AFFILIATE LINK. Thank you if you purchase anything. And I mean anything. Just click on the link and purchase anything you need. It won't cost you anything extra.


Material:

  • Approximately 200g of Lana Grossa, Gomitolo Puno; color 003; 70% Cotton, 19% Merino, 11% Alpaca; 570m/150 g per ball
  • DPNs, Circulars Knitting Needles, Long Knitting Needles - US size #5 (3.75 mm)
  • Hook 3.75 mm 
  • Scissors
  • Yarn Needle (for weaving in the tails)

Size:
  • Women US Medium

Gouge (stockinette stitch):

  • on US knitting needles #5 (3.75 mm) - 1"x1" = 6 sts x 8 rows


Abbreviation:

DPN(s) - double-pointed needle(s)
CO - cast on
K - knit
P - purl
m1 - increase by making one stitch (I used m1R; you could also increase by knitting below your next stitch)
YO - yarn over
SSK - slip knit-wise, slip knit-wise, and then knit them together through the back loop
K2tog - knit two stitches together
M - stitch marker
eM - edge marker
bobble = 2hdc bobble - with crochet hook pull a loose loop through the next stitch, YO, pull a 2nd loop, YO, pull a 3rd loop (5 loops on the hook), pull yarn through all 5 loops; bring the hook behind your bobble and pick up the stitch just below the bobble and pull this stitch through the stitch on the hook; lastly, transfer the stitch from the hook onto the working needle
CDD - slip the next two stitches from the left knitting needle to the right knitting needle as if to knit; knit the next stitch; insert the left knitting needle into the two slipped stitches and pull them over the knitted stitch
KTBL - knit through the back loop
SLS - slip last stitch purl-wise with yarn in front
m1R - make one right (increase)
m1L - make one left (increase)
CCO - cable cast-on
RS - right side
WS - wrong side

NOTE:
While knitting this blouse I used 3 types of knitting needles - long needles, DPNs, and circular needles, each time switching to the best type to knit with.


Step-by-Step Directions
:

SECTION #1

Foundation: to start knitting yoke cast on 112 stitches

Rnd 1          *[K1, P1]* - to end of the row, then distribute the stitches evenly, among 4 DPNs (or use either 2 pairs of short circular needles or circular needles with a long cable), without twisting your knitted row, join needles into a circle
Rnd 2-6       *[K1, P1]* - to end of each row
Rnd 7          *[K7, m1]* - repeat 16x (to end of the row)
Rnd 8-9       K128
Rnd 10        *[K8, m1]* - repeat 16x (to end of the row)
Rnd 11-12    K144
Rnd 13        *[K9, m1]* - repeat 16x (to end of the row)
Rnd 14-16   K160
Rnd 17        *[K10, m1]* - repeat 16x (to end of the row) - total 176 sts

SECTION #2 - PATTERN PART
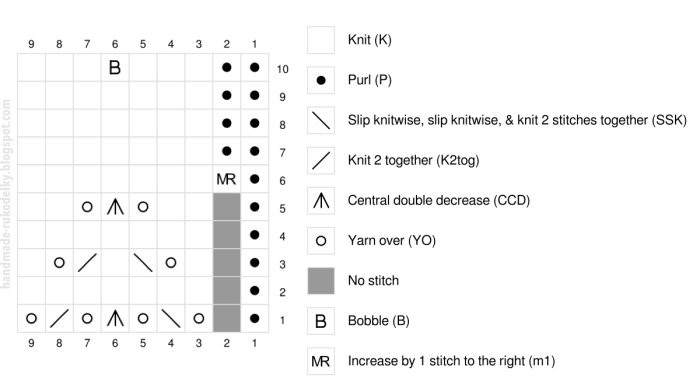

Work the "8 stitch/10 rows" pattern (the bobble could be substituted with K1 instead):

Rnd 1        *[YO, SSK, K3, K2tog, YO, K1, M]* - 22x
Rnd 2        K176
Rnd 3        *[YO, SSK, K3, K2tog, YO, K1, M]* - 22x
Rnd 4        K176
Rnd 5        *[YO, SSK, K1, bobble, K1, K2tog, YO, K1, M]* - 22x
Rnd 6        K176
Rnd 7        *[K1, YO, SSK, K1, K2tog, YO, K2, M]* - 22x
Rnd 8        K176
Rnd 9        *[K2, YO, CDD, YO, K3, M]* - 22x
Rnd 10       K176; remove your markers

SECTION #3

Continue working the yoke; start counting from 1

Rnd 1        *[K11, m1]* - repeat 16x (to end of the row) - total 192 sts
Rnd 2-4     K192
Rnd 5        *[K12, m1]* - repeat 16x (to end of the row) - total 208 sts
Rnd 6-7     K208

SECTION #4

At this point organize your stitches by placing markers as such:

Rnd 8        (back part) K10, eM, K44, eM, K10, M; (first sleeve) K43, M; (front part) K10, eM, K38, eM, K10, M; (the second sleeve) K43, M (end of the row)

Rnd 9      (back part) *[K1, P1] - 5x, eM, K44, eM, [P1, K1] - 5x, M; (sleeve) *[P1, K1]* - 21x, P1, M; (front part) *[K1, P1] - 5x, eM, K38, eM, [P1, K1] - 5x, M;  (the second sleeve) *[P1, K1]* - 21x, P1, M

Rnd 10      (back part) *[K1, P1] - 5x, eM, K44, eM, [P1, K1] - 5x, M; (sleeve) *[P1, K1]* - 21x, P1, M; (front part) *[K1, P1] - 5x, eM, K16, increase in each of next 6 sts as such: *[K1, YO, K1]*, K16, eM, [P1, K1] - 5x, M;  (the second sleeve) *[P1, K1]* - 21x, P1, M (total 220 sts)

Rnd 11-13  (back part) *[K1, P1] - 5x, eM, K44, eM, [P1, K1] - 5x, M; (sleeve) *[P1, K1]* - 21x, P1, M; (front part) *[K1, P1] - 5x, eM, K50, eM, [P1, K1] - 5x, M;  (the second sleeve) *[P1, K1]* - 21x, P1, M

In the next row bind off your sleeves, and place your front part on the holder (a thick string of yarn); when finished with your 14th round start working on your back part

Rnd 14       (back part) *[K1, P1] - 5x, eM, K44, eM, [P1, K1] - 5x; BO 43 sleeve sts; (front part) *[K1, P1] - 5x, eM, K50, eM, [P1, K1] - 5x, M; BO 43 sleeve sts; do not fasten off your yarn.

SECTION #5 - BACK PART

Keep working back and forth - odd rows on the right side, even rows on the wrong side, start counting from 1

Row 1       *[K1, P1]* - 5x, eM, K44, eM, *[P1, K1]* - 4x, P1, SLS, turn (64 sts)
Row 2       KTBL, K1, *[P1, K1]* - 4x, eM, P 44, eM, *[K1, P1]* - 4x, K1, SLS, turn

Row 3       KTBL, P1, *[K1, P1]* - 4x, eM, m1R, K44, m1L, eM, *[P1, K1]* - 4x, P1, SLS, turn (66 sts)
Row 4       KTBL, K1, *[P1, K1]* - 4x, eM, P46, eM, *[K1, P1]* - 4x, K1, SLS, turn
Row 5       KTBL, P1, *[K1, P1]* - 4x, eM, K46, eM, *[P1, K1]* - 4x, P1, SLS, turn 
Row 6       KTBL, K1, *[P1, K1]* - 4x, eM, P46, eM, *[K1, P1]* - 4x, K1, SLS, turn

Row 7       KTBL, P1, *[K1, P1]* - 4x, eM, m1R, K46, m1L, eM, *[P1, K1]* - 4x, P1, SLS, turn (68 sts)
Row 8       KTBL, K1, *[P1, K1]* - 4x, eM, P48, eM, *[K1, P1]* - 4x, K1, SLS, turn
Row 9       KTBL, P1, *[K1, P1]* - 4x, eM, K48, eM, *[P1, K1]* - 4x, P1, SLS, turn 
Row 10     KTBL, K1, *[P1, K1]* - 4x, eM, P48, eM, *[K1, P1]* - 4x, K1, SLS, turn

Row 11      KTBL, P1, *[K1, P1]* - 4x, eM, m1R, K48, m1L, eM, *[P1, K1]* - 4x, P1, SLS, turn (70 sts)
Row 12      KTBL, K1, *[P1, K1]* - 4x, eM, P50, eM, *[K1, P1]* - 4x, K1, SLS, turn
Row 13      KTBL, P1, *[K1, P1]* - 4x, eM, K50, eM, *[P1, K1]* - 4x, P1, SLS, turn 
Row 14      KTBL, K1, *[P1, K1]* - 4x, eM, P50, eM, *[K1, P1]* - 4x, K1, SLS, turn

Row 15      KTBL, P1, *[K1, P1]* - 4x, eM, m1R, K50, m1L, eM, *[P1, K1]* - 4x, P1, SLS, turn (72 sts)
Row 16      KTBL, K1, *[P1, K1]* - 4x, eM, P52, eM, *[K1, P1]* - 4x, K1, SLS, turn

Rows 17-34    Repeat rows 15 & 16 nine more times, where you increase by 2 sts in each odd row.  In row 35 you should have 90 sts total. Fasten off your yarn.

SECTION #5 - FRONT PART

Work back and forth just like you worked "the back part" starting on the right side (odd rows on the right side, even rows on the wrong side), and start counting from 1

Row 1       *[K1, P1]* - 5x, eM, K50, eM, *[P1, K1]* - 4x, P1, SLS, turn (70 sts)
Row 2       KTBL, K1, *[P1, K1]* - 4x, eM, P 50, eM, *[K1, P1]* - 4x, K1, SLS, turn

Row 3       KTBL, P1, *[K1, P1]* - 4x, eM, m1R, K50, m1L, eM, *[P1, K1]* - 4x, P1, SLS, turn (72 sts)
Row 4       KTBL, K1, *[P1, K1]* - 4x, eM, P52, eM, *[K1, P1]* - 4x, K1, SLS, turn
Row 5       KTBL, P1, *[K1, P1]* - 4x, eM, K52, eM, *[P1, K1]* - 4x, P1, SLS, turn 
Row 6       KTBL, K1, *[P1, K1]* - 4x, eM, P52, eM, *[K1, P1]* - 4x, K1, SLS, turn

Row 7       KTBL, P1, *[K1, P1]* - 4x, eM, m1R, K52, m1L, eM, *[P1, K1]* - 4x, P1, SLS, turn (74 sts)
Row 8       KTBL, K1, *[P1, K1]* - 4x, eM, P54, eM, *[K1, P1]* - 4x, K1, SLS, turn
Row 9       KTBL, P1, *[K1, P1]* - 4x, eM, K54, eM, *[P1, K1]* - 4x, P1, SLS, turn 
Row 10     KTBL, K1, *[P1, K1]* - 4x, eM, P54, eM, *[K1, P1]* - 4x, K1, SLS, turn

Row 11      KTBL, P1, *[K1, P1]* - 4x, eM, m1R, K54, m1L, eM, *[P1, K1]* - 4x, P1, SLS, turn (76 sts)
Row 12      KTBL, K1, *[P1, K1]* - 4x, eM, P56, eM, *[K1, P1]* - 4x, K1, SLS, turn
Row 13      KTBL, P1, *[K1, P1]* - 4x, eM, K56, eM, *[P1, K1]* - 4x, P1, SLS, turn 
Row 14      KTBL, K1, *[P1, K1]* - 4x, eM, P56, eM, *[K1, P1]* - 4x, K1, SLS, turn

Row 15      KTBL, P1, *[K1, P1]* - 4x, eM, m1R, K56, m1L, eM, *[P1, K1]* - 4x, P1, SLS, turn (78 sts)
Row 16      KTBL, K1, *[P1, K1]* - 4x, eM, P58, eM, *[K1, P1]* - 4x, K1, SLS, turn

Rows 17-34    Repeat rows 15 & 16 nine more times, where you increase by 2 sts in each odd row.  In row 35 you should have 96 sts total. Do not fasten off your yarn.

SECTION #5 - BODY

From now on work in the round on the right side, and start counting from 1

Rnd 1       (front part) KTBL, P1, *[K1, P1]* - 4x, eM, m1R, K76, m1L, eM, *[P1, K1]* - 5x; (underarm space) turn your work to WS to CCO 7 sts; turn your work to knit on RS and to join the back part: *[K1, P1]* - 5x, eM, m1R, K70, m1L, eM, *[P1, K1]* - 5x; (underarm space) turn your work to WS to CCO 7 sts; turn your work to knit on RS; join your knit to work in the round (204 sts)

Rnd 2-6     (front part) *[K1, P1]* - 5x, eM, K78, eM, *[P1, K1]* - 5x; (underarm space) *[P1, K1]* - 3x, P1; (back part) *[K1, P1]* - 5x, eM, K72, eM, *[P1, K1]* - 5x;  (underarm space) *[P1, K1]* - 3x, P1; (204 sts)

Rnd 7-?     K204 (remove all eMs) - after you knit your desired length, finish your blouse with a few rows of *[K1, P1]* edging, and then weave in all your ends.


Copyright:
You may not sell my written pattern to anyone, and you may not publish it as your own.
However, you may sell a finished product (any item) made by you. Credit me, please.

Thank you.
***

DID YOU FIND ERRORS? Let me know on what page of my blog, and in which row by clicking HERE, and I will fix it as soon as I get to it. You can PM me on my FB Page HERE as well. Txs!
Also if you haven't subscribed to my HandmadeRukodelky Channel, you can do it HERE. There are many videos to be seen, too.

*******************************************************************************


Copyright page - click HERE


PLEASE, COMMENT ON YOUTUBE BELOW MY VIDEOS, AND/OR SHARE YOUR IMAGES OF YOUR RECREATED WORKS ON MY FB PAGE HERE :-)


Mandala Vest - Crochet Along


I start a project, then get an idea, start another project based on my idea, get another idea to start a project, and so on..... ugh. Well, now is the time to finish some of the projects I started a while ago. I started the "Mandala" project in 2018. Finally, I am getting back to it so I can finish it. 

If you ever wanted to crochet a mandala vest (or even mandala rug) below is the first fourteen rows of my pattern plus video tutorial #1 for all wonderful crocheters. This video is for more advanced people, however, my videos are always very detailed, so if you are talented enough you could possibly crochet slowly along. For this lovely project, I used fabulously soft alpaca yarn from the company "MISTI ALPACA". The yarn is soooo soft - it is a pleasure to work with it - I highly recommend it. 

If you want to crochet along with my videos, click on any of the video links (for right-handed or left-handed). 

Occasionally I get questions like this one :


MANDALA VEST PLAYLIST FOR RIGHTIES - CLICK HERE

MANDALA VEST PLAYLIST FOR RIGHTIES - CLICK HERE

LINKS TO INDIVIDUAL VIDEOS - SEE EACH SECTION WITH WRITTEN PATTERN BELOW.

MATERIALS:

  • Misti Alpaca, Tonos Carnaval; Fingering Weight; 50% alpaca, 30% Merino Wool, 10% silk, 10% Nylon; 100g; 437 yds/400 m; 1 skein of each color - Golden (TF67), Sage (TF66), Aqua (TF65), Sacred Orange (TF68), Red Hot (TF03) - 5 colors/5 skeins
  • Crochet Hook: 2.75mm
  • Knitting Needle: 2.25 mm (for bullion stitch)
  • Yarn Needle
  • Scissors


SIZE:

Women US size Medium

Mandala Vest - Click on the image for a bigger photo

ABBREVIATIONS: (the US terminology)

ch - chain
sc - single crochet
hdc - half double crochet
dc - double crochet
st - stitch
sl st - slip stitch
ch1sp - chain one space (or any other number represents the number of chain spaces)
prev - previous
join - join with a slip stitch
shell - 3 dc, ch1, 3 dc
bullion - see video #2 (or how to crochet a "bullion stitch" video for righties is HERE, for lefties HERE)
Puff st - YO, insert hook into a stitch, pull up a long loop, (YO, insert hook into same stitch, pull up a long loop) - 4x (total 5x), YO pull yarn through all 11 loops, close the puff st with a chain st


R - Red Hot color (red)
G - Sage color (green)
B - Aqua color (blue)
Y - Golden color (yellow)
O - Sacred Orange color (orange)


STEP-BY-STEP DIRECTIONS:

VIDEO #1/5 for righties


Red Hot Yarn

Foundation:  ch6, join

Row 1            (R) ch1, 12 sc, join
Row 2            (R) ch3 + ch1, [1 dc, ch1] - repeat 11x, join
Row 3            (R) ch3, bullion st in the same st, skip ch1sp, ch1, [2 bullion sts, skip ch1sp, ch1] - repeat 11x, join (23 bullion sts + ch3)
Row 4            (R) ch3+1, 1 dc in next st, ch1, 1 dc in ch1sp, ch1, [1 dc in next st, ch1, 1 dc in next st, ch1, 1dc in ch1sp, ch1] - repeat to end, join (total 36 dc)

Sage Yarn

Row 5            (G) 1 sc in each st to end, join (72 sts)
Row 6            (G) [1 sc, ch5, skip 2 sts] - repeat to end, join into first sc (total 24 "5-chain" loops)
Row 7-8        (G) 2 sl st in along ch5sp, [1 sc in middle of ch5sp, ch5] - repeat to end, join
Row 9            (G) 2 sl st in along ch5sp, ch3 in middle of ch5sp, 4 dc in same st, [ 5 dc in 3rd st of ch5sp] - repeat to end, join (total 24 "fans" or shells)

Sacred Orange Yarn

Row 10          (O) in 1st st pull yarn to the height of DC, (YO, pull yarn through next st) - 4x, pull yarn through ALL loops on the hook, ch1, then ch5; [in next 1st st of your fan pull yarn to the height of DC, (YO, pull yarn through next st) - 4x; pull yarn through all loops on the hook, ch1; then ch5] - 23x (total 24x)
Row 11           (O) ch3 + ch2, 2 dc into ch5sp, ch2, [1dc in the peak of the st from prev. row, ch2, 2 dc into ch5sp, ch2] - 23x, join
Row 12           (O) 1 sc, ch5, 1 sc between 2 dc from prev row, ch5, [1 sc in dc from prev row, ch5, 1 sc between 2 dc from prev row, ch5] - 23x, join
Row 13-14      (O) 2 sl st along ch5sp, [1 sc in middle of ch5sp, ch5] - repeat to end, join


Aqua Yarn

Row 15             (B) ch3, 1 hdc in middle of ch5sp, ch1, [1 hdc in sc from prev. row, ch1, 1 hdc in ch5sp, ch1] - repeat to end, join
Row 16             (B) ch4, then into each hdc from prev. row make *[puff st, ch1, 1 dc, ch1]* - repeat to end, join, (total 48 puff sts, or total 192 sts) 
Row 17             (B) ch3; 1dc into each st - 14x, 2 dc into next st; then *[1dc into each st - 15x, 2 dc into next st]* - repeat to end; join (204 sts total - 12 increases) 
Row 18             (B) ch3; 1 bpdc in each of 2 consecutive sts; *[ch4, skip 3 sts, 1 bpdc in each of 3 consecutive sts] - repeat to end; finish with ch4; join (total 34 ch4sp/34 "clusters of bpdc sts")
Row 19            (B) 1 sc, ch2, skip 1 st, 1 sc in next dc, ch2, 1 sc in ch4sp, ch 2, *[1 sc in next dc, ch2, skip 1 st, 1 sc in next dc, ch2, 1 sc in ch4sp, ch 2]* - repeat to end; finish with ch4; join
Row 20            (B) sl st into ch2sp, in same ch2sp make: (ch3, 2 dc, ch1, 3 dc), skip ch2sp, 1 sc in sc from prev row, skip ch2sp; *[in next ch2sp above "3 dc cluster" make shell, skip ch2sp, 1 sc in sc from prev row, skip ch2sp]* - repeat to end;  Note: instead of working last sc from your repeat (right after your shell stitch) you need to slip stitch into first sc & third chain of ch3 in order to join

Golden Yarn

Row 21            (Y) ch6 (3+3), 2 hdc in ch1sp, ch3, *[1 dc in sc from prev row, ch3, 2 hdc in ch1sp, ch 3]* - repeat to end, join
Row 22            (Y) ch3, 3 dc in ch3sp, bullion st in 2hdc cluster, 3 dc in ch3sp, *[bullion st in dc st from prev row, 3 dc in ch3sp, bullion st in "2hdc cluster", 3 dc in ch3sp]* - repeat to end; join; (total 67 bullion sts + ch3 instead of bullion st)
Row 23            (Y)  sl st into next st, ch3, 1 dc in next 2 consecutive sts, ch 1, skip st, *[1 dc in next 3 sts, ch1, skip st]* - repeat to end, join (272 sts) 
Row 24            (Y) 1 back sc into last ch1sp from prev row, ch5, skip 3 sts, *[1 sc in next ch1sp, ch5, skip 3 sts]* - repeat to end, join
Row 25-26       (Y) sl st into next 2 ch sts, *[1 sc in the middle of ch5sp, ch5]* - repeat to end, join
Row 27            (Y) sl st into ch5sp, in ch5sp make (ch3 + 3 dc), ch1, in next ch5sp make 3 dc, ch1 *[in next ch5sp make 4 dc, ch1, in next ch5sp make 3 dc, ch1]* - repeat to end, join (total 306 sts)


Red Hot Yarn

Row 28            (R) ch3, 1 dc in next 16 sts, 2 dc in next ch1sp, then *[1 hdc iin next 17 sts, 2 dc in next ch1sp]* - repeat to end, add 1 extra dc, then join (total 324 sts)
Row 29            (R) ch3, 1 dc in each of next 49 sts; ch62; 1 dc in each of next 150 sts; ch62; join
Row 30            (R) ch3+1, *[skip 1 st, 1 bpdc in next st, ch1]* - repeat until you reach ch62, then work chain stitches as such: *[skip 1 st, 1dc, ch1]* - repeat until you reach double crochet stitches; then *[skip 1 st, 1 bpdc in next st, ch1]* - repeat until you reach ch62 again; finish row crocheting into chain stitches as such: *[skip 1 st, 1dc, ch1]*;  join
Row 31            (R) ch3, 1 dc in next 24 sts, 2 dc in next st; *[1 dc in next 25 sts, 2 dc in next st]* - repeat 11 more times; then 1 dc in each 12 sts;  join
Row 32            (R) ch5, *[skip 2 sts, 1 sc in next st, ch5]* - repeat to end; join to first st
Row 33-34       (R) sl st to the middle of ch5sp, *[make 1 sc in ch5sp; ch5]* - repeat to end; join

Sage Yarn

Row 35            (G) ch3 in first ch5sp, 2 dc in same ch5sp, 3 dc in next ch5sp, 3 dc in next ch5sp, in next ch5so: 2dc, ch1, 2 dc; *[2 dc in next ch5sp,  3 dc in next ch5sp, 3 dc in next ch5sp, in next ch5so: 2dc, ch1, 2 dc]* - repeat to end; join
Row 36            (G) ch3, 1 dc in each of next 8 sts, skip 2 sts, in ch1sp work: (2dc, ch1, 2 dc); then *[skip 2 sts, 1 dc in each of next 9 sts; skip 2 sts, then in ch1sp work: (2dc, ch1, 2 dc)]* - repeat to end; join
Row 37            (G) ch3+1, (skip 1 sts, 1 dc in next st, ch1) - 4x; then skip 2 sts and work into ch1sp: (2dc, ch1, 2 dc, ch1); follow with this repeat: *[skip 2 sts, 1 dc into next st, then (skip 1 sts, 1 dc in next st, ch1) - 4x; then skip 2 sts and work into ch1sp: (2dc, ch1, 2 dc, ch1) ]* - repeat to end; join
Row 38            (G) Note: when making first puff st, pull yarn up to the height of dc; *[Puff st, ch3, skip 3 sts, Puff st, ch3, skip 3 sts, Puff st, ch1, then skip 2 sts and work into ch1sp: (2dc, ch1, 2 dc, ch1), skip 2 sts]* - repeat to end, join
Row 39            (G) ch3, (3 dc into ch3sp, 1 dc into Puff st) - 2x; 1 dc into ch1st, then skip 2 sts and work into ch1sp: (2dc, ch1, 2 dc); then *[1 dc into ch1st; 1 dc into Puff st; (3 dc into ch3sp, 1 dc into Puff st) - 2x; 1 dc into ch1st, then skip 2 sts and work into ch1sp: (2dc, ch1, 2 dc)]* - repeat to end, 1 dc into last ch1sp, join
Row 40            (G) ch3, 1 bpdc into each of next 9 sts, skip 2 sts; 6 dc in ch1sp; skip 2 sts; then continue with repeats as such: *[1 bpd into each of next 11 sts, skip 2 sts; then 6 dc into ch1sp, skip 2 sts]* -
- repeat to end; then make 1 bpdc into last st; join with orange colored yarn


 Sacred Orange Yarn 

 Row 41            (O) take your hook out of the stitch, and insert hook one st back, pull the yarn through, and continue as such: *[ch5, 1 sc in 3rd st, ch5, 1 sc in 4th st, ch5, 1 sc in 3rd st, ch5, 1 sc in 4th st, ch5, 1 sc in 3rd st]* - repeat to end;  join (Note: I had to start one stitch back because it was originally the first stitch and we need to work with repeats) 
Row 42-43       (O) slip stitch into the center of ch5 space/loop, then: *[ch5, 1 sc in middle of next ch5 space/loop]* - repeat to end; join (total 140 ch5sp/loops) 
Row 44            (O) slip stitch into the center of ch5 space/loop, then: ch3, 2 dc; *[3 dc in next ch5sp]* - repeat to end; join
Row 45            (O) ch3+1, skip 4 sts, in next st: (4 dc, ch2, 4 dc), *[ch1, skip 4 sts, 1 dc in next st, ch 1, skip 4 sts, in next st: (4 dc, ch2, 4 dc)]* - repeat to end; make ch1, join
Row 46            (O) ch3+1, 1 dc in same st, ch1, in ch2sp: (4 dc, ch2, 4 dc), ch1, *[in dc from prev row: (1 dc, ch1, 1dc); ch 1; in ch2sp: (4 dc, ch2, 4 dc), ch1]* - repeat to end; join
Row 47            (O) in first ch1sp: (ch3, 5 dc); then in each shell stitch make 1 bpdc - 8x; *[6 dc in ch1sp;  in each shell stitch make 1 bpdc - 8x]*; - repeat to end; join (42 shells/6dc clusters = 588 sts)

Aqua Yarn

Row 48            (B) ch3+1, skip 1 st, 1 dc in next st, ch1, *[skip 1 st, 1 dc in next st, ch1]* - repeat to end; join
Row 49            (B) sl st into ch1sp; ch3, 1 dc in same ch1sp; *[make 2 dc in each ch1sp]* - repeat to end; join
Row 50            (B) ch3+1, skip 1 st, 1 bpdc in next st, ch1, *[skip 1 st, 1 bpdc in next st, ch1]* - repeat to end; join
Row 51            (B) sl st into ch1sp; ch3, 1 dc in same ch1sp; *[make 2 dc in each ch1sp]* - repeat to end; join
Row 52            (B) ch3+1, skip 1 st, 1 bpdc in next st, ch1, *[skip 1 st, 1 bpdc in next st, ch1]* - repeat to end; join
Row 53            (B) Note: this is our increase row: sl st into ch1sp; ch3, 1 dc in same ch1sp; *(make 2 dc into each ch1sp)* - 13x; then *[make 3 dc into next st; (make 2 sc into each ch1sp) - 14x]* - repeat; then 11 spaces before the end: make 3 dc into next ch1sp; (make 2 sc into each ch1sp) - 9x; finish with 3 dc into last ch1sp; join
Row 54            (B) ch3+1, skip 1 st, 1 dc in next st, ch1, *[skip 1 st, 1 dc in next st, ch1]* - repeat to end; join


Golden Yarn

Row 55            (Y) ch3, YO, insert hook into same st, pull yarn up, YO, hook into ch1sp,  pull yarn up, YO, hook into next st,  pull yarn up, then pull yarn through 6 loops, then through 2 loops, ch1; *[YO, insert hook into prev st, pull yarn up, YO, hook into ch1sp,  pull yarn up, YO, hook into next st,  pull yarn up, then pull yarn through 6 loops, then through 2 loops, ch1]* - repeat to end;  join
Row 56            (Y) sl. st. into ch1sp, ch3, 1 dc in same ch1sp, ch2; *[skip next ch1sp; 2dc in next ch1sp, ch2]* - repeat to end, join (Note: last 2 dc will be right next to first 2 dc, but will be separated with ch2)
Row 57            (Y) sl. st. into ch2sp, ch3, 1 dc in same ch2sp, ch2; *[skip next 2 sts; 2dc in next ch2sp, ch2]* - repeat to end, join
Row 58            (Y) sl. st. into ch2sp and make: (ch3, 1 dc, ch1, 2 dc), then *[ch2; (2dc in next ch2sp, ch2) - repeat 3x; in next (4th) ch2sp make (2 dc, ch1, 2 dc)]* - repeat from * to * until last repeat; then ch2; (2 dc in next ch2sp, ch2) - 4x; join
Row 59            (Y) sl. st. into ch1sp and make: (ch3, 2 dc, ch1, 3 dc), *[(2dc in next ch2sp, ch2) - repeat 3x; 2dc in next ch2sp, in next ch1sp make (3 dc, ch1, 3dc)]* - repeat from * to * until last repeat; then (2 dc in next ch2sp, ch2) - 4x; 2 dc in last ch2sp; join
Row 60            (Y) sl. st. into ch1sp and make: (ch3, 2 dc, ch1, 3 dc), then *[ch2; (2dc in next ch2sp, ch2) - repeat 3x; in next (4th) ch1sp make (3 dc, ch1, 3 dc)]* - repeat from * to * until last repeat; then ch2; (2 dc in next ch2sp, ch2) - 4x; join

Finishing:
Crochet one row of single crochet stitches around the armhole and weave in the tails.


Copyright:

You may not sell my written pattern to anyone, and you may not publish it as your own.
However, you may sell a finished product made by you. Don't forget to give me a credit.

Thank you.
***

DID YOU FIND ERRORS? Let me know on what page of my blog, and in which row by clicking HERE, and I will fix it as soon as I get to it. You can PM me on my FB Page HERE as well. Txs!
Also if you haven't subscribed to my HandmadeRukodelky Channel, you can do it HERE. There are many videos to be seen, too.

*******************************************************************************


Copyright page - click HERE


PLEASE, COMMENT ON YOUTUBE BELOW MY VIDEOS, AND/OR SHARE YOUR IMAGES OF YOUR RECREATED WORKS ON MY FB PAGE HERE :-)


Note: Most of the time I work as fast as I can to keep up with knitting and crocheting requests. I have to videotape, edit videos, then convert them & upload them to my channel. After that often I post on my blog patterns. I answer many questions, which means that often I work up to 16 hours a day. I would tremendously appreciate IF anyone of you who finds an error in the written pattern, so please, let me know - where (what rows) and what may be the problem. Many future knitters & crocheters from our artsy and crafty virtual world will thank you for your good deed, including myself.


Socks With Pocket - Women US Shoe Size 6-7

Many moons ago I knitted a "Mousie" - finger puppet for my daughter. After she grew up Mousie was just laying around and no one played with it anymore. 

Then I remembered that not too long ago I saw an image of socks with a pocket. The pocket was for a tiny toy. I thought that would be a great idea to make these socks, insert Mousie inside the pocket for my (now adult) daughter and send it to her. She is a kid at heart and I thought it would make a great gift for her birthday. 

I thought that a slightly thicker yarn would be the best too - the socks would be for lounging in the bed when it is cold outside and she'd feel just relaxing, and reading books. Make a great gift for the winter holidays. If you are an experienced knitter you could make socks of any size with any yarn and adjust the pocket accordingly.

I have a big stash of KnitPicks "Bare" yarn, so that's the yarn that I chose to work with on these socks. 


Material: 


Size:
  • Length of the sole (heel to toe): ~8” (you can make it longer if you chose so)
  • Ankle Area: ~ circumference of K1/P1 ribbing is ~9" (stretched)
  • Sole width: 4.5” flat;

Gouge:

On knitting needles #5 (3.75mm) - 1” x 1” = 6 sts x 8 rows (in stockinette stitch)


Abbreviation:

DPN(s) - double-pointed needle(s)
CO - cast on
K - knit
P - purl
sl 1st st - slip first stitch purl-wise
SSK - slip knit-wise, slip knit-wise, and then knit them together through the back loop
P2tog - purl two stitches together
K2tog - knit two stitches together
RS - right side
WS - wrong side
st(s) - stitch(es)
N1, N2, N3, N4 - if knitting with DPNs - needle #1, #2, #3, #4 respectively


Step-by-Step Directions:

Make 2.

Foundation: cast on 54 stitches

  • The Cuff
Rnd 1          *[K1, P1]* - to end of the row, then distribute the stitches evenly, among 4 DPNs (or use either 2 pairs of short circular needles or circular needles with a long cable), without twisting your knitted row, join stitches into a circle

Rnd 2-16      *[K1, P1]* - to end of each row. Note: you can make your cuff longer if you want. 
Rnd 17-22    K54

  • Pocket #1
Start knitting back and forth, count rows starting at 1

LINING:
Row 1           K52 (2 sts left), turn
Row 2           P12, turn
Row 3           K12, turn
Row 4           P12, turn

Repeat Rows 3 and 4  four more times (Rows 5-12), do not BO these stitches - leave the stitches on DPN needle, fasten off yarn, leave a 1-foot long tail

POCKET & SOCK CONTINUED: rows correspond with the pocket rows, start knitting in the round
Rnd 1           with about a foot long tail (later on the tail will be needed for sewing up the side) CO 12 sts (outside pocket part); join unfinished Row 1 by K2
Rnd 2           K40, join stitches into the circle, (outside pocket part) - *[K1, P1]* - 6x, K2
Rnd 3-5        K40, *[K1, P1]* - 6x, K2
Rnd 6-13      K54, Note - outside pocket part has one extra row

Connect the lining part with the outside pocket part

Rnd 14         K40, K2tog from both needles - 12x line up 12 stitches from both needles (lining and outside pocket) to combine them as such - insert working knitting needle into first st from the outside part, then insert the same working needle into first st from the lining part and knit these two stitches together - repeat 11 more times, K2
Rnd 15-24    K54

  • Pocket #2 (on the opposite side)
Start knitting back and forth, count rows starting at 1

LINING:
Row 1           K28 (26 sts left), turn
Row 2           P12, turn
Row 3           K12, turn
Row 4           P12, turn

Repeat Rows 3 and 4  four more times (Rows 5-12), do not BO these stitches - leave the stitches on DPN needle, fasten off yarn, leave a 1-foot long tail for sewing one side

POCKET & SOCK CONTINUED: rows correspond with the pocket rows, start knitting in the round
Rnd 1           with about a foot long tail (later on the tail will be needed for sewing up the side) CO 12 sts (outside pocket part); join unfinished Row 1 by K14 (Note: watch my video for a little trick how to make sure there is not a big gap when you are joining the row into a circle)
Rnd 2           K28, join stitches into the circle, (outside pocket part) - *[K1, P1]* - 6x, K14
Rnd 3-5        K28, *[K1, P1]* - 6x, K14
Rnd 6-13      K54, Note - outside pocket part has one extra row

Connect the lining part with the outside pocket part

Rnd 14         K28, line up 12 stitches from both needles (lining and outside pocket) to combine them as such - insert working knitting needle into first st from the outside part, then insert the same working needle into first st from the lining part and knit these two stitches together - repeat 11 more times), K14
Rnd 15-24    K54
  • The Heel Flap
If knitting on DPN's divide your stitches as such: needles #1 and #2 - 10 sts each, needle #3 - 8 sts. If you are using circular needles you most likely have stitches divided to 14 + 14 between your magic loops.

Row 21-26      Work on your first 14 sts only back and forth (NOT in the round) - *[K1, P1]* - 7x

  • Turning The Heel (row by row)
Keep working your sock back and forth (NOT in the round), starting with Row 1.

Row 1     (RS) sl. 1st st, K7, SSK, K1, (3 sts left on the needle), turn
Row 2     (WS) sl. 1st st, P3, P2tog, P1, (3 sts left on the needle), turn
Row 3     (RS) sl. 1st st, K4, SSK, K1, (1 sts left on the needle), turn
Row 4     (WS) sl. 1st st, P5, P2tog, P1, (1 sts left on the needle), turn
Row 5     (RS) sl. 1st st, K6, SSK, (0 sts left on the needle), turn
Row 6     (WS) sl. 1st st, P6, P2tog, (0 sts left on the needle), turn

  • The Gusset (knit in the round)
Note: you will work from now on RS only in the round.

You should finish with 8 sts on your working needle, and you are ready to pick up stitches along the sides of your flap. You will proceed as such (starting with Rnd 1 again):

Rnd 1             K8, PU 5, K14, PU 5
Rnd 2             K11, K2tog, K14, SSK, K3
Rnd 3             K30
Rnd 4             K10, K2tog, K14, SSK, K2
Rnd 5             K28
Rnd 6             K9, K2tog, K14,  Note: This is the end of your row. We will start a new row after this point. If you are knitting on DPNs reshuffle your stitches to N1 (first 10 stitches), then split your 14 sts between N2 and N3

  • The Foot Part
Rnd 7             SSK, K1 (Note: add these two stitches to N1), K24 (total 26 sts)
Rnd 8-12        K26
Rnd 13           (N1) K12; (N2) K2tog, K5; (N3) K5, SSK; (total 24 sts)
Rnd 14-15      K24
Note: To make your socks a little longer add 1+ more rows.
 
  • The Toe Part
Let's start with Rnd 1 again.

Rnd 1           *[K2tog, K8, SSK]* - 2x
Rnd 2          K20
Rnd 3           *[K2tog, K6, SSK]* - 2x
Rnd 4          K16
Rnd 5           *[K2tog, K4, SSK]* - 2x (total 12 sts)

  • To Finish Each Sock:
In order to close your toe gap with Kitchener stitch, you need 6 stitches lined up with the other 6 stitches. If knitting with DPNs you may have first 6 sts on the first needle already, but you need to place the next 6 sts (from needles #2 and #3) on another needle. Cut off about 1/2 a foot-long tail, thread it into your yarn needle, and using the Kitchener Stitch close the toe gap. Weave in all the ends/tails. 


Copyright:
You may not sell my written pattern to anyone, and you may not publish it as your own.
However, you may sell a finished product (socks) made by you.

Thank you.
***

DID YOU FIND ERRORS? Let me know on what page of my blog, and in which row by clicking HERE, and I will fix it as soon as I get to it. You can PM me on my FB Page HERE as well. Txs!
Also if you haven't subscribed to my HandmadeRukodelky Channel, you can do it HERE. There are many videos to be seen, too.

*******************************************************************************


Copyright page - click HERE


PLEASE, COMMENT ON YOUTUBE BELOW MY VIDEOS, AND/OR SHARE YOUR IMAGES OF YOUR RECREATED WORKS ON MY FB PAGE HERE :-)


Note: Most of the time I work as fast as I can to keep up with knitting and crocheting requests. I have to videotape, edit videos, then convert them & upload them to my channel. After that often I post on my blog patterns. I answer many questions, which means that often I work up to 16 hours a day. I would tremendously appreciate IF anyone of you who finds an error in the written pattern, so please, let me know - where (what rows) and what may be the problem. Many future knitters & crocheters from our artsy and crafty virtual world will thank you for your good deed, including myself.

Knitted Confetti Socks

I bought this yarn and made these socks over a year ago. I just didn't have time to finish editing my video and writing the pattern. But here I am a year later to make a little write up before I will publish all - the video and the pattern.

The yarn's colors were appealing to me so strongly that I just had to have it. I am sure you all know the feeling. I feel like a child in a candy store when I see yarn around me. Gold, turquoise and magenta colors intertwine in such ways that they look like confetti fell on the uncolored yarn. This yarn is hand-painted and reflects one of ancient South American color combinations, and it just may brighten anyone 's day.

However, you may replace this yarn with another fingering sock yarn of your choice, the one that appeals to you. Sock yarns are so beautiful these days, and there are a lot of talented yarn "painters". I may try to paint my sock yarn (or any other type of yarn) one day myself. I will keep you posted.


FOR THIS PROJECT YOU WILL NEED:

Yarn:
  • 1 ball of Araucania Yarn - Huasco Sock; Color: Guacamayo; 75% Superwash Wool; 25 % Polyamide; 3.52 oz/100 g; 433 yd/396 m 
  • Knitting Needles - 2.75mm - DPN or Circular (long ones to knit using a magic circle)
  • Yarn Needle (for weaving in the tail)
  • Scissors 
Size:
  • Shoe size: ~ US size 6
  • Ankle Area: ~ 6.5-7” circumference
  • Ribbing Height: 2”
  • Sole width: 3.25” (circumference is ~ 6.5”)
  • Length of the sole: ~7.5” (you can make it longer if you choose so)

VIDEOS:


And just in case: if you would like to purchase a written pattern and support my video teachings here is the link:


Copyright:
You may not sell/share my written pdf pattern to/with anyone, and you may not publish it as your own.
However, you may sell a finished product (socks) made by you.

Thank you.
***

DID YOU FIND ERRORS? Let me know on what page of my blog, and in which row by clicking HERE, and I will fix it as soon as I get to it. You can PM me on my FB Page HERE as well. Txs!
Also if you haven't subscribed to my HandmadeRukodelky Channel, you can do it HERE. There are many videos to be seen, too.

*******************************************************************************


Copyright page - click HERE


PLEASE, COMMENT ON YOUTUBE BELOW MY VIDEOS, AND/OR SHARE YOUR IMAGES OF YOUR RECREATED WORKS ON MY FB PAGE HERE :-)


Note: Most of the time I work as fast as I can to keep up with knitting and crocheting requests. I have to videotape, edit videos, then convert them & upload them to my channel. After that often I post on my blog patterns. I answer many questions, which means that often I work up to 16 hours a day. I would tremendously appreciate IF anyone of you who finds an error in the written pattern, so please, let me know - where (what rows) and what may be the problem. Many future knitters & crocheters from our artsy and crafty virtual world will thank you for your good deed, including myself.


B&W Fuzzy Scarf With iCord Edge For Fashion-conscious

Today, I would like to write about knitting my black and white fuzzy scarf, which I absolutely love.

Not too long ago I went to check out a yarn store that I like to visit occasionally. In this store, they had a knitted dark gray caplet with green fuzzy pieces sticking out and green edging around it. The effect of the green edging vs. green fuzzy pieces sticking out of the gray yarn was divine.

Then, I noticed they had these fuzzies in different colors too. One of them was a yarn with fuzzy white tufts. I knew right away that this yarn would be perfect for a scarf, which would go well with my white jacket that has black trim. So I bought four skeins of the fuzzy yarn and two skeins (per store owner's recommendation) for the trim. I had a hunch that I will not need two skeins for the trim. Instead, I should have bought five of the fuzzy yarns and one for the trim. Well, that's OK, I will make good use of the leftover white yarn in the future.

Knitting with "Lang Yarns" is not complicated. For my project, I used a seed stitch so my edges would not curl and my scarf would have a reversible effect. I could have used a garter stitch also, but I thought that seed stitch would allow for a longer scarf.

After wearing my scarf, I noticed that the tufts shed, which is fine with me because I wear my new scarf with my white jacket that has a nylon surface. But I cannot wear it with a cotton fabric, because I would look like I played with a dog.

I made a detailed video too. Enjoy.


VIDEO FOR RIGHT-HANDED

VIDEO FOR LEFT-HANDED


Materials:
Yarn

  • Lang Yarns, "Drago"; Color: 999.0094 (white tufts); Fiber: 41% Mohair - 25% Wool - 18% Nylon - 16% Acrylic; 50g/1.75 oz; 110 yds/100 m; Care: Use detergent for fine wash without softener
  • Berrocco, "Comfort"; Color: 9700 Chalk; Fiber: 50% Super Fine Nylon, 50% Super Fine Acrylic; 100g/3.5 oz; 210 yds; 


Knitting Needles - Long needles - 6.00 mm (for scarf); 2 short DPNs - size 5.5mm (for an i-cord)
Yarn needle
Scissors

Abbreviations:
CO - cast on
K - knit
P - purl
st, sts - stitch, stitches
WS - wrong side
RS - right side
K2togtbl - knit two stitches together through the back loop
BO - bind off


Gauge:
My gauge corresponds to a manufacturer's gauge on the yarn label

Size:
Length: 33"
Width: 7"

Step-by-Step:

Using Lang Yarns knit a rectangle of our desired width and length

Working with two long knitting needles CO 49 sts (or your desired number of stitches). I CO an odd number of stitches to work every row the same way (the seed stitch)

Row 1-??          (RS) *[K1, P1]* repeat to last st, K1

Knit as many rows as desired, do not bind off.

Work along the last row

CO 3 (or 4) stitches onto DPN and bind off using an i-cord technique. When finished with binding off, work using two DPNs - knit 3 rows in the round (K3), then (if you are right-handed) work i-cord as such:

Work along 1st long side

Rnd 1               pick one loop (leading yarn) along the side with your left END of your DPN (that has 3 sts on it), slide all 4 stitches toward the right side, K2, K2togtbl (white and dark stitches)

Rnd 2               pick second loop (leading yarn) along the side with your left END of your DPN (that has 3 sts on it), slide all 4 stitches toward the right side, K2, K2togtbl (= white and dark stitches)

Rnd 3               slide all 3 stitches toward the right side, K3

Repeat until you reach next corner, then knit 3 rows in the round (K3)

Work along the CO side (the bottom)

Rnd 1-49          pick each loop (every CO stitch) along the bottom with your left END of your DPN (that has 3 sts on it), slide all 4 stitches toward the right side, K2, K2togtbl (white and dark stitches)

Repeat until you reach next corner, then knit 3 rows in the round (K3)

Work along 1st long side

Rnd 1               pick one loop (leading yarn) along the side with your left END of your DPN (that has 3 sts on it), slide all 4 stitches toward the right side, K2, K2togtbl (white and dark stitches)

Rnd 2               pick second loop (leading yarn) along the side with your left END of your DPN (that has 3 sts on it), slide all 4 stitches toward the right side, K2, K2togtbl (= white and dark stitches)

Rnd 3               slide all 3 stitches toward the right side, K3

Repeat until you reach next corner, then knit 2 rows in the round (K3) - finish the i-cord by sewing both ends together and weave in all loose ends.


***

DID YOU FIND ERRORS? Let me know on what page of my blog, and in which row by clicking HERE, and I will fix it as soon as I get to it. You can PM me on my FB Page HERE as well. Txs!
Also if you haven't subscribed to my HandmadeRukodelky Channel, you can do it HERE. There are many videos to be seen, too.

*******************************************************************************


Copyright page - click HERE


PLEASE, COMMENT ON YOUTUBE BELOW MY VIDEOS, AND/OR SHARE YOUR IMAGES OF YOUR RECREATED WORKS ON MY FB PAGE HERE :-)


Note: Most of the time I work as fast as I can to keep up with knitting and crocheting requests. I have to videotape, edit videos, then convert them & upload them to my channel. After that often I post on my blog patterns. I answer many questions, which means that often I work up to 16 hours a day. I would tremendously appreciate IF anyone of you who finds an error in the written pattern, so please, let me know - where (what rows) and what may be the problem. Many future knitters & crocheters from our artsy and crafty virtual world will thank you for your good deed, including myself.

My Mom's Old Fashioned Scarf

When I was a child, my mom used to make scarves for my siblings and me. These scarves' one end would go through an opening on the other end that my mom made while knitting our scarves. That way we would not lose them.
Today I would like to share with you my mom's design (which was very popular then) for such a scarf. I also made videos for knitters (for lefties and righties - see below) who prefer to knit along. The pattern can be adjusted by simply changing stitches to lower or higher number when increasing or decreasing, and knitting the middle part shorter or longer than I described it below and in my videos. I used worsted (#4) yarn, but you may knit this scarf from thinner or thicker yarn as well - then you will have to adjust a number of increases and decreases, and a number of rows in the middle as well.
To knit this scarf, you need to know: how to cast on, knit, purl, knit two together, increase, transfer stitches from one needle onto two needles and then back, and how to bind off.

VIDEO TUTORIAL FOR RIGHTIES

VIDEO TUTORIAL FOR LEFTIES

Materials:
Yarn - any yarn of medium weight (#4, worsted) - your choice;
In the video I am using: Cascade Yarns, Cascade 220, worsted weight #4, 100g/3.5 oz; 220 yds/200 m; Colors: #1 - 9559 (light gray), #2 - 8505 (white)
Knitting Needles - US #8 (5.00 mm): 3 long DPNs (minimum 8" or longer; three 10" would be better) OR 2-3 circular needles (EITHER one 30"+ long, plus one 16"long, OR three 9" to 16" circulars)
Scissors

The scarf weighs 85g in total.

Abbreviations:
CO - cast on
K - knit
P - purl
st, sts - stitch, stitches
WS - wrong side
RS - right side
incr - increase; insert your needle purlwise through the back loop, knit it, don't take the stitch off the needle yet, knit the same stitch regular way, only then take the stitch off the needle - you increased by 1 stitch
K1-ptbl - knit one stitch purlwise through the back loop
K2tog - knit two stitches together
BO - bind off

Gauge:
My gauge corresponds to a manufacturer's gauge on the yarn label

Size:
Length: 33"
Width: 7"


Step-by-Step:

  • HEART/LEAF SHAPED END #1
Yarn color #1 (gray)

Working with two long DPNs, OR one long 30" circular (knitting back and forth with each end), OR two shorter circular (using them the same way as DPNs)  CO 4 sts

Row 1          (WS) K4

Row 2          (RS) incr, K to end
Row 3          (WS) incr, K to end

repeat Rows 2 & 3 as many times as you need, I increased my stitches in each row until I had total 32 stitches on my needles

Row 30       (RS) K32
Row 31       (WS) K32

Repeat Rows 30 & 31 as many times as you need. For my width of 32 stitches, I knitted total 16 rows (half of 32 sts), which means I finished with Row 45.

  • OPENING #1
Before you will continue knitting do this first:
While you have your 32 (or your desired even number of stitches, that can be divided by two into another even number) stitches on your needle take either two DPNs, OR two shorter circulars, OR the other end of your long circular and one short circular and transfer stitches from the one needle onto two needles in alternating fashion - first transfer one stitch onto needle #1, then transfer the second stitch onto needle #2 and repeat to end. You should end up with 16 sts on needle #1 and 16 sts on needle #2

Knit stitches on needle #1, the one closer to your body, first:
Row 46     (RS) *[K1, P1]* - to end
Row 47     (WS) *[K1, P1]* - to end

Repeat Rows 46 & 47 nine more times, until you are finished with Row 65, then fasten off the yarn while keeping a tail long about 8"-10"

Fold the first knitted piece forward toward your body, then knit stitches on needle #2, the one further away from your body, starting on the same side as you started when you were working with needle #1, second:
Row 46     (RS) *[K1, P1]* - to end
Row 47     (WS) *[K1, P1]* - to end

Repeat Rows 46 & 47 seven more times, until you are finished with Row 65, DO NOT fasten off the yarn

Transfer stitches in the alternating fashion from two needles onto just one needle as such: starting with the back needle #2 move your first stitch onto the single knitting needle, then take the first stitch from needle #1 and move it onto the same single knitting needle - repeat until you have all 32 stitches back on one knitting needle only.

  • MIDDLE PANEL
Note: if you knit this scarf with only one color yarn, knit as many rows as needed to wrap around your neck. My middle part measures 14.5".

This is how I knitted my middle panel:

Row 66              combine tail from the knitting needle #1 and the yarn from the knitting needle #2 and K all stitches to end (with combo tail/yarn you will knit only a few stitches, then continue with yarn only - this will eliminate weaving in the ends)
Row 67-105       K32

Color #2 (white)
Row 106-113    K32

Yarn color #1 (gray)
Row 114-121    K32

Color #2 (white)
Row 122-125    K32

Yarn color #1 (gray)
Row 126-129    K32

Color #2 (white)

Row 130-137    K32

Yarn color #1 (gray)
Row 138-145    K32

Color #2 (white, from now on till end)
Row 146-185    K32

  • OPENING #2
In Rows 186 through 205 repeat knitting this opening same way as in Opening #1 - separation of your stitches onto 2 knitting needles, then knit side #1, then side #2, then put these two sides back together onto one knitting needle only.

  • HEART/LEAF SHAPED END #2
Continue working as such:

Row 206-221   K32

Row 222          (RS) K1-ptbl, K2tog, K to end
Row 223          (WS) K1-ptbl, K2tog, K to end

Repeat Rows 222 and 223 until you have 4 sts on your needle.

In your last row BO all your stitches. Then weave in all the tails/ends.

***

DID YOU FIND ERRORS? Let me know on what page of my blog, and in which row by clicking HERE, and I will fix it as soon as I get to it. You can PM me on my FB Page HERE as well. Txs!
Also if you haven't subscribed to my HandmadeRukodelky Channel, you can do it HERE. There are many videos to be seen, too.

*******************************************************************************


Copyright page - click HERE


PLEASE, COMMENT ON YOUTUBE BELOW MY VIDEOS, AND/OR SHARE YOUR IMAGES OF YOUR RECREATED WORKS ON MY FB PAGE HERE :-)


Note: Most of the time I work as fast as I can to keep up with knitting and crocheting requests. I have to videotape, edit videos, then convert them & upload them to my channel. After that often I post on my blog patterns. I answer many questions, which means that often I work up to 16 hours a day. I would tremendously appreciate IF anyone of you who finds an error in the written pattern, so please, let me know - where (what rows) and what may be the problem. Many future knitters & crocheters from our artsy and crafty virtual world will thank you for your good deed, including myself.


Unicorn Legwarmers

Legwarmers or Armwarmers
I designed these "Sweet Taffy Legwarmers" with ballerinas on my mind. I pictured them wearing crocheted legwarmers as they practice their tendu, plie or pirouette. But let's not limit ourselves to who can wear these legwarmers and how. People that feel cold in the fall, winter, and spring (such as myself) can enjoy crocheted "legwarmers", or wear these as "armwarmers 😊 ".

This pattern is NOT for utter beginners. However, if you are a little skilled and adventurous crocheter and if you watch my video, you may be able to work on this project even if you don't have a whole lot of experience. The video is so detailed that a few less experienced crocheters may find it helpful and embrace it as a push forward to try something new.

Below you will find two patterns - one for very slim legs (mine, LOL) and one for a newborn baby. However, you can make these for anyone. If it comes to a width, first, you should crochet enough chain stitches to wrap around the widest area of your leg (upper part, or a calf). Then count them and make sure the total number is a multiple of 4 (such as 24, 36, 48, 56, 60, etc.) For example, if you make a chain of 62 sts than your nearest number to work with would be 60 sts. It is better to make it one or two stitches smaller because the legwarmers will stretch. I started legwarmers for myself with 50 stitches, but it would have been better to make 48 chain stitches to start with. It would eliminate the extra 2 stitches I had to "get rid of" when I started the design after the ribbing. I started the legwarmers for a newborn baby with 30 sts. However, to make it easier for myself I should have started it with 28 sts (for slimmer legs), or with 32 sts (for chubbier legs). Here too, I had to eliminate 2 sts when I started to crochet the design part. I will write the Newborn pattern with 28 stitches, to make it easier on you. If you want to make it for an older child, then just add one or more extra 4-chain repeats.

For the length do this: measure a distance between the upper part and the ankle area, and crochet until you reach the desired length. If you would like your legwarmers to have a gathered look, then I would make few extra rows. Good luck and enjoy.

CLICK  HERE  4  VIDEO  4  RIGHTIES
CLICK  HERE  4  VIDEO  4  LEFTIES


If you'd shop yarn on-line via my affiliate links below, I'd get few pennies, which would help to fund my future projects TXS):
Michaels online store, OR Hobby Lobby, OR Jo-Ann Fabrics, OR Walmart 

Size:
Adult
Upper leg measurement: 14" (stretches to 16", and holds OK on tights)
Length: approx. 26"
Newborn
Upper leg measurement: 7" (stretches to 8", and holds OK on tights)
Length: 6"

Materials:
1 ball of yarn that is lightweight #3; I used Lion Brand Yarns, Mandala, Unicorn color; 100% acrylic; 5.3 oz/150 g; 590 yds/540m (if you want to match up variegated colors, you will need 2 balls)
Hook size 5mm
Yarn needle
Scissors


Size:
Varies

Gauge:
4"x4" = 12 dc sts x 7 dc rows

Abbreviations:
ch - chain
dc - double crochet
hdc - half double crochet
sc - single crochet
fpdc - crochet dc through front post of dc from prev. row
bpdc - crochet dc through back post of dc from prev. row
join - join with a slip stitch

Step-by-Step

Make 2

Foundation (according to video) - ch50, join

Work on your "ribbing":
Rnd 1           ch3 (counts as dc), then 1 dc into next 49 consecutive ch sts, join (total 50 sts)
Rnd 2-10      ch2 (counts as dc), then *[1 fpdc, 1 bpdc]* - 24x; then 1 fpdc, join to ch2  (total 50 sts)

Work on your pattern:
Rnd 11         ch3, then 3 dc in the same base as ch3 (4dc-cluster), skip 4 sts, 4 dc in 5th ch st, *[skip 3 sts, 4 dc in 4th ch st]* - repeat 10x = until last 4 sts, skip these 4 sts, join into ch3 (total 12 "4dc-clusters")
(Note: if you will make foundation with multiples of 4, then you will always skip only 3 sts and make 4 dc in 4th st)
Rnd 12        ch2, *[skip 3 sts, 1 dc in 4th st, ch2, 1 dc in first skipped st]* - repeat 11x OR until you have 3 sts left - skip these 3 sts, make 1 dc into the base of ch2 in the beginning of the row, ch2, then 1 dc into first skipped st and join into 2 chain sts (in the spot where first dc and ch2 meet)

Note: from now on you will repeat Rnd 13 & 14 until your desired length
Rnd 13       slip stitch into ch2 space; then start your first cluster with ch3, then 3 dc in the same base as ch3 (4dc-cluster), *[skip 3 sts, 4 dc in 4th ch st]* - 11x; join (total 12 "4dc-clusters")
Rnd 14        ch2, *[skip 3 sts, 1 dc in 4th st, ch2, 1 dc in first skipped st]* - repeat 11x OR until you have 3 sts left - skip these 3 sts, make 1 dc into the base of ch2 in the beginning of the row, ch2, then 1 dc into first skipped st and join into 2 chain sts (in the spot where first dc and ch2 meet)

Repeat Rnd 13 & 15 as many times as needed.


Finishing:
After you finish your desired length, your last row should be the "criss-cross" row. To make the bottom flare out a little, first you will work your dc-cluster differently then finish with a tiny scalloped edge created by slip stitches, single crochet stitches and half double crochet stitches this way:

Rnd 1       slip stitch into ch2 space; then start your first cluster with ch3, then 4 dc in the same base as ch3 (5dc-cluster), *[skip 3 sts, 4 dc in 4th ch st, skip 3 sts, 4 dc in 4th ch st]* - alternate these 4- and 5-dc clusters to end; join (total 12 "dc-clusters")
Rnd 2       In 5-dc clusters make *[1 sc, 2 hdc, 1 sc, sl st]*; and in 4-dc clusters make *[1 sc, 1 hdc, 1 sc, sl st]* - alternate to end         


LEGWARMERS FOR A NEWBORN

Make 2

Foundation (according to video) - ch28, join

Work on your "ribbing":
Rnd 1           ch3 (counts as dc), then 1 dc into next 27 consecutive ch sts, join (total 28 sts)
Rnd 2-5      ch2 (counts as dc), then *[1 fpdc, 1 bpdc]* - 13x; then 1 fpdc, join to ch2  (total 28 sts)

Work on your pattern:
Rnd 6         ch3, then 3 dc in the same base as ch3 (4dc-cluster), *[skip 3 sts, 4 dc in 4th ch st]* - repeat 6x = until last 3 sts, skip these 3 sts, join into ch3 (total 7 "4dc-clusters")
(Note: if you will make foundation with multiples of 4, then you will always skip only 3 sts and make 4 dc in 4th st)
Rnd 7        ch2, *[skip 3 sts, 1 dc in 4th st, ch2, 1 dc in first skipped st]* - repeat 6x OR until you have 3 sts left - skip these 3 sts, make 1 dc into the base of ch2 in the beginning of the row, ch2, then 1 dc in first skipped st and join into 2 chain sts (in the spot where first dc and ch2 meet)

Note: from now on you will repeat Rnd 13 & 14 until your desired length
Rnd 8       slip stitch into ch2 space; then start your first cluster with ch3, then 3 dc in the same base as ch3 (4dc-cluster), *[skip 3 sts, 4 dc in 4th ch st]* - 6x; join (total 7 "4dc-clusters")
Rnd 9        ch2, *[skip 3 sts, 1 dc in 4th st, ch2, 1 dc in first skipped st]* - repeat 6x OR until you have 3 sts left - skip these 3 sts, make 1 dc into the base of ch2 in the beginning of the row, ch2, then 1 dc in first skipped st and join into 2 chain sts (in the spot where first dc and ch2 meet)

Repeat Rnd 8 & 9 as 2x (or as many times as needed).

Finishing:
After you finish your desired length, your last row should be the "criss-cross" row. To make the bottom flare out a little, first you will work your dc-cluster differently then finish with a tiny scalloped edge created by slip stitches, single crochet stitches and half double crochet stitches this way:

Rnd 1       slip stitch into ch2 space; then start your first cluster with ch3, then 4 dc in the same base as ch3 (5dc-cluster), *[skip 3 sts, 4 dc in 4th ch st, skip 3 sts, 4 dc in 4th ch st]* - alternate these 4- and 5-dc clusters to end (you will finish with 5-dc cluster); join (total 7 "dc-clusters") - weave in all ends.   


***

DID YOU FIND ERRORS? Let me know on what page of my blog, and in which row by clicking HERE, and I will fix it as soon as I get to it. You can PM me on my FB Page HERE as well. Txs!
Also if you haven't subscribed to my HandmadeRukodelky Channel, you can do it HERE. There are many videos to be seen, too.

*******************************************************************************


Copyright page - click HERE


PLEASE, COMMENT ON YOUTUBE BELOW MY VIDEOS, AND/OR SHARE YOUR IMAGES OF YOUR RECREATED WORKS ON MY FB PAGE HERE :-)


Note: Most of the time I work as fast as I can to keep up with knitting and crocheting requests. I have to videotape, edit videos, then convert them & upload them to my channel. After that often I post on my blog patterns. I answer many questions, which means that often I work up to 16 hours a day. I would tremendously appreciate IF anyone of you who finds an error in the written pattern, so please, let me know - where (what rows) and what may be the problem. Many future knitters & crocheters from our artsy and crafty virtual world will thank you for your good deed, including myself.