Search This Blog and The Web

Showing posts with label Sweater. Show all posts

TANGERINE TOP

ENJOY MY LATEST PROJECT - AN AIRY TOP (BLOUSE OR SWEATER) KNITTED FROM A LACY FUZZY YARN WITH LARGER-SIZED KNITTING NEEDLES, WITH 3D SLEEVES.


Please, consider supporting my blog and YouTube Channel by shopping on Amazon via MY AFFILIATE LINK. Thank you if you purchase anything.


Material:

  • Yarn - DIABLO; Colors: 4 balls of Yellow Ochre (#18); Lace (#1); 30% Mohair, 30% Nylon, 40% Acrylic; 0.9 oz/25g; 246 yds/225 m; 
  • Knitting needles #9 (5.5 mm)
  • Markers
  • Yarn needle (to weave in the ends)
  • Scissors


Abbreviations:
CO - cast on
K - knit
P - purl
st/sts - stitch/stitches
K2tog - knit two stitches together (decrease)
SSK - slip 2 stitches (one at a time), place them back on the needle and knit them through the back loop (decrease)
CO extra st - cast on an extra stitch between short rows to close the hole
PM - place marker
K1B - increase by knitting 1 stitch below the next stitch (then knit next st)
YO - yarn over
BO - bind off

Gauge (stockinette st):
4" x 4" = 16 sts x 22 rows

Size:
Oversized small, or regular medium women's size

Measurements (measured flat): 


Step-by-Step Directions:

This blouse is knitted from bottom to top. 

BODY PART

CO 140 sts. Knit in the round.

Row 1-12             *[K1, P1]* - repeat to end of row (70x)
Row 13-80            K140

Divide 140 stitches into 2 halves - 70 sts for your back, and 70 sts for the front. Knit back and forth. Work your back first, then the front. 

BACK PART OF THE BODY

Row 81               K68
Row 82               P66, put the first 2 sts and last 2 sts on the stitch holder made from yarn, they will be part of the sleeves
Row 83               K66
Row 84               P66

Repeat Rows 83 & 84 thirteen more times, up to Row 110.

Row 111              BO 7 sts, K to end
Row 112              BO 7 sts, P to end

Repeat Rows 111 & 112 two more times, up to Row 116.

Row 117              K24
Row 118              P24


FRONT PART OF THE BODY

Row 81               put the first 2 sts on the stitch holder made from yarn, start the new ball, and K66; put the last 2 sts on the stitch holder made from yarn, they will be part of the sleeves
Row 82               P66
Row 83               K66
Row 84               P66

Repeat Rows 83 & 84 nine more times, up to Row 102.

We will make a "U" shaped neck area, and then BO for the shoulders. Start on the first side of the front on the RIGHT (KNIT) side.

FIRST HALF OF THE UPPER FRONT

Row 103              K28, do not work with the last 38 sts on the needle (you may put them on the stitch holder)
Row 104              P28
Row 105              K25, three stitches left on the needle
Row 106              P25
Row 107              K23, three + two stitches left on the needle
Row 108              P23
Row 109              K21, three + two + two stitches left on the needle
Row 110              P21
Row 111              K21
Row 112              P21
Row 113              BO 7 sts, K13
Row 114              P14
Row 115              BO 7 sts, K6
Row 116              P7
Row 117              BO 7 sts, leave a long tail for sewing the shoulder area together

SECOND HALF OF THE UPPER FRONT

Start on the second side of the front on the RIGHT (KNIT) side; from the middle.

Row 103              Leave the first 10 sts on the stitch holder, then K28 to end
Row 104              P25, three stitches left on the needle
Row 105              K25
Row 106              P23, three + two stitches left on the needle (total 5 sts)
Row 107              K23
Row 108              P21, three + two + two stitches left on the needle  (total 7 sts)
Row 109              K21
Row 110              P21
Row 111              K21
Row 112              BO 7 sts, P13
Row 113              K14
Row 114              BO 7 sts, P6
Row 115              K 7
Row 116              BO 7 sts, do not fasten off the yarn, use it for knitting the edge

Sew the front and back shoulder areas together (on both sides). Knit a neckband/edge in the round as such:

Row 1                  Starting at your back part and on the RIGHT side of the knit, K24; CO 8 sts along straight side; K2; CO extra st; K2; CO extra st; K3; CO extra st; K10; CO extra st; K3;  CO extra st; K2;  CO extra st; K2; CO 8 sts along straight side; (total 70 sts = 24+8+2+1+2+1+3+1+10+1+3+1+2+1+2+8)
Row 2-6               *[K1, P1]* - to end (35x)
Row 7                   BO


SLEEVES - make two

Start in the underarm area. 

Row 1                    CO 24 stitches along the front (or back) arm area, then CO 24 stitches along the back (or front) area, and K4 (stitchers that are on your stitch holder) - make sure there are no holes between the CO stitches and 4 underarm stitches, PM
Row 2                    K2tog, K44, SSK, K4 (50 sts total)
Row 3-10               *[K7, P3]* - 5x (total 50 sts)

Row 11                   *[K1; then increase by K1B & K1 regularly - 5x; K1, P3]* - 5x (total 75 sts)
Row 12-19             *[K12, P3]* - 5x (total 75 sts)
Row 20                  *[K1; then decrease by K2tog - 5x; K1, P3]* - 5x (total 50 sts)
Row 21-30             *[K7, P3]* - 5x (total 50 sts)

Repeat Rows 11-30 three more times (90 rows more)

Finish with 10 more rows (or as many as you need)

Row 121-130        *[K7, P3]* - 5x (total 50 sts)
Row 131                BO all sts

When you knit both sleeves, weave in all the ends. 


Copyright:
You may not sell my written pattern to anyone, and you may not publish it as your own.
However, you may sell a finished product (sweater/blouse/top) made by you.

Thank you.

***

DID YOU FIND ERRORS? Let me know on what page of my blog, and in which row by clicking HERE, and I will fix it as soon as I get to it. You can PM me on my FB Page HERE as well. Txs!
Also if you haven't subscribed to my HandmadeRukodelky Channel, you can do it HERE. There are many videos to be seen, too.

*******************************************************************************


Copyright page - click HERE


PLEASE, COMMENT ON YOUTUBE BELOW MY VIDEOS, AND/OR SHARE YOUR IMAGES OF YOUR RECREATED WORKS ON MY FB PAGE HERE :-)


Note: Most of the time I work as fast as I can to keep up with knitting and crocheting requests. I have to videotape, edit videos, then convert them & upload them to my channel. After that often I post on my blog patterns. I answer many questions, which means that often I work up to 16 hours a day. I would tremendously appreciate it IF anyone of you finds an error in the written pattern, so please, let me know - where (what rows) and what may be the problem. Many future knitters & crocheters from our artsy and crafty virtual world will thank you for your good deed, including myself.

BEEHIVE SWEATER

I knew this project would take a long time to finish when I started it at the end of Spring. Not only because knitting cables is more time-consuming than just simple knitting, but I tend to start other projects as well. So, if you want to knit this "Beehive Sweater," give yourself ample time to finish it on time. If you want to knit the sweater, you need to know how to cast on, how to knit "knit" and "purl" stitches, C4F and C4B stitches, and how to bind off. 

If you are attempting to knit cables for the first time, do not despair. I have several videos grouped into a playlist for this project. Yes, my videos can be lengthy at times. But if you feel you understand what I am demonstrating, skip those parts. And if you don't understand, what is happening, play the video again. I hope you will find these videos helpful.

I knitted this sweater in a rectangle way.  (See the diagram below). Sleeves can be knitted as rectangles or tapered. You decide if you want them wide, or more narrow around the wrist area.

I also would like to talk about how you can size this sweater. It seems that 12 rows and 16 stitches both measure three inches (3"). So, from this knowledge, draw a plan of how wide and long your sweater should be. Don't forget to consider that if you wash your finished sweater, it may stretch - my small size turned into nearly a medium size. However, my daughter loves this oversized and cozy gift. The sleeves are longer than I anticipated. I suggested to my daughter that I would shorten them - it would be no problem since they are knitted from the shoulder down toward the wrist. However, she refused me to fix "the problem." So with this knowledge, you can decide how many repeat cables in rows and stitches you prefer. Also, consider having the sweater dry cleaned.

Now, let me talk a little about the head opening. In the video, I am demonstrating the binding off 44 stitches. You can also see that I had to rip it because the head opening was too big (it would, most likely, work better for a larger person). Instead, the second time around, I bound off 36 stitches. (See the image above of how it looks after I washed the sweater). I feel it would be even better if I bound off 28 stitches, but my daughter loves it as it is. The binding off 28 stitches, few shoulder rows, and casting on 28 stitches would make the head opening hug the neck area, yet it would have enough space to pull the sweater over the head. So again, using this information, you can tailor your project to any person's body and what the person prefers.

I doubled the strands because I didn't have any chunky yarn at hand. However, I had nearly 2 kilos of Knit Picks DK Merino. You may replace it with chunky yarn if you wish. Perhaps you would love to use light and fluffy (chunky) yarn instead of merino. Then all you have to do is a swatch to make sure you will size your work correctly. 

Please, consider supporting my blog and YouTube Channel by shopping on Amazon via MY AFFILIATE LINK. Thank you if you purchase anything.


"BEEHIVE SWEATER" - PLAYLIST 4 RIGHT-HANDED KNITTERS

"BEEHIVE SWEATER" - PLAYLIST 4 LEFT-HANDED KNITTERS

STAY TUNED for the "Half-Balls" pattern (you can see them on the model in the design above). The remaining videos will be added as I finish editing them. ENJOY and share your work 😉🙂🌸


Size: Small (oversized), or Medium (more fitting)

Material:

  • Yarn - 16 skeins of KNIT PICKS, Bare - DOUBLED; Colors: Natural; DK (#3); 100% Merino; 246 yds/100g; (12 skeins for a sweater, and 4 skeins for 1/2 balls)
  • Knitting needles (straights, circulars, DPNs) #11 (8 mm)
  • Markers
  • Hook 6 mm
  • Yarn needle (to weave in the ends)
  • Scissors

Abbreviations:
CO - cast on
K - knit
P - purl
st, sts - stitch, stitches 
M - marker
C4F - make 2/2 cable while holding 2 sts on the cable needle in front of your knitting
C4B - make 2/2 cable while holding 2 sts on the cable needle in the back of your knitting
CCO - cable cast-on
BO - bind off

Cable Stitch Pattern Repeat


Gauge (cable):
3"x 3" = 16 sts x 12 rows

Step-by-Step Directions:

FRONT PART

CO 108 sts

Row 1            *[K4, P4]* - 13x,  K4, turn
Row 2            *[P4, K4]* - 13x,  P4, turn

Repeat Row 1 & 2 two more times (Row 3-6)

Note: From now on use knit sts only for the cables (knit sts on the right side, purl sts on the wrong side)

Row 7            K2, *[C4F, C4B]* - 13x, K2 (CABLE ROW #1)
Row 8            P108
Row 9            K
108
Row 10          P
108
Row 11          K108
Row 12          P108

Row 13          K2, *[C4B, C4F]* - 13x, K2 (CABLE ROW #2)
Row 14          P108
Row 15          K108
Row 16          P108
Row 17          K108
Row 18          P108

Repeat Rows 7-18 as many times as needed. I repeated these twelve rows 7x in total before starting my shoulder area. If you would like your sweater longer repeat Rows 7-18  one or more extra times.

Then repeat rows 7-13 again as such:

Row 7            K2, *[C4F, C4B]* - 13x, K2
Row 8            P108
Row 9            K
108
Row 10          P
108
Row 11          K108
Row 12          P108

Row 13          K2, *[C4B, C4F]* - 13x, K2

Then continue your front as such (NECK AREA RIBBING):

Row 14          K36, *[P4, K4]* - 4x,  P4, K36, turn
Row 15          P36, *[K4, P4]* - 4x,  K4, P36, turn
Row 16          K36, *[P4, K4]* - 4x,  P4, K36, turn
Row 17          P36, *[K4, P4]* - 4x,  K4, P36, turn
Row 18          K36, *[P4, K4]* - 4x,  P4, K36, turn
Row 19          P36, *[K4, P4]* - 4x,  K4, P36, turn

Work on the head opening = BO stitches in the middle as such:

Row 1            K2, *[C4F, C4B]* - 4x, next C4F - BUT knit only the 2 back (purl) sts !! and BO 2 knit sts; then BO 32 sts, THEN start your C4B - but BO 2 knit sts, then BO 1 purl st and knit 1 back (purl) sts (these two sts will be part of your shoulder, 36 sts) finish the row with *[C4F, C4B]* - 4x, and K2, turn 

At this point, you will turn your work around and work on the first shoulder part. 

SHOULDER #1

Row 2            P36
Row 3            K3
6
Row 4            P3
6
Row 5            K36
Row 6            P36
Row 7            K2, *[C4B, C4F]* - 4x, K2
Row 8            P36
Row 9            K3
6

DO NOT FASTEN OFF (don't cut off your yarn). 

With a different skein work on the second shoulder.

SHOULDER #2

Row 2            start working on the wrong side - attach a different skein; P36
Row 3            K3
6
Row 4            P3
6
Row 5            K36
Row 6            P36
Row 7            K2, *[C4B, C4F]* - 4x, K2
Row 8            P36
Row 9            K3
6

BACK PART

Continue working on your back part starting with the yarn on Shoulder #1:

Row 10            P36, CCO 36 sts, P36 sts from Shoulder #2  (Note: put a marker in this row on each side - this will be the middle mark for your future sleeves.)
Row 11            K108
Row 12            P108

Starting with Row 13 - repeat Cable Rows 7-18 (= "12-Row Repeat") from FRONT PART eight times (8x) in total. 
(If you knitted your front longer than the written pattern for the front, knit as many EXTRA "row repeats" as you did for the front part.)

After you knit your last "12-Row Repeat" finish your BACK PART with the last cable row and then 4/4 ribbing as such:

Row 1            K2, *[C4F, C4B]* - 13x, K2
Row 2            *[K4, P4]* - 13x,  K4, turn
Row 3            *[P4, K4]* - 13x,  P4, turn
Row 4            *[K4, P4]* - 13x,  K4, turn
Row 5            *[P4, K4]* - 13x,  P4, turn
Row 6            *[K4, P4]* - 13x,  K4, turn
Row 7            BO all sts, fasten off

SLEEVES - make 2 (one on each side of the sweater)

There are 4 ways to make your sleeves.

  1. Cast your stitches directly onto your front and back parts, then knit them in the round (use either DPNs or circulars)
  2. Cast your stitches directly onto your front and back parts, then knit them back and forth
  3. Knit them separately - cast your 78 stitches onto a knitting needle and knit them back and forth
  4. Knit them separately - cast your 78 stitches onto a circular needle (or DPN) and knit them in the round

If you choose to work back and forth (as in #2 & #3 ways), you will follow all odd rows (1, 3, 5.... etc) as written below. All your even rows (2, 4, 6... etc.) will be worked on the wrong side, which means you will purl every even row, except the 4/4 ribbing.

Cast on 78 stitches along the side of your front/back part. The middle of the sleeve width should correspond with the row where you casted-on for the back part and where you put your marker. You should CO 39 sts from the front and 39 sts from the back into EVERY row. (The tightness of the cable pattern makes the cast on nicely even and flat. There is no need to skip or add stitches. The seam should not be warped or pulling.) 

This sleeve pattern is for knitting in the round. Sleeves come out long. If you want them shorter you may adjust your rows.


After you CO your 78 sts, start knitting in the round (on DPNs or Circular needles) as such:

Rnd 1-3             K78


Rnd 4                   K3, *[C4B, C4F]* - 9x, K3
Rnd 5-9                K78
Rnd 10                 K3, *[C4F, C4B]* - 9x, K3
Rnd 11-14            K78
Rnd 15                 (decrease row) K1, K2tog, K72, SSK, K1 (76 sts)

Rnd 16                 K2, *[C4B, C4F]* - 9x, K2
Rnd 17-21            K76
Rnd 22                 K2, *[C4F, C4B]* - 9x, K2
Rnd 23-26            K76
Rnd 27                 (decrease row) K1, K2tog, K70, SSK, K1 (74 sts)

Rnd 28                  K1, *[C4B, C4F]* - 9x, K1
Rnd 29-33             K74
Rnd 34                  K1, *[C4F, C4B]* - 9x, K1
Rnd 35-39             K74
Rnd 40                  K1, *[C4B, C4F]* - 9x, K1
Rnd 41-44             K74
Rnd 45                   (decrease row) K1, K2tog, K68, SSK, K1(72 sts)

Rnd 46                   *[C4F, C4B]* - 9x
Rnd 47-51              K72

Rnd 52                   *[C4B, C4F]* - 9x
Rnd 53-57               K72
Rnd 58                   *[C4F, C4B]* - 9x
Rnd 59-63              K72

Rnd 64                   *[C4B, C4F]* - 9x
Rnd 65-69              K72
Rnd 70                   *[C4F, C4B]* - 9x
Rnd 71-75              K72

Rnd 76                   *[C4B, C4F]* - 9x
Rnd 77-83              *[K2, P4, K2]* - 9x

Rnd 84                    BO

Finishing:

Sew/crochet sides (= back to front) together, and weave in all the ends. If you desire, you could crochet half-balls (video coming soon), or buy acrylic pom-poms, and sew/tie them into the "dimples" between the cables.

CROCHETED HALF BALLS

Double the yarn.

To start: leave about 1 foot long tail, then wrap yarn around your index and middle finger (make magic loop) and croche into the loop as such: ch2, then make 7 (or eight) unfinished dc (only half way through) - you shoud have 8 (or nine) loops on your hook; then pull yarn through all 8 (9) loops, and make last chain (or rather knot). Pull on the yarn tight. Leaving second tail about 1 foot.

To finish - either color the "half balls" while still flat, OR pull on the first tail (the magic loop tail) to form the half ball and color then. 

As soon as I have this video edited you will be able to see it in the playlist above.


***

DID YOU FIND ERRORS? Let me know on what page of my blog, and in which row by clicking HERE, and I will fix it as soon as I get to it. You can PM me on my FB Page HERE as well. Txs!
Also if you haven't subscribed to my HandmadeRukodelky Channel, you can do it HERE. There are many videos to be seen, too.

*******************************************************************************


Copyright page - click HERE


PLEASE, COMMENT ON YOUTUBE BELOW MY VIDEOS, AND/OR SHARE THE IMAGES OF YOUR RECREATED WORKS ON MY FB PAGE HERE :-)


Note: Most of the time I work as fast as I can to keep up with knitting and crocheting requests. I have to videotape, edit videos, then convert them & upload them to my channel. After that often I post on my blog patterns. I answer many questions, which means that often I work up to 16 hours a day. I would tremendously appreciate IF anyone of you finds an error in the written pattern, so please, let me know - where (what rows) and what may be the problem. Many future knitters & crocheters from our artsy and crafty virtual world will thank you for your good deed, including myself.

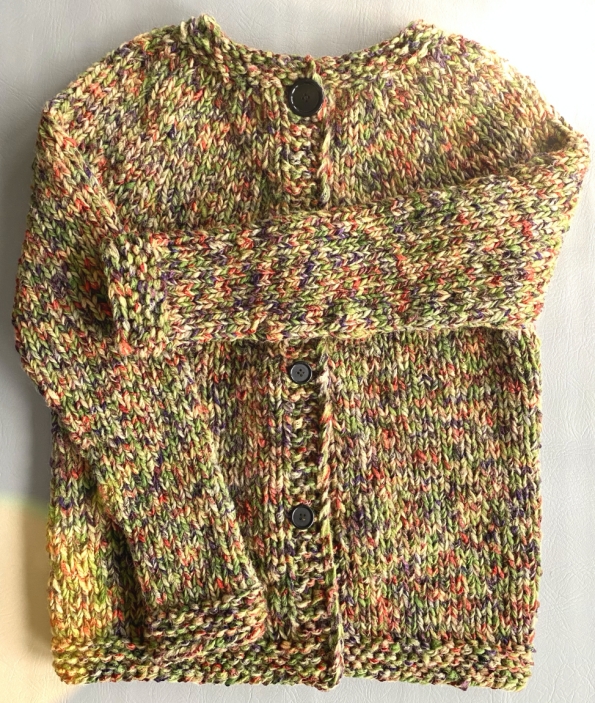
Knitted Chunky Sweater

I love yarn, and often I want to buy more. I search various yarn websites and marvel at all those beautiful skeins and dream what I could knit or crochet with them. But lately, I have been trying to be strict with myself. Seriously. I need to de-stash my yarn from all the hiding places. What can be quite sad is that by the time I get to knit some of the projects, the yarn is discontinued. Ugh, grrrr. 

I bought this extravagant-looking yarn about five years ago. Four bags. Twenty balls of a greenish and twenty balls of a pinkish color. About two weeks ago, I pulled out the yummy green one with orange and purple speckles. I thought: "This will make a nice warm sweater for my petite daughter." 

Here we are today - let me share a finished written pattern of the top-down sweater for XS/S women. Although the company discontinued this yarn, you may opt for another super bulky one, which yields 8 sts and 11 rows in 4", and you should be fine. Yes, the sweater will look different, but it will be your design knitted with my pattern.

f you are interested in watching my video about this sweater where I am presenting how to start a sleeve, you may click on one of the links below.

Please, consider supporting my blog and YouTube Channel by shopping on Amazon via MY AFFILIATE LINK. Thank you if you purchase anything.


VIDEO FOR RIGHTIES

VIDEO FOR LEFTIES 

Enjoy.


Materials:
16 balls of ARTFUL YARNS, Palace; 48% wool, 45% acrylic, 7% nylon; Color: 366; 50g/1.75 oz; 27 yds/ 24.7 m;
Knitting needles - circular and DPNs, US size #15, 10 mm
Hook 9mm (see the sleeve part in the video)
Yarn needle
Buttons

Abbreviations:
CO - cast on
KE - knit edge (= knit 4 sts for edge)
K - knit
K1tbl - knit one stitch through the back loop
sl1wyf - slip one (last) stitch with yarn in front 
P - purl
M1 - increase by making 1 st between the stitches
K2tog - knit 2 stitches together
YO - yarn over
SSK - slip knitwise, slip knitwise, knit both stitches through the back loop
BO - bind of your stitches


Size:
women XS/S

Measurements:


YOKE

CO 48 sts

Note: place buttonholes every 20, 22, or 24 rows after the first initial buttonhole in the seventh row. Your choice of how close/far together you would like to have them.

Row 1-4              K48
Row 5                 K1tbl, K3; *[M1, K4]* - 10x,  M1; K3, sl1wyf
Row 6                 K1tbl, K3; P51; K3, sl1wyf
Row 7                 K1tbl, K3; *[M1, K5]* - 10x, M1, K1; K2tog, YO (button hole), K1, sl1wyf
Row 8                 K1tbl, K3; P62; K3, sl1wyf
Row 9                 K1tbl, K3; K1, *[M1, K6]* - 10x,  M1, K1; K3, sl1wyf
Row 10               K1tbl, K3; P73; K3, sl1wyf
Row 11               K1tbl, K3; K2, *[M1, K7]* - 10x, M1, K1; K3, sl1wyf
Row 12               K1tbl, K3; P84; K3, sl1wyf
Row 13               K1tbl, K3; K6, *[M1, K8]* - 9x, M1, K6; K3, sl1wyf
Row 14               K1tbl, K3; P94; K3, sl1wyf
Row 15               K1tbl, K3; K94; K3, sl1wyf
Row 16               K1tbl, K3; P94; K3, sl1wyf
Row 17               K1tbl, K3; K6, *[M1, K9]* - 9x, M1, K7; K3, sl1wyf
Row 18               K1tbl, K3; P104; K3, sl1wyf
Row 19               K1tbl, K3; K104; K3, sl1wyf
Row 20               K1tbl, K3; P104; K3, sl1wyf
Row 21               K1tbl, K3; K7, *[M1, K10]* - 9x, M1, K7; K3, sl1wyf
Row 22               K1tbl, K3; P114; K3, sl1wyf
Row 23               K1tbl, K3; K114; K3, sl1wyf
Row 24               K1tbl, K3; P114; K3, sl1wyf
Row 25               K1tbl, K3; K114; K3, sl1wyf
Row 26               K1tbl, K3; P114; K3, sl1wyf
Row 27               K1tbl, K3; K8, *[M1, K11]* - 9x, M1, K7; K3, sl1wyf
Row 28               K1tbl, K3; P124; K3, sl1wyf
Row 29               K1tbl, K3; K124; K3, sl1wyf
Row 30               K1tbl, K3; P124; K3, sl1wyf
Row 31               K1tbl, K3; K124; K3, sl1wyf
Row 32               K1tbl, K3; P124; K3, sl1wyf
Row 33               K1tbl, K3; K19 ( front #1), move 24 sts on holder/string - stitches on your holder will be knitted later (sleeve #1), CO 2 sts, connect the front part to the back part by knitting next 38 sts, move 24 sts on holder/string - stitches on your holder will be knitted later (sleeve #2), CO 2 stsconnect the back part to the front part by knitting next 19 stitches (front #2); K3, sl1wyf

Note: you should have stitches as such:
EDGE: 4 sts;
FRONT: 19 sts; plus 
2 extra sts for underarm;
BACK: 38 sts; plus 
2 extra sts for underarm; 
FRONT: 19 sts; 
EDGE: 4 sts;

Also - if your arms' circumference is bigger add more underarm stitches, but remember to change the stitch count below.

The back of the sweater


BODY - repeat Row 1 & Row 2 many times until you have desired length. I knitted 14 inches (40 rows) measured from the underarm.

Row 1               K1tbl, K3; P80; K3, sl1wyf
Row 2               K1tbl, K3; K80; K3, sl1wyf

BOTTOM BODY EDGE

Row 1-6           K88 (After knitting your desired length of the body, knit 6 rows of garter stitch), BO your last row and weave in the tail


SLEEVES

Work in the round. Start with the underarm area (for reference RIGHTIES can watch my video HERE, and LEFTIES can watch the video HERE). There are 2 extra stitches (but it looks like there are 4 sts).

Rnd 1                Start in the middle of your underarm area - CO one stitch of the 2 underarm sts, then CO one extra stitch to close the gap between your CO stitch and the first stitch of the sleeve; then K24; then  CO 2 more sts - again closing the gap between the sleeve stitches and underarm stitches - total 28 stitches (4 CO + 4 sleeve sts)
Rnd 2-10            K28
Rnd 11                K2tog, K24, SSK
Rnd 12-20          K26
Rnd 21                K2tog, K22, SSK
Rnd 22-30          K24
Rnd 31                K2tog, K20, SSK
Rnd 32-40          K22
Rnd 41                K2tog, K18, SSK
Rnd 42-52          K20
Rnd 53                P20
Rnd 54                K20
Rnd 55                P20
Rnd 56                K20
Rnd 57                P20
Rnd 58                K20
Rnd 59                BO 20sts and weave in the tail

Copyright:
You may not sell my written pattern to anyone, and you may not publish it as your own.
However, you may sell a finished product (socks) made by you.

Thank you.

***

DID YOU FIND ERRORS? Let me know on what page of my blog, and in which row by clicking HERE, and I will fix it as soon as I get to it. You can PM me on my FB Page HERE as well. Txs!
Also if you haven't subscribed to my HandmadeRukodelky Channel, you can do it HERE. There are many videos to be seen, too.

*******************************************************************************


Copyright page - click HERE


PLEASE, COMMENT ON YOUTUBE BELOW MY VIDEOS, AND/OR SHARE YOUR IMAGES OF YOUR RECREATED WORKS ON MY FB PAGE HERE :-)


Note: Most of the time I work as fast as I can to keep up with knitting and crocheting requests. I have to videotape, edit videos, then convert them & upload them to my channel. After that often I post on my blog patterns. I answer many questions, which means that often I work up to 16 hours a day. I would tremendously appreciate IF anyone of you who finds an error in the written pattern, so please, let me know - where (what rows) and what may be the problem. Many future knitters & crocheters from our artsy and crafty virtual world will thank you for your good deed, including myself.

Granny Square No 5 - Flower

Today I am publishing another granny square for my crocheted "Foggy Dawn Sweater Project," this time it is a "Granny Square No 5". Just like Channel perfume No 5, it is feminine and romantic. This square has a 3D feel to it, with the flower centerpiece. It is not difficult once you understand the concept. I have a quite detailed (what else is new?) video that will help you with grasping the construction of this design. I am sure many of you, who are fairly new to crocheting, saw variations of this 3D flower and wondered how it is done. Do not let anything stop you from crocheting this 3D square. You can use it in any project no matter what weight of yarn, yarn type or color you chose. Use it for my sweater project, or make a baby blanket using as many "granny squares no 5" as needed. Give power to your imagination.

LINKS TO ALL VIDEOS REGARDING THIS PROJECT (INCLUDING THE INTRODUCTION):

BLOG POSTS WITH FREE PATTERNS REGARDING THIS PROJECT:
Size:
Granny Squares - approx. 6"
Sweater - build your size with as many squares as needed

Material:
Yarn - Loops & Threads; Snuggly Wuggly; 100% acrylic; weight light (sport) #3; 446 yards/408m; 5 oz/141g
Hook - F/5, 3.75mm
Yarn needle
Scissors

Abbreviations:
ch - chain stitch
sc - single crochet
hdc - half double crochet
dc - double crochet
st, sts - stitch, stitches
sl st - slip stitch
sp - space
ch2sp - two chains space
ch3sp - three chains space
ch4sp - four chains space
prev - previous

**********************************

Square #5 (3D Flower)

Foundation: ch7, join

Crochet in the round

Rnd 1          ch1, 16 sc in ring, join with sl st in first sc
Rnd 2          ch4 (counts as hdc + ch2), skip next st, *[1 hdc in next st, ch2, skip next st]* -  7x, join with a sl st in 2nd ch
Rnd 3          work on petals as such: ch1, in each ch3sp: (1 sc, 1 hdc, 3 dc, 1 hdc, 1 sc) - 8x, join with sl st into first ch st
Rnd 4          work in the back of petals as such:  bend the petal forward and make 1 back post sc around first ch2 stitch from Row 2, ch 4; then *[bend the petal forward and make 1 back post sc around hdc from Row 2, ch 4]* - 7x, join with sl st in first sc
Rnd 5          ch1, then in each ch4sp make (1 sc, 1 hdc, 5 dc, 1hdc, 1 sc) - 8x
Rnd 6          sl st in each of next 2 st, 1 sc in next st, *[ch3, skip 3 sts, 1 sc in next st, ch3, skip 4 st, 1 sc in next st, ch3, skip 3 sts, 1 sc in next st, ch4, skip 4 st, 1 sc in next st, ]* - 3x, then ch3, skip 3 sts, 1 sc in next st, ch3, skip 4 st, 1 sc in next st, ch3, skip 3 sts, 1 sc in next st, ch4, skip 4 st, join with a sl st in first sc

Edge:

Rnd 7 - start forming sides

side 1:
sl st into ch4sp, in ch3sp make ch2, 4 hdc, *[in next ch3sp make 5 hdc]* - 2x, in next ch4sp corner: (3dc, ch2, 3dc);
side 2, 3 and 4:
*[in next ch3sp make 5 hdc]* - 3x, in next ch4sp corner: (3dc, ch2, 3dc)
When finished with side 4 join with a sc in second ch st

Rnd 8

side 1:
*[ch3, skip 2 sts, 1 sc in next st, ch2, skip 2 sts, 1 sc in next st]* - 2x, ch3, skip 2 sts, 1 sc in next st,   in corner (3 hdc, ch2, 3hdc)
side 2, 3 and 4:
skip 2 sts, 1 sc in next st, *[ch3, skip 2 sts, 1 sc in next st, ch2, skip 2 sts, 1 sc in next st]* - 2x, ch3, skip 2 sts, 1 sc in next st, in corner (3 hdc, ch2, 3hdc)
When finished with corner of side 4 join with a sl st in first sc st

Rnd 9

side 1
sl st into first ch3sp, in ch3sp (ch3, 3 dc), ch2,*[skip ch2sp, 4 dc in ch3sp, ch2]* -  2x, then in corner: (3dc, ch2, 3 dc)
side 2, 3, & 4
ch2, skip ch2sp, *[4 dc in first ch3sp, ch2, skip ch2sp]* -  2x, 4 dc in ch3sp, ch2, then in corner: (3 dc, ch2, 3 dc)
When finished with side 4, make ch2 (for the space), join with a sl st in 3rd ch st of initial ch3

***

DID YOU FIND ERRORS? Let me know on what page of my blog, and in which row by clicking HERE, and I will fix it as soon as I get to it. You can PM me on my FB Page HERE as well. Txs!
Also if you haven't subscribed to my HandmadeRukodelky Channel, you can do it HERE. There are many videos to be seen, too.

*******************************************************************************


Copyright page - click HERE


PLEASE, COMMENT ON YOUTUBE BELOW MY VIDEOS, AND/OR SHARE YOUR IMAGES OF YOUR RECREATED WORKS ON MY FB PAGE HERE :-)


Note: Most of the time I work as fast as I can to keep up with knitting and crocheting requests. I have to videotape, edit videos, then convert them & upload them to my channel. After that often I post on my blog patterns. I answer many questions, which means that often I work up to 16 hours a day. I would tremendously appreciate IF anyone of you who finds an error in the written pattern, so please, let me know - where (what rows) and what may be the problem. Many future knitters & crocheters from our artsy and crafty virtual world will thank you for your good deed, including myself.

Granny Square No 4 - Shell Stitch - For Foggy Dawn Sweater Project

Another detailed video tutorial of our granny square for crocheters for our Foggy Dawn Sweater Project - this time it is a #4 shell stitch square. If you would like to make this sweater, click on the link "Introduction to this project" (see my link below) OR on one of the two links for a PLAYLIST (left-handed OR right-handed crocheters) so you can crochet along. All of my videos are quite detailed for anyone that needs help with crocheting. But if you are more experienced, use it just as a reference and skip over the parts that you know how to do - this way you don't get too bored.

Use this pattern for any project - my sweater, a granny square blanket, a scarf, or any other project that requires crocheted squares.

To crochet this square, you need to know how to crochet chain, slip stitch, single crochet stitch, and double crochet stitch.


LINKS TO ALL VIDEOS REGARDING THIS PROJECT (INCLUDING THE INTRODUCTION):

BLOG POSTS WITH FREE PATTERNS REGARDING THIS PROJECT:
Size:
Granny Squares - approx. 6"
Sweater - build your size with as many squares as needed

Material:
Yarn - Loops & Threads; Snuggly Wuggly; 100% acrylic; weight light (sport) #3; 446 yards/408m; 5 oz/141g
Hook - F/5, 3.75mm
Yarn needle
Scissors

Abbreviations:
ch - chain
dc - double crochet
sc - single crochet
st, sts - stitch, stitches
sl st - slip stitch
sp - space
ch2sp - two chain space
ch3sp - three chain space
prev - previous

**********************************

Square #4 (Shells)
Foundation: ch22

Row 1          1 dc into 6th ch from hook, *[skip next 2 ch sts, 5 dc in next st (shell st), skip next 2 sts, 1 dc in next ch st, ch 1, skip next ch st, 1 dc in next st]* - 2x, turn
Row 2          ch4 (counts as dc + ch1sp), skip next ch1sp, 1 dc in next st, *[skip next 2 ch sts, 5 dc in next st (shell st), skip next 2 sts, 1 dc in next st, ch 1, skip next ch st, 1 dc in next st]* - 2x, turn
Row 3-7       same as Row 2

Edge

Crochet in the round = around the perimeter of the square

Rnd 1

side 1
turn your work to crochet along the side as such: ch3 (counts as a sc + ch2), *[1 sc in st, ch3, 1 sc in st, ch2]* - 3x, in corner st: (1 sc, ch3, 1 sc)
side 2
turn your work  to crochet along the bottom of the square as such: ch2, 1 sc in dc st, ch3, 1 sc in the middle of the shell st base, ch2, 1 sc in dc st, ch3, 1 sc in next dc st, ch2, 1 sc in the middle of the shell st base, ch3, 1 sc in dc st, ch2, skip 1 ch st,   in next ch st (= corner): (1 sc, ch2, 1 sc)
side 3
turn your work  to crochet along the other side as such: ch2, *[1 sc in st, ch3, 1 sc in st, ch2]* - 3x, in 3rd ch st (= corner): (1 sc, ch3, 1 sc)
side 4
turn your work  to crochet along the top of the square as such: ch2, skip 1 st,  1 sc in dc from prev row, ch3, skip 2 sts, 1 sc in next st (= top of the shell st), ch2, skip 2 sts, 1 sc in dc from prev row, ch3, skip 1 st, 1 sc in dc from prev row, ch2, skip 2 sts, 1 sc in next st (= top of the shell st), ch3, skip 2 sts, 1 sc in dc from prev row, ch2, skip 1 st, then finish corner as such: 1 sc in dc from prev row (= your first corner, where you started with ch st), ch3, join with sl st

Working on the Edge - Row 1, Side 4


Rnd 2
keep working in the round:

side 1
sl st along ch2sp into ch3sp, then crochet ch3, 3 dc in same ch3sp, *[ch2, skip ch2sp, 4 dc in ch3sp]* - 2x, skip ch2sp, ch2, then in ch3sp/corner: (3 dc, ch2, 3 dc)
side 2, 3 & 4
*[ch2, skip ch2sp, 4 dc in ch3sp]* - 3x, skip ch2sp, ch2, in ch3sp/corner: (3 dc, ch2, 3 dc)
When finished with side 4, make ch2 and then join with a sl st in 3rd ch st of initial ch3


***

DID YOU FIND ERRORS? Let me know on what page of my blog, and in which row by clicking HERE, and I will fix it as soon as I get to it. You can PM me on my FB Page HERE as well. Txs!
Also if you haven't subscribed to my HandmadeRukodelky Channel, you can do it HERE. There are many videos to be seen, too.

*******************************************************************************


Copyright page - click HERE


PLEASE, COMMENT ON YOUTUBE BELOW MY VIDEOS, AND/OR SHARE YOUR IMAGES OF YOUR RECREATED WORKS ON MY FB PAGE HERE :-)


Note: Most of the time I work as fast as I can to keep up with knitting and crocheting requests. I have to videotape, edit videos, then convert them & upload them to my channel. After that often I post on my blog patterns. I answer many questions, which means that often I work up to 16 hours a day. I would tremendously appreciate IF anyone of you who finds an error in the written pattern, so please, let me know - where (what rows) and what may be the problem. Many future knitters & crocheters from our artsy and crafty virtual world will thank you for your good deed, including myself.
Granny Square No 3 - Mesh - For Foggy Dawn Sweater Project

Here is another detailed video tutorial of #3 mesh granny square for crocheters for our Foggy Dawn Sweater Project. If you would like to make this sweater, click on the link "Introduction to this project" below OR on one of the two links for a PLAYLIST (left-handed or right-handed crocheters), to crochet along. My videos are quite detailed for anyone that needs help with crocheting. But if you are more experienced, use it just as a reference and skip some of the parts so you don't get too bored.

Use this pattern for any project - my sweater, a granny square blanket, or any other project that requires crocheted squares.

To crochet this square, you need to know how to crochet chain, slip stitch, single crochet stitch, and double crochet stitch.


LINKS TO ALL VIDEOS REGARDING THIS PROJECT (INCLUDING THE INTRODUCTION):

BLOG POSTS WITH FREE PATTERNS REGARDING THIS PROJECT:


Note: To attach your granny squares as you go use all your ch2 spaces along one, two, three or even four sides as well as ch2 spaces in corners. Please be aware that in the video where I demonstrate how to crochet this square I crocheted ch3 in each corner of the last row, but changed the ch3 to ch2 in the written pattern below.

Size:
Granny Squares - approx. 6"
Sweater - build your size with as many squares as needed

Material:
Yarn - Loops & Threads; Snuggly Wuggly; 100% acrylic; weight light (sport) #3; 446 yards/408m; 5 oz/141g
Hook - F/5, 3.75mm
Yarn needle
Scissors

Abbreviations:
ch - chain
dc - double crochet
sc - single crochet
sl st - slip stitch
sp - space
dc sp - double crochet space
ch1sp - one chain space
ch2sp - two chain space
ch3sp - three chain space

**********************************

Square #3 (Mesh)
Foundation: ch27

Row 1          make 1 dc into 9th ch from the hook, *[ch2, skip 2 sts, 1 dc in next st]* - 6x, turn
Row 2          ch5, skip 2 sts, 1 dc in next st, *[ch2, skip 2 sts, 1 dc in next st]* - 5x, then ch2, skip 2 ch sts, make 1 dc into 3rd ch, turn
Row 3-7       same as Row 2

Edge:

Crochet in the round

Rnd 1

side 1
turn your turn your work to crochet along 1st side as such: ch2, 2 sc in the sp, *[1 sc in the ch st, 2 sc in sp]* - 5x, 1 sc in ch st, then in last sp/corner: (2 sc, ch3, 2 sc);
side 2 & 3
turn your turn your work to crochet along 2nd and 3rd sides as such: *[1 sc in the ch st, 2 sc in sp]* - 5x, 1 sc in ch st, then in last sp/corner: (2 sc, ch3, 2 sc);
side 4
turn your work to crochet along 4th side: *[1 sc in the ch st, 2 sc in sp]* - 5x, 1 sc in ch st, then in last sp/corner: (2 sc, ch3, join to the initial 2nd ch with sl st);

Rnd 2

side 1
turn your work to crochet along 1st side: ch2, skip 1 sts, 1 sc in next st, *[ch3, skip 3 sts, 1 sc in next st, ch1, skip 1 sts, 1 sc in next st]* - 2x, ch3, skip 3 sts, 1 sc in next st, ch1, then in the ch3sp corner: (1 sc, ch3, 1 sc);
side 2-3
turn your turn your work to crochet along 2nd and 3rd sides as such: ch1, skip 1 sts, 1 sc in next st, *[ch3, skip 3 sts, 1 sc in next st, ch1, skip 1 sts, 1 sc in next st]* - 2x, ch3, skip 3 sts, 1 sc in next st, ch1, then in the ch3sp corner: (1 sc, ch3, 1 sc);
side 4
turn your work to crochet along 4th side: ch1, skip 1 sts, 1 sc in next st, *[ch3, skip 3 sts, 1 sc in next st, ch1, skip 1 sts, 1 sc in next st]* - 2x, ch3, skip 3 sts, 1 sc in next st, ch1, then in the ch3sp corner: (1 sc, ch3, 1 sc, join with sl st in initial first ch);

Rnd 3

side 1
turn your work to crochet along 1st side: slip stitch into ch3sp, in ch3sp crochet ch3,  3dc, ch2, *[then in ch3sp crochet 4dc, ch2]* - 2x, then in the ch3sp corner: (3 dc, ch2, 3 dc);
side 2, 3 and 4
turn your turn your work to crochet along 2nd, 3rd, and 4th sides as such: *[ch2, 4 dc]* - 3x, then ch2 and in the ch3sp corner: (3 dc, ch2, 3 dc); join the 4th side to 1st side as such: ch2, then sl st in 3rd ch of initial ch3


Note: In the video, while I videotaped my last row in SOME of these videos I worked my corner stitches as such: (3 dc, ch3, 3 dc). As I made more of these squares I changed the corner to (3 dc, ch2, 3 dc) - one less chain stitch in the corner. It is better for joining the squares. Thank you for understanding.

***

DID YOU FIND ERRORS? Let me know on what page of my blog, and in which row by clicking HERE, and I will fix it as soon as I get to it. You can PM me on my FB Page HERE as well. Txs!
Also if you haven't subscribed to my HandmadeRukodelky Channel, you can do it HERE. There are many videos to be seen, too.

*******************************************************************************


Copyright page - click HERE


PLEASE, COMMENT ON YOUTUBE BELOW MY VIDEOS, AND/OR SHARE YOUR IMAGES OF YOUR RECREATED WORKS ON MY FB PAGE HERE :-)


Note: Most of the time I work as fast as I can to keep up with knitting and crocheting requests. I have to videotape, edit videos, then convert them & upload them to my channel. After that often I post on my blog patterns. I answer many questions, which means that often I work up to 16 hours a day. I would tremendously appreciate IF anyone of you who finds an error in the written pattern, so please, let me know - where (what rows) and what may be the problem. Many future knitters & crocheters from our artsy and crafty virtual world will thank you for your good deed, including myself.

Granny Square No 2 - Corner 2 Corner - For Foggy Dawn Sweater

In today's post, I will introduce to you my second granny square for "Foggy Dawn" sweater. This "corner to corner" granny square is unusual, and although as you crochet this square it may seem that it is a diamond - but proper stretching by hand or blocking will help you shape it into a square.
You have to know how to crochet: chain, sl st, single crochet, double crochet, and puff stitch. You can follow my written pattern or crochet along my video (see links below).


Stay tuned for a few more granny squares (including video tutorials in my YouTube Channel) to make your sweater unique.


LINKS TO ALL VIDEOS REGARDING THIS PROJECT (INCLUDING THE INTRODUCTION):

BLOG POSTS WITH FREE PATTERNS REGARDING THIS PROJECT:

Note: To attach your granny squares as you go use all your ch2 spaces along one, two, three or even four sides as well as ch2 spaces in corners. Please be aware that in the video where I demonstrate how to crochet this square I crocheted ch3 in each corner of the last row, but changed the ch3 to ch2 in the written pattern below.

Size:
Granny Squares - approx. 6"
Sweater - build your size with as many squares as needed

Material:
Yarn - Loops & Threads; Snuggly Wuggly; 100% acrylic; weight light (sport) #3; 446 yards/408m; 5 oz/141g
Hook - F/5, 3.75mm
Yarn needle
Scissors

Abbreviations:
ch - chain
dc - double crochet
sc - single crochet
sl st - slip stitch
YO - yarn over
sp - space
dc sp - double crochet space
ch1sp - one chain space
ch2sp - two chain space
ch3sp - three chain space
ch4sp - fourth chain space
ch5sp - five chain space
ch6sp - six chain space
puff-1 - puff stitch #1: YO and insert the hook into the next stitch (or space). YO and pull through to the height of dc - repeat this process 3 times and you will end up with 6 loops plus an initial stitch on your hook. YO and pull through 6 loops, YO and pull through last 2 stitches on the hook
puff-2 - puff stitch #2: YO and insert the hook into the next stitch (or space). YO and pull through to the height of dc - repeat this process 4 times and you will end up with 8 loops plus an initial stitch on your hook. YO and pull through 8 loops, YO and pull through last 2 stitches on the hook
prev - previous
5-dc st - 5 double crochet stitch
bobble - (yarn over and insert the hook into the chain space, yarn over and pull through, yarn over and pull through two loops) - 3x - you will end up with 4 loops on your hook (including stitch on hook), then yarn over and pull through all of the loops on the hook


**********************************

Square #2 (C2C)
Foundation: ch6, join

Row 1           ch3, 5 dc in the ring, turn
Row 2           ch4 (4th chain acts as a ch1sp),  *[in each st: 1 dc, ch1]* - 4x, 1 dc in 3rd ch st of ch4 (5 ch1sps), turn
Row 3           ch4,  *[puff st in ch1sp, ch1]* - 5x, 1 dc in 3rd ch st of ch4 (5 puff-1 sts), turn
Row 4           ch4,  *[in each ch1sp: 1 dc, ch1]* - 3x, 1dc in 3rd puff-1 from prev row, ch1, *[in each ch1sp: 1 dc, ch1]* - 3x, 1 dc in 3rd ch st of ch4 (8 ch1sps), turn
Row 5           ch4,  *[puff-1 in ch1sp, ch1]* - 8x, 1 dc in 3rd ch st of ch4 (8 puff-1 sts + 9 ch1sp), turn
Row 6           ch4, *[in each ch1sp: 1 dc, ch1]* - 9x, 1 dc in 3rd ch st of ch4 (10 ch1sps), turn
Row 7           ch4,  *[puff-1 st in ch sp, ch1]* - 10x, 1 dc in 3rd ch st of ch4 (10 puff-1 sts + 11 ch1sp), turn
Row 8           ch3, *[2 dc in ch1sp, 1 dc into puff]* - 10x, 1 dc in ch1sp, 1 dc in 3rd ch st of ch4 (total ch3 + 32 dc), turn
Row 9           *[ch5, 1 sc in 4th dc]* - 7x, ch2, 1 dc in 3rd ch st of ch3 from prev row (8 loops)
Row 10         *[ch5, 1 sc in ch5sp]* - 6x, ch2, 1 dc in last ch5sp from prev row (7 loops)
Row 11         *[ch5, 1 sc in ch5sp]* - 5x, ch2, 1 dc in last ch5sp from prev row (6 loops)
Row 12         *[ch5, 1 sc in ch5sp]* - 4x, ch2, 1 dc in last ch5sp from prev row (5 loops)
Row 13         *[ch5, 1 sc in ch5sp]* - 3x, ch2, 1 dc in last ch5sp from prev row (4 loops)
Row 14         *[ch5, 1 sc in ch5sp]* - 2x, ch2, 1 dc in last ch5sp from prev row (3 loops)
Row 15         *[ch5, 1 sc in ch5sp]* - 1x, ch2, 1 dc in last ch5sp from prev row (2 loops)
Row 16         ch5, 1 sl st in ch5sp (1 loop) turn and continue with an edge

Edge:

Crochet in the round

side 1
sl st into ch5sp and make ch3, then make 2 dc, ch2, 3 dc in the same ch5sp, continue crocheting along the 1st side of the square as such: *[ch2, skip sp, 4 dc into next sp]* - 3x, ch2, skip sp; then in ch3 from Row 8 make (3 dc, ch2, 3 dc);
side 2
then continue along the 2nd side with puff sts as such: *[ch2, skip sp, 4 dc into next sp]* - 3x, ch2, skip sp; then in the initial ch8 ring make (3 dc, ch2, 3 dc);
side 3
then continue along the 3rd side with puff sts as such: *[ch2, skip sp, 4 dc into next sp]* - 3x, ch2, skip sp; then in ch3 from Row 8 make (3 dc, ch2, 3 dc);
side 4
finish crocheting along the 4th side of the square as such: *[ch2, skip sp, 4 dc into next sp]* - 3x, ch2, skip sp; join with sl st into 4th ch at the beginning of the edge.


Note: In the video, while I videotaped my last row in SOME of these videos I worked my corner stitches as such: (3 dc, ch3, 3 dc). As I made more of these squares I changed the corner to (3 dc, ch2, 3 dc) - one less chain stitch in the corner. It is better for joining the squares. Thank you for understanding.

***

DID YOU FIND ERRORS? Let me know on what page of my blog, and in which row by clicking HERE, and I will fix it as soon as I get to it. You can PM me on my FB Page HERE as well. Txs!
Also if you haven't subscribed to my HandmadeRukodelky Channel, you can do it HERE. There are many videos to be seen, too.

*******************************************************************************


Copyright page - click HERE


PLEASE, COMMENT ON YOUTUBE BELOW MY VIDEOS, AND/OR SHARE YOUR IMAGES OF YOUR RECREATED WORKS ON MY FB PAGE HERE :-)


Note: Most of the time I work as fast as I can to keep up with knitting and crocheting requests. I have to videotape, edit videos, then convert them & upload them to my channel. After that often I post on my blog patterns. I answer many questions, which means that often I work up to 16 hours a day. I would tremendously appreciate IF anyone of you who finds an error in the written pattern, so please, let me know - where (what rows) and what may be the problem. Many future knitters & crocheters from our artsy and crafty virtual world will thank you for your good deed, including myself.