Search This Blog and The Web

Showing posts with label Gifts. Show all posts

CROCHETED WOOL BOOTS WITH RUBBER SOLES

I crocheted boots before, but never a pair with rubber soles. And let me tell you, this was a challenge. I had to pull a thick yarn through a very tight cotton string base on the rubber soles. 
I started first with a yarn needle. That didn't work, so II switched to a 1.65 mm stainless steel hook. That worked, but I destroyed it after working on my first boot. I tossed it and went rummaging into my hook box. I found another stainless steel hook, this time a 2 mm one. This hook worked out fine, but it was harder to push it through and then pull it out with the yarn. I worked slowly to distribute all slip stitches (my base) evenly. I pulled 51 slip stitches on my first boot but 52 on my second. I solved my problem by crocheting two single crochet stitches together in the second row in order to have both my boots sized identically.
When I was attaching the top part (instep), I made sure I achieved the same number of stitches for both ankles. Each boot took me one day to finish. I think these boots would make a great gift. 

You may not be able to find the same yarn (I bought it a while ago) - I pulled it out of my considerable stash. I would suggest using any ribbon type of yarn because my yarn is in a shape of a ribbon.

ALSO:
Please, consider supporting my blog and YouTube Channel by shopping on Amazon via MY AFFILIATE LINK. Thank you if you purchase anything. And I mean anything. Just click on the link and purchase anything you need. It won't cost you anything extra and I will get a tiny portion of the sale. 💛

Material:

  • 7+ balls (depending on the size of the shoe) of ARTFUL YARNS, Palace, Super Bulky Weight; 48% wool,45% acrylic, 7% nylon; 50g; approx. 27 yards. OR any ribbon-like yarn.
  • Hooks: 2 mm stainless steel (for the foundation around the rubber sole's perimeter) and 6 mm to crochet the boot
  • Rubber soles (I bought mine from Etsy, which was shipped to me from Spain)
  • Scissors
  • Yarn Needle (for weaving in the tails)

Size:
Women's shoe EU 35 (US size 5; 22 cm foot length)
Height of the boot - 7"
Circumference at the top of the boot 11"
However, you can adjust your rows to different sizes and heights of your boots.

Gouge:
2" = 8 sts
1.5" = 3 double crochet rows

Abbreviations:
RS - right side
WS - wrong side
ch - chain
sl st - slip stitch
sc - single crochet
hdc - half double crochet
2 sctog - two single crochet together
st, sts - stitch, stitches
prev - previous

Step-by-Step Directions:

Make 2 of each: Sole Inserts, Instep Pieces, and Boots.

SOLE INSERTSMake 2 identical, but use one on the right side and the other on wrong side

I used my sole as a template for my increases and decreases

I made my sole inserts a little bigger than the rubber soles so I could connect them together with the first row while crocheting the boot.
I used my rubber soles as my template in order to crochet the shape of the sole, which means I increased or decreased according to the shape, checking in each row. In order to make an identical sole I penned down all my rows - this is how I proceeded:

Foundation - ch5

Row 1                 (RS) insert hook into 2nd ch from hook - make 1 sc, then 1 sc in each stitch to end (total 4 sc), turn
Row 2                 (WS) 2 sc in first st, then 1 sc in each stitch to end (5 sc), turn
Row 3                 2 sc in first st, then 1 sc in each stitch to end (6 sc), turn
Row 4                 1 sc in each of 3 stitches, in next st 2 sc, 1 sc in each of 2 stitches, turn
Row 5                 1 sc in each of 3 stitches, in next st 2 sc, 1 sc in each of 3 stitches  (8 sc), turn
Row 6                 1 sc in each of 4 stitches, in next st 2 sc, 1 sc in each of 3 stitches  (9 sc), turn
Row 7-9              1 sc in each of 9 stitches (9 sc), turn
Row 10               1 sc in each of 4 stitches, next 2 sc tog, 1 sc in each of 3 stitches (8 sc), turn
Row 11               1 sc in each of 8 stitches (8 sc), turn
Row 12               1 sc in each of 3 stitches, next 2 sc tog, 1 sc in each of 3 stitches (7 sc), turn
Row 13-19          1 sc in each of 7 stitches (7 sc), turn
Row 20               1 sc in each of 2 stitches, next 2 sc tog, 1 sc in each of 3 stitches (6 sc), turn
Row 21-22          1 sc in each of 6 stitches (6 sc), turn
Row 23               *[1 sc, next 2 sctog]* - 2x,  (4 sc),  fasten off


INSTEP - TOP OF THE BOOT

The bottom piece is my INSTEP piece (top of the boot)

Foundation - ch5

Row 1                1 sc into 2nd ch from hook, 1 sc in each ch st to end, turn (total 4 sts)
Row 2                2
 sc into 1st st, 1 sc in each of the next 2 sts, 2 sc into last st to, turn (6 sts)
Row 3                1 sc in each of the next 6 sts, turn (6 sts)
Row 4                2 sc in 1st st, 1 sc in each of the next 4 sts, 2 sc in last st, turn (8 sts)
Row 5-8            1 sc in each of the next 8 sts, turn (8 sts)
Row 9                1 sc into in each of the next 3 sts, 2 sc in next, 1 sc into in each of the next 4 sts, turn (9 sts)
Row 10              1 sc in each of the next 9 sts, turn (9 sts)
Row 11              1 sc into in each of the next 4 sts, 2 sc in next, 1 sc into in each of the next 4 sts, turn (10 sts)
Row 12              1 sc in each of the next 10 sts, turn (10 sts)

Fasten off your yarn

BOOT

Note: My starting point was at the back (heel) of the rubber sole.

Prep your rubber sole by crocheting slip stitches around the entire perimeter of the sole. For this hard job I used a 1.65 mm hook, which I inserted under each thread (on the side of the rubber sole) and pulled a loop big enough to make a slip stitch, I skipped the next thread, and then I made another slip stitch. I continued this way around, which means each time I skipped one thread and made a slip stitch in the next one.

I was able to make 51 stitches slip stitches around. Place your SOLE INSERT inside the rubber sole - you will crochet both together. Make sure the SOLE INSERT is placed correctly

    The Foot Area

Rnd 1                1 hdc into each slip st and to the side of the crocheted SOLE INSERT (to end)
                          Note: don't use slip st, just continue crocheting in a spiral pattern

This is how finished Rnd 1 looks like


Rnd 2
                1 sc into each hdc (to end)
Rnd 3                1 sc into each sc from prev row (to end)

Place the INSTEP (see above) over the front part of the shoe and pin it so it doesn't shift. Make sure it is not crooked. Make sure that you will place the second INSTEP on the other boot exactly the same way.

Instep before & after crocheted together with the boot

Rnd 4                1 sc into each sc from prev row until you reach the INSTEP part, then crochet around 1 sc into sc and the side of the crocheted INSTEP, then continue with 1 sc into each sc from prev row to last st before the row ends

    The Ankle Area

Rnd 5                Decrease by crocheting the last sc and 1st sc stitches together (= 2 sctog), then 1 sc into each stitch until you have one stitch before the INSTEP part (corner),  decrease again by crocheting last sc st on the side and the first sc Instep stitch together, then crochet across to last Instep sc st and decrease in that corner again with 2 sctog, finish the row with 1 sc into each sc from prev row (to end)


The green arrows represent the ankle ("tube") part,
the yellow arrows point to the 2 sctog in Rnd 5


Rnd 6-11           1 sc into each sc from prev row (I ended up with 26 ankle stitches)
Rnd 12              2 sc in first st, then 1 sc into each sc from prev row (27 sts)
Rnd 13              1 sc into each sc from prev row  (27 sts)
Rnd 14              2 sc in first st, then 1 sc into each sc from prev row (28 sts)
Rnd 15-17        1 sc into each sc from prev row (28 sts)
Rnd 18             1 sc into each sc from prev row until 5 sts from end, then do 1 sl st into each sc from prev row, fasten off (23 sts + 5 sl sts), weave in all tails


***

DID YOU FIND ERRORS? Let me know on what page of my blog, and in which row by clicking HERE, and I will fix it as soon as I get to it. You can PM me on my FB Page HERE as well. Txs!
Also if you haven't subscribed to my HandmadeRukodelky Channel, you can do it HERE. There are many videos to be seen, too.

*******************************************************************************


Copyright page - click HERE


PLEASE, COMMENT ON YOUTUBE BELOW MY VIDEOS, AND/OR SHARE THE IMAGES OF YOUR RECREATED WORKS ON MY FB PAGE HERE :-)


Note: Most of the time I work as fast as I can to keep up with knitting and crocheting requests. I have to videotape, edit videos, then convert them & upload them to my channel. After that often I post on my blog patterns. I answer many questions, which means that often I work up to 16 hours a day. I would tremendously appreciate it IF anyone of you finds an error in the written pattern, so please, let me know - where (what rows) and what may be the problem. Many future knitters & crocheters from our artsy and crafty virtual world will thank you for your good deed, including myself.

SOCKS FOR 9 INCH LONG FOOT - WITH CAST ON 56 STITCHES

This is my standard, simple sock pattern, where I knit the heel and the toe area with a complementary color. For my complimentary color, I use usually a leftover sock yarn of the same thickness. In these socks, I also added a stripe in my ribbing for an extra effect.

I love my sock cuff to be knitted long, and stretchy all the way down to my ankles - to keep my leg warm.

If you would like to watch my sock musings - HERE IS THE VIDEO that I recorded for my New Year 2022. In it, I talk about these particular socks as well.

I also have SOCK playlists:

For RIGHT HANDED-KNITTERS HERE

and for LEFT-HANDED KNITTERS HERE


Please, consider supporting my blog and YouTube Channel by shopping on Amazon via MY AFFILIATE LINK. Thank you if you purchase anything.


Material:

  • Approximately 400 m of any combination sock yarn; I used one ball of MC - Mayflower 1 Class, 75% Wool/25% Nylon, 210 m, 50 grams; for CC I used leftovers of ONline, Supersocke 100, Color - Savanne, Fingering, 75% Wool/25% Polyamide - about 140 m (total 420 m/100 grams in the ball)
  • DPNs, or long Circulars Knitting Needles #2 (2.75 mm) - if you knit loosely then 2.5mm needles
  • Scissors
  • Yarn Needle (for Kitchener Stitch & for weaving in the tails)


Size:
  • Shoe size: ~ US size 7-8
  • Ankle Area: ~ circumference of K1/P1 ribbing is 5"(unstretched) to ~10" (stretched)
  • Ribbing (Cuff) Height: 6.75” or make your preferred height
  • Heel Flap: 2.25" (reinforced flap - 28 rows)
  • Sole width: 4” flat; (circumference is ~ 8”)
  • Length of the sole heel to toe: 9” (you can make it longer if you chose so)


Gouge (stockinette stitch):

  • on knitting needles size US #2 (2.75 mm) - 2"x2" = 15 sts x 21 rows


Abbreviation:

DPN(s) - double-pointed needle(s)
CO - cast on
MC - main color
CC - complimentary color
K - knit
P - purl
sl 1st st - slip first stitch purl-wise
SSK - slip knit-wise, slip knit-wise, and then knit them together through the back loop
P2tog - purl two stitches together
K2tog - knit two stitches together
wyb-slPst - with yarn in back slip purl stitch purl-wise
RS - right side
WS - wrong side
st(s) - stitch(es)
N1, N2, N3, N4 - if knitting with DPNs - needle #1, #2, #3, #4 respectively


Step-by-Step Directions:

We will work in sections (the cuff, the flap, the turning heel, the gusset, the foot, the toe part) and each of these sections will start with Row 1.

Make 2 identical socks.

Foundation: on knitting needles size US #2 (2.75 mm) cast on 56 stitches

The Cuff

Rnd 1          *[K1, P1]* - to end of the row, then distribute the stitches evenly, among 4 DPNs (or use either 2 pairs of short circular needles or circular needles with a long cable), without twisting your knitted row, connect needles into a circle, start knitting in the round

Rnd 2-70      *[K1, P1]* - to end of each row. Make your cuff as long as you want. I knitted this cuff really tall, about 7.5" tall

Do not cut off  MC - you will continue working with it on the gusset and part of your sock after you are finished with Turning The Heel.

The Heel Flap

NOTE: For the Heel Flap & Turning The Heel I used CC. 

If knitting on DPN's divide your stitches as such: needle #1 -28 sts, needles #2 and #3 - 14 sts each. If you are using circular needles you most likely have stitches divided to 28 + 28 between your magic loops. Work on your first 28 sts (needle #1) only, back and forth (NOT in the round) as such:

Row 1            (RS) *[K1, P1]* - repeat to end, turn
Row 2            (WS) *[K1, wyb-slPst]* - repeat to last 2 sts, then K1, P1

Repeat these 2 rows thirteen more times (total 14x = 28 rows)


Turning The Heel (row by row)

Keep working your sock with CC back and forth (NOT in the round), starting with Row 1. 


Row 1         (RS) sl. 1st st, K15, SSK, K1, (9 sts left on the needle), turn
Row 2         (WS) sl. 1st st, P5, P2tog, P1, (9 sts left on the needle), turn
Row 3         (RS) sl. 1st st, K6, SSK, K1, (7 sts left on the needle), turn
Row 4         (WS) sl. 1st st, P7, P2tog, P1, (7 sts left on the needle), turn
Row 5         (RS) sl. 1st st, K8, SSK, K1, (5 sts left on the needle), turn
Row 6         (WS) sl. 1st st, P9, P2tog, P1, (5 sts left on the needle), turn
Row 7         (RS) sl. 1st st, K10, SSK, K1, (3 sts left on the needle), turn
Row 8         (WS) sl. 1st st, P11, P2tog, P1, (3 sts left on the needle), turn
Row 9         (RS) sl. 1st st, K12, SSK, K1, (1 sts left on the needle), turn)
Row 10       (WS) sl. 1st st, P13, P2tog, P1, (1 sts left on the needle), turn
Row 11       (RS) sl. 1st st, K14, SSK,  (0 sts left on the needle), turn
Row 12       (WS) sl. 1st st, P14, P2tog, (0 sts left on the needle), fasten off yarn (16 sts)

The Gusset (in the round)

Note: For the gusset and the part of the foot (excluding the toe area), use MC color.
You will work from now on RS only in the round. 


You should have 16 sts on your needle #1, and you are ready to pick up stitches along the sides of your flap. Note: If you are knitting on DPNs you will need 5 knitting needles to continue knitting this sock. If you are using circular needles insert markers between the 17-16-17-28 sts (while you're picking up your stitches on the side) to keep track of your sections. 

You will proceed as such:

  • N1 - turn your sock sideways and pick up 17 stitches with MC along the first side - distribute these 17 sts evenly, making sure there are no "holes" between the needles; (this will be the BEGINNING of the row now)
  • N2 - then knit 16 sts; (the "turning the heel stitches")
  • N3 - turn your sock sideways and pick up 17 stitches along the second side - distribute these 17 sts evenly; (second side of the flap)
  • N4 - then K28; (top of the foot - combined needles #2 & #3); 

Note: You should have 78 sts total. Now, we have to decrease stitches on both sides of your flap to get back to 56 sts total on all four needles (or on your circular needles). Do it as such:

Rnd 1            (N1) SSK, K15; (N2) K16; (N3) K15, K2tog; (N4) K28 (76 sts)
Rnd 2            (N1) SSK, K14; (N2) K16; (N3) K14, K2tog; (N4) K28 (74 sts)
Rnd 3            (N1) SSK, K13; (N2) K16; (N3) K13, K2tog; (N4) K28 (72 sts)
Rnd 4            (N1) SSK, K12; (N2) K16; (N3) K12, K2tog; (N4) K28 (70 sts)
Rnd 5            (N1) SSK, K11; (N2) K16; (N3) K11, K2tog; (N4) K28 (68 sts)
Rnd 6            (N1) SSK, K10; (N2) K16; (N3) K10, K2tog; (N4) K28 (66 sts)
Rnd 7            (N1) SSK, K9; (N2) K16; (N3) K9, K2tog; (N4) K28 (64 sts)
Rnd 8            (N1) SSK, K8; (N2) K16; (N3) K8, K2tog; (N4) K28 (62 sts)
Rnd 9            (N1) SSK, K7; (N2) K16; (N3) K7, K2tog; (N4) K28 (60 sts)
Rnd 10          (N1) SSK, K6; (N2) K16; (N3) K6, K2tog; (N4) K28 (58 sts)
Rnd 11          (N1) SSK, K5; (N2) K16; (N3) K5, K2tog; (N4) K28 (56 sts)


The Foot Part

Note: If you need to, reshuffle your stitches on your DPNs for ease of knitting. Each of my DPN had 14 sts. If you are knitting on circular needles, put a marker in the beginning and after 28th st. Knit as many rows as needed - for US foot size 7.5 I knitted 50 rows.

Rnd 1-44                K56

Note: Before you will start your toe part knit 6 rows with CC color (or a few more if you need your socks a tad longer). Then keep knitting the Toe Part with CC. 

Rnd 45-50              (CC) K56


The Toe Part

Rnd 1                    *[K2, K2tog, K20, SSK, K2]* - 2x
Rnd 2-3                 K52
Rnd 4                    *[K2, K2tog, K18, SSK, K2]* - 2x
Rnd 5-6                 K48
Rnd 7                    *[K2, K2tog, K16, SSK, K2]* - 2x
Rnd 8-9                 K44
Rnd 10                 *[K2, K2tog, K14, SSK, K2]* - 2x
Rnd 11-12             K40
Rnd 13                 *[K2, K2tog, K12, SSK, K2]* - 2x
Rnd 14                 K36
Rnd 15                 *[K2, K2tog, K10, SSK, K2]* - 2x
Rnd 16                 K32
Rnd 17                 *[K2, K2tog, K8, SSK, K2]* - 2x
Rnd 18                 *[K2, K2tog, K6, SSK, K2]* - 2x (24 sts)


To Finish Each Sock:

Move the first 12 sts onto one DPN, then move the last 12 sts onto another DPN, cut off about a foot-long tail, thread it into your yarn needle, and using the Kitchener Stitch close the toe gap. Weave in all the ends/tails. Then wear it or gift it.


My Other Project:

TINY HAT AND SOCKS FOR NEWBORN TWINS
Tiny Hat and Socks For Newborn Twins - HandMadeRukodelky ©2020


Copyright:
You may not sell my written pattern to anyone, and you may not publish it as your own.
However, you may sell a finished product (socks) made by you.

Thank you.

***

DID YOU FIND ERRORS? Let me know on what page of my blog, and in which row by clicking HERE, and I will fix it as soon as I get to it. You can PM me on my FB Page HERE as well. Txs!
Also if you haven't subscribed to my HandmadeRukodelky Channel, you can do it HERE. There are many videos to be seen, too.

*******************************************************************************


Copyright page - click HERE


PLEASE, COMMENT ON YOUTUBE BELOW MY VIDEOS, AND/OR SHARE YOUR IMAGES OF YOUR RECREATED WORKS ON MY FB PAGE HERE :-)


Note: Most of the time I work as fast as I can to keep up with knitting and crocheting requests. I have to videotape, edit videos, then convert them & upload them to my channel. After that often I post on my blog patterns. I answer many questions, which means that often I work up to 16 hours a day. I would tremendously appreciate IF anyone of you who finds an error in the written pattern, so please, let me know - where (what rows) and what may be the problem. Many future knitters & crocheters from our artsy and crafty virtual world will thank you for your good deed, including myself.

SOCKS FOR 10 PLUS INCH FOOT - WITH CAST ON 64 STITCHES

My daughter asked me for another pair of socks for a friend. I decided to use my leftover sock yarn - all in all, the leftovers came up to about a little less than 2 balls (2 different kinds of yarn).
My daughter told me that the shoe size of this young lady is 11. Since they are living very far from me and didn't have measurements of my daughter's friend's feet, I had to do some research on how approximately long these socks need to be. And I just second-guessed how wide the socks could most likely be. After much of thinking and poking around the internet, I decided to start socks on 64 sts. The socks are knitted like the "Simple Socks For Gentlemen - Shoe Size 13" - however, I tweaked the number of rows and decreases a bit, and changed the decreases in the toe area a little (made it more round instead of angular.)
Oh yes and don't forget to check my YouTube Channel also - plenty of other detailed videos there.

In the meantime knit some socks for your daughters, sons, other family members, friends... If you need help, see the video for reference. More videos will be posted on my Youtube channel in the future.
(If you see any error on this page - contact me via social media on the left - txs)

SOME HELPFUL VIDEOS:

Material:
  • MC - 1 & 1/4 leftover ball of Patons, KROY Socks; 75% Washable Wool - 25% Nylon; 166 yds (152 m); 1.75 oz (50 gr), color: Blue Striped Rag - total yarn usage approx 200 m
  • CC - A leftover ball of Drops Design, FABEL Uni Colour, Superwash Treated Sock Wool; 75% Wool - 25% Polyamide; 224 yds (205 m); 1.8 oz (50 gr), color: medium blue #103
  • DPNs, or long Circulars Knitting Needles #2 (2.75 mm) - if you knit loosely then 2.5mm needles
  • Scissors
  • Yarn Needle (for Kitchener Stitch & for weaving in the tails)

Size:
  • Shoe size: ~ US size 10-11
  • Ankle Area: ~ circumference of K1/P1 ribbing is ~4.5"(unstretched) to ~10" (stretched)
  • Ribbing (Cuff) Height: 5.5”
  • Heel Flap: ~2.25"
  • Sole width: 4” flat; (circumference is ~ 8”)
  • Length of the sole heel to toe: ~10” (you can make it longer if you chose so)

Gouge (stockinette stitch):
  • on knitting needles size US #2 (2.75 mm) - 1"x1" = 8 sts x 11 rows

Abbreviation:

DPN(s) - double-pointed needle(s)
CO - cast on
MC - main color
CC - complimentary color
K - knit
P - purl
sl 1st st - slip first stitch purl-wise
SSK - slip knit-wise, slip knit-wise, and then knit them together through the back loop
P2tog - purl two stitches together
K2tog - knit two stitches together
RS - right side
WS - wrong side
st(s) - stitch(es)
N1, N2, N3, N4 - if knitting with DPNs - needle #1, #2, #3, #4 respectively


Step-by-Step Directions:

Make 2.

Foundation: on knitting needles size US #2 (2.75 mm) cast on 64 stitches


The Cuff

I knitted the initial 7 rows with CC yarn, then I switched to MC yarn.

Rnd 1-7          (CC) *[K1, P1]* - to the end of the row, then distribute the stitches evenly, among 4 DPNs (or use either 2 pairs of short circular needles or circular needles with a long cable), without twisting your knitted row, connect needles into a circle

Rnd 8-50      (MC) *[K1, P1]* - to end of each row. Make your cuff as long as you want. I knitted this cuff about 5.5" long.
Note: Do not cut off your MC yarn, you will continue with it after you are finished with your heel flap and turning heel.


The Heel Flap

For the heel flap, I used CC yarn.
If knitting on DPN's divide your stitches as such: needle #1 -32 sts, needles #2 and #3 - 16 sts each. If you are using circular needles you most likely have stitches divided into 32 + 32 between your magic loops. Use markers if needed.

Row 1-20      Work on your first 32 sts only back and forth (NOT in the round) - *[K1, P1]* - to the end (of each row)
Note: This heel is not reinforced with slip stitches thus only 20 rows.


Turning The Heel (row by row)

Keep working your sock back and forth (NOT in the round), starting with Row 1.

Row 1     (RS) sl. 1st st, K17, SSK, K1, (11 sts left on the needle), turn
Row 2     (WS) sl. 1st st, P5, P2tog, P1, (11 sts left on the needle), turn
Row 3     (RS) sl. 1st st, K6, SSK, K1, (9 sts left on the needle), turn
Row 4     (WS) sl. 1st st, P7, P2tog, P1, (9 sts left on the needle), turn
Row 5     (RS) sl. 1st st, K8, SSK, K1, (7 sts left on the needle), turn
Row 6     (WS) sl. 1st st, P9, P2tog, P1, (7 sts left on the needle), turn
Row 7     (RS) sl. 1st st, K10, SSK, K1, (5 sts left on the needle), turn
Row 8     (WS) sl. 1st st, P11, P2tog, P1, (5 sts left on the needle), turn
Row 9     (RS) sl. 1st st, K12, SSK, K1, (3 sts left on the needle), turn)
Row 10   (WS) sl. 1st st, P13, P2tog, P1, (3 sts left on the needle), turn
Row 11   (RS) sl. 1st st, K14, SSK, K1, (1 sts left on the needle), turn
Row 12   (WS) sl. 1st st, P15, P2tog, P1, (1 sts left on the needle), turn
Row 13   (RS) sl. 1st st, K16, SSK, turn
Row 14   (WS) sl. 1st st, P16 to last 2 sts , P2tog, (total 18 sts on the needle)


The Gusset
 (round by round)

Note: you will work from now on RS only in the round. Use MC from now on until the toe area.

You should finish with 18 sts on your needle, and you are ready to pick up stitches along the sides of your flap. You will proceed as such:
  • turn your sock sideways and pick up 13 stitches along the first side using a knitting needle and your MC color yarn; 
  • then K18 (the "turning the heel stitches")
  • pick up another 13 sts along the other side of the flap
  • then K32 sts - you should have now 76 stitches on your needles, distributed as such: N1(this will be the BEGINNING of the row) - 13 sts (= first side of the flap); N2 - 18 sts (from turning the heel); N3 - 13 sts (= second side of the flap); N4 - 36 sts (top of the foot
Note: If you are knitting on DPNs you will need 5 knitting needles to continue knitting this sock. If you are using circular needles insert markers between the 13-18-13-36 sts to keep track of your work.
Now we have to decrease some stitches on both sides of your flap to get back to 64 sts total on our needles - we will do that by decreasing while working on our gusset.

Let's start with Rnd 1 on the side using MC (from the cuff)

Rnd 1        (N1) SSK, K11; (N2) K18; (N3) K11, K2tog; (N4) K32 (74)
Rnd 2        K74
Rnd 3        (N1) SSK, K10; (N2) K18; (N3) K10, K2tog; (N4) K32 (72)
Rnd 4        K72
Rnd 5        (N1) SSK, K9; (N2) K18; (N3) K9, K2tog; (N4) K32 (70)
Rnd 6        K70
Rnd 7        (N1) SSK, K8; (N2) K18; (N3) K8, K2tog; (N4) K32 (68)
Rnd 8        K68
Rnd 9        (N1) SSK, K7; (N2) K18; (N3) K7, K2tog; (N4) K32 (66)
Rnd 10       K66
Rnd 11       (N1) SSK, K6; (N2) K18; (N3) K6, K2tog; (N4) K32 (64)


The Foot Part

Let's start with Rnd 1 again for ease of counting.

Rnd 1-60     K64


The Toe Part

Switch yarn color to CC. Let's start with Rnd 1

Rnd 1       *[K2tog, K28, SSK]* - 2x
Rnd 2       K60
Rnd 3       *[K2tog, K26, SSK]* - 2x
Rnd 4       K56
Rnd 5       *[K2tog, K24, SSK]* - 2x
Rnd 6       K52
Rnd 7       *[K2tog, K22, SSK]* - 2x; (48 sts)
Rnd 8       *[K2tog, K20, SSK]* - 2x; (44 sts)
Rnd 9       *[K2tog, K18, SSK]* - 2x; (40 sts)
Rnd 10     *[K2tog, K16, SSK]* - 2x; (36 sts)
Rnd 11     *[K2tog, K14, SSK]* - 2x; (32 sts)
Rnd 12     *[K2tog, K12, SSK]* - 2x; (28 sts)
Rnd 13     *[K2tog, K10, SSK]* - 2x; (24 sts)


To Finish Each Sock:

Combine the first 12 sts on one needle, then combine the last 12 sts on another needle, cut off about a foot-long tail, thread it into your yarn needle, and using the Kitchener Stitch close the toe gap. Weave in all the ends/tails. Then wear it or gift it.


My Other Project:

TINY HAT AND SOCKS FOR NEWBORN TWINS
Tiny Hat and Socks For Newborn Twins - HandMadeRukodelky ©2020


Copyright:
You may not sell my written pattern to anyone, and you may not publish it as your own.
However, you may sell a finished product (socks) made by you.

Thank you.
***

DID YOU FIND ERRORS? Let me know on what page of my blog, and in which row by clicking HERE, and I will fix it as soon as I get to it. You can PM me on my FB Page HERE as well. Txs!
Also if you haven't subscribed to my HandmadeRukodelky Channel, you can do it HERE. There are many videos to be seen, too.

*******************************************************************************


Copyright page - click HERE


PLEASE, COMMENT ON YOUTUBE BELOW MY VIDEOS, AND/OR SHARE YOUR IMAGES OF YOUR RECREATED WORKS ON MY FB PAGE HERE :-)

Socks From Leftover Yarn For 3-6 Month Old Babies

You probably will see more baby patterns on my blog for a while. That's because our friend had a baby and I love to knit for babies.

Here are another tiny socks knitted from a leftover yarn (which I used to knit my daughter's boyfriend's socks). Unfortunately, I can't remember the brand of the yarn. Although I  tried to search for this particular color I just didn't find any image online. The closest was the "Wisdom Yarns" sock yarn. 

I believe that you could use basically any sock yarn to knit these socks for about 3 months old baby.  

My next project will be socks for 6-9 months old rascal.


Material:
  • Yarn: leftover sock yarn (any sock yarn)
  • Knitting needles 2.75 mm - either DPNs or Circular - whichever ones you prefer
  • Scissors
  • Yarn Needle

Size:
  • Length of the sole (heel to toe): ~3.5” (you can make it longer if you chose so)
  • Ankle Area: ~ circumference of K1/P1 ribbing is 4"(unstretched) to ~6" (stretched)
  • Ribbing (Cuff) Height: 2.75”
  • Heel Flap: 0.75"
  • Sole width: 2” flat; (circumference is ~ 4+”)

Gouge:

On knitting needles 2.75mm - 1” x 1” = 7 sts x 10 rows (in stockinette stitch)


Abbreviation:

DPN(s) - double-pointed needle(s)
CO - cast on
K - knit
P - purl
sl 1st st - slip first stitch purl-wise
SSK - slip knit-wise, slip knit-wise, and then knit them together through the back loop
P2tog - purl two stitches together
K2tog - knit two stitches together
RS - right side
WS - wrong side
st(s) - stitch(es)


Step-by-Step Directions:

Make 2.

Foundation: cast on 36 stitches

  • The Cuff
Rnd 1          *[K1, P1]* - to end of the row, then distribute the stitches evenly, among 3 or 4 DPNs (or use either 2 pairs of short circular needles or circular needles with a long cable), without twisting your knitted row, join stitches into a circle

Rnd 2-26      *[K1, P1]* - to end of each row. Make your cuff as long as you want. I knitted my cuff 2.75" long.

  • The Heel Flap
If knitting on DPN's divide your stitches as such: needle #1 (the heel flap needle) - 18 sts, and needles #2 and #3 - 9 sts. If you are using circular needles you most likely have stitches divided to 18 + 18 between your magic loops.

Row 27-34      Work on your first 18 sts only back and forth (NOT in the round) - *[K1, P1]* - 9x

  • Turning The Heel (row by row)
Keep working your sock back and forth (NOT in the round), starting with Row 1.

Row 1     (RS) sl. 1st st, K9, SSK, K1, (5 sts left on the needle), turn
Row 2     (WS) sl. 1st st, P3, P2tog, P1, (5 sts left on the needle), turn
Row 3     (RS) sl. 1st st, K4, SSK, K1, (3 sts left on the needle), turn
Row 4     (WS) sl. 1st st, P5, P2tog, P1, (3 sts left on the needle), turn
Row 5     (RS) sl. 1st st, K6, SSK, K1 (1 sts left on the needle), turn
Row 6     (WS) sl. 1st st, P7, P2tog, P1 (1 sts left on the needle), turn
Row 7     (RS) sl. 1st st, K8, SSK, (0 sts left on the needle), turn
Row 8     (WS) sl. 1st st, P8, P2tog, (0 sts left on the needle), turn

  • The Gusset (knit in the round)
Note: you will work from now on RS only in the round.

You should finish with 10 sts on your working needle, and you are ready to pick up stitches along the sides of your flap. You will proceed as such (starting with Rnd 1 again):

Rnd 1             K10, PU 6, K18, PU 6
Rnd 2             K14, K2tog, K18, SSK, K4
Rnd 3             K38
Rnd 4             K13, K2tog, K18, SSK, K3
Rnd 5             K36
Rnd 6             K12, K2tog, K18, SSK, K2
Rnd 7             K34
Rnd 8             K11, K2tog, K18,  Note: This is the end of your row. We will start a new row after this point. 

  • The Foot Part
Rnd 9             Note: Move your last 3 stitches to your next (= first) needle, this will be your new beginning, then SSK, K1, K30 (total 32 sts)
Rnd 10-21     K32

Note: To make your socks a little longer add 1+ more rows.
 
  • The Toe Part
Let's start with Rnd 1 again.

Rnd 1           *[K1, K2tog, K10, SSK, K1]* - 2x
Rnd 2          K28
Rnd 3           *[K1, K2tog, K8, SSK, K1]* - 2x
Rnd 4          K24
Rnd 5           *[K1, K2tog, K6, SSK, K1]* - 2x (20 sts)
Rnd 6           *[K1, K2tog, K4, SSK, K1]* - 2x (16 sts)

  • To Finish Each Sock:
Bind off using Kitchener Stitch. In order to close your toe gap with Kitchener stitch, you need your first 8 stitches lined up with your next 8 stitches. Cut off about 1/2 a foot-long tail, thread it into your yarn needle, and using the Kitchener Stitch close the toe gap. Weave in all the ends/tails. 


Copyright:
You may not sell my written pattern to anyone, and you may not publish it as your own.
However, you may sell a finished product (socks) made by you.

Thank you.
***

DID YOU FIND ERRORS? Let me know on what page of my blog, and in which row by clicking HERE, and I will fix it as soon as I get to it. You can PM me on my FB Page HERE as well. Txs!
Also if you haven't subscribed to my HandmadeRukodelky Channel, you can do it HERE. There are many videos to be seen, too.

*******************************************************************************


Copyright page - click HERE


PLEASE, COMMENT ON YOUTUBE BELOW MY VIDEOS, AND/OR SHARE YOUR IMAGES OF YOUR RECREATED WORKS ON MY FB PAGE HERE :-)


Note: Most of the time I work as fast as I can to keep up with knitting and crocheting requests. I have to videotape, edit videos, then convert them & upload them to my channel. After that often I post on my blog patterns. I answer many questions, which means that often I work up to 16 hours a day. I would tremendously appreciate IF anyone of you who finds an error in the written pattern, so please, let me know - where (what rows) and what may be the problem. Many future knitters & crocheters from our artsy and crafty virtual world will thank you for your good deed, including myself.


Easy Crochet Snowflake No 6

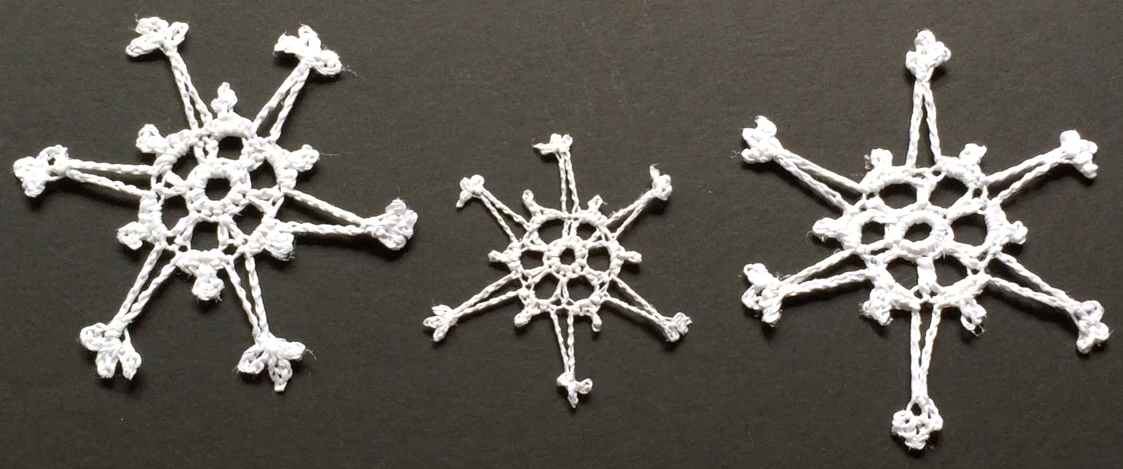
I love to crochet snowflakes - make them as I go. And it is that time of the year again - making winter decorations. Over the years I made many different "freehand" snowflakes. What I mean by that is that I didn't follow any patterns and I didn't write a pattern either. Today I present you a free pattern of a crocheted snowflake and a videotape of my outcome. I love to decorate my house with snowflakes in the winter time.
you can crochet snowflakes from a thin cotton yarn/thread or thick one. Your choice. I do prefer the thin cotton thread - they are much daintier.

If you would like to subscribe to my YouTube Channel then click HERE.

Huge "thank yous" to all my wonderful followers for sharing my projects.
Enjoy, and have fun knitting or crocheting :-)

Materials (if you shop via affiliated links below you could help fund my future projects TXS):
Michaels online store, OR Hobby Lobby, OR Jo-Ann Fabrics, OR Walmart 

Size:
Varies according to a yarn/thread weight (thickness)

Abbreviations:
ch - chain
sc - single crochet
dc - double crochet
join - connect into a circle
sl st - slip stitch

Materials:
Thicker Yarn - Paton's Grace Cotton Yarn (few feet)
Hook - Stainless Size C (2.75mm)
OR
Thinner Yarn/Thread - Aunt Lydia's  Crochet Thread No. 10
Hook - Stainless Steel Size 7 (1.65mm)
AND
Scissors
Cooked Thick Starch (video)
Stainless Steel Pins
Pads/Plastic For Blocking


Step-by-Step:

Foundation: ch7 and connect into a circle with sl. st.
Note: I make my connecting slip stitches tight so I do not count them as an extra stitch.

Rnd 1               ch1, 12 sc, sl st into ch1 to connect into circle (Note: if you crochet over the tail, you won't have to weave it in later)
Rnd 2               ch3, 1 dc into 1st st, ch2; *[skip 1 st, 2 dc into next st, ch2]* - 5x; sl st into third ch of initial ch3 to connect into circle
Rnd 3               *{ch10, sl st into 4th ch st from hook, *[ch4, sl st into same st]* - 2x; ch6, sl st into second dc from prev row; 2 sc into ch2-sp from prev row, ch4, sl st into last crocheted sc, 2 sc  into ch2-sp from prev row, sl st into next dc from prev row}* - repeat all in { } brackets 5 more times (total 6x)

Finishing - weave in your tail(s), starch it, stretch it into the snowflake shape on a non-sticky surface, let it dry, decorate or give it as a gift.


***

DID YOU FIND ERRORS? Let me know on what page of my blog, and in which row by clicking HERE, and I will fix it as soon as I get to it. You can PM me on my FB Page HERE as well. Txs!
Also if you haven't subscribed to my HandmadeRukodelky Channel, you can do it HERE. There are many videos to be seen, too.

*******************************************************************************


Copyright page - click HERE


PLEASE, COMMENT ON YOUTUBE BELOW MY VIDEOS, AND/OR SHARE YOUR IMAGES OF YOUR RECREATED WORKS ON MY FB PAGE HERE :-)


Note: Most of the time I work as fast as I can to keep up with knitting and crocheting requests. I have to videotape, edit videos, then convert them & upload them to my channel. After that often I post on my blog patterns. I answer many questions, which means that often I work up to 16 hours a day. I would tremendously appreciate IF anyone of you who finds an error in the written pattern, to please, let me know - where (what rows) and what may be the problem. Many future knitters & crocheters from our artsy and crafty virtual world will thank you for your good deed, including myself.

Purple Rain Lacy Scarf

Purple Rain Lacy Scarf  
In August (2017) I posted a free pattern for a purple hat for Shaken Baby Syndrome (SBS). I used a purple part of Lion Brand yan for Shawls. However, I still had about 3/4 of the ball left over, and I wanted to use it up. Instead of a shawl, I decided to knit a scarf. I am a very busy person, and I was hoping to find an easy pattern that will look very rich. I looked through my books and found a chart I thought it could work. Believe it or not, this project turned out great - exactly what I wanted.
The yarn has two different fibers - cotton and acrylic. Cotton is making this scarf strong, and acrylic is making the yarn very soft - when I touch it, it feels plush against my fingers. Of course, I made videos for right-handed knitters and for left-handed knitters, too.


Materials (if you shop on-line via my affiliated links below, I would get few pennies, which would help to fund my future projects TXS):
Michaels on line store, OR Hobby Lobby, OR Jo-Ann Fabrics, OR Walmart 

Yarn: the purple part of Lion Brand; Shawl in a Ball; color: Mindful Mauve; 58% cotton/39% acrylic; 3 % other fiber; 5.3 oz/150 g; 518 yd/473 m; Note: I made 2 hats from the purple part of this yarn, which is surprisingly soft to the touch - see the link about the hats above

Knitting Needles - size #8 (5mm)
Hook - size #D
Yarn Needle (for weaving in the tail)
Scissors

Size:
Width of the scarf: 11"
Length: I just used leftover (about 3/4) of the yarn ball

Abbreviations:
CO - cast on
EDGE - knit 3 sts (or your desired # of stitches)
K - knit
P - purl
YO - yarn over
K2tog - knit 2 stitches together
SSK - slip knitwise, slip knitwise, knit both slipped stitches through the back loop
BO - bind off

Gauge:
My gauge corresponds with a manufacturer's gauge on any yarn label


Step-by-Step Directions:

CO 50 stitches (4 repeats of 11 sts + 3 sts for the first edge + 3 sts for the second edge).
Note: you can adjust a number of your repeats and edge stitches per your desire.


Row 1-6             K50

Pattern:
Note: you will repeat 10 rows of this lacy pattern until your desired length (we will start counting again from Row 1)

Row 1                 EDGE, pm; *(K2tog - 2x; YO, K, YO, K, YO, K, YO , SSK - 2x; pm)* - repeat total 4x; EDGE
Row 2                 EDGE; P44; EDGE
Row 3                 EDGE, pm; *(K2tog - 2x; YO, K, YO, K, YO, K, YO , SSK - 2x; pm)* - repeat total 4x; EDGE
Row 4                 EDGE; P44; EDGE
Row 5                 EDGE, pm; *(K2tog - 2x; YO, K, YO, K, YO, K, YO, SSK - 2x; pm)* - repeat total 4x; EDGE
Row 6                 EDGE; K44; EDGE
Row 7                 EDGE; K44; EDGE
Row 8                 EDGE; P44; EDGE
Row 9                 EDGE; K44; EDGE
Row 10               EDGE; P44; EDGE


After you knit your desired number of ROW repetitions, you will finish your scarf this way:

Row 1                 EDGE, pm; *(K2tog - 2x; YO, K, YO, K, YO, K, YO, SSK - 2x; pm)* - repeat total 4x; EDGE
Row 2                 EDGE; P44; EDGE
Row 3                 EDGE, pm; *(K2tog - 2x; YO, K, YO, K, YO, K, YO, SSK - 2x; pm)* - repeat total 4x; EDGE
Row 4                 EDGE; P44; EDGE
Row 5                 EDGE, pm; *(K2tog - 2x; YO, K, YO, K, YO, K, YO , SSK - 2x; pm)* - repeat total 4x; EDGE
Row 6                 K50 (take your markers out as you knit)
Row 7                 K50
Row 8                 K50
Row 9                 K50
Row 10               K50
Row 11               BO all your stitches and weave in your tails/ends


Click on the image to enlarge this chart


***

DID YOU FIND ERRORS? Let me know on what page of my blog, and in which row by clicking HERE, and I will fix it as soon as I get to it. You can PM me on my FB Page HERE as well. Txs!
Also if you haven't subscribed to my HandmadeRukodelky Channel, you can do it HERE. There are many videos to be seen, too.

*******************************************************************************


Copyright page - click HERE


PLEASE, COMMENT ON YOUTUBE BELOW MY VIDEOS, AND/OR SHARE YOUR IMAGES OF YOUR RECREATED WORKS ON MY FB PAGE HERE :-)


Note: Most of the time I work as fast as I can to keep up with knitting and crocheting requests. I have to videotape, edit videos, then convert them & upload them to my channel. After that often I post on my blog patterns. I answer many questions, which means that often I work up to 16 hours a day. I would tremendously appreciate IF anyone of you who finds an error in the written pattern, to please, let me know - where (what rows) and what may be the problem. Many future knitters & crocheters from our artsy and crafty virtual world will thank you for your good deed, including myself.

1 Pattern - 2 Knitted Triangular Scarves

Triangular Scarf For Fall   
There are many easy projects for knitting, and this triangular scarf is one of them. It is knitted sideways.
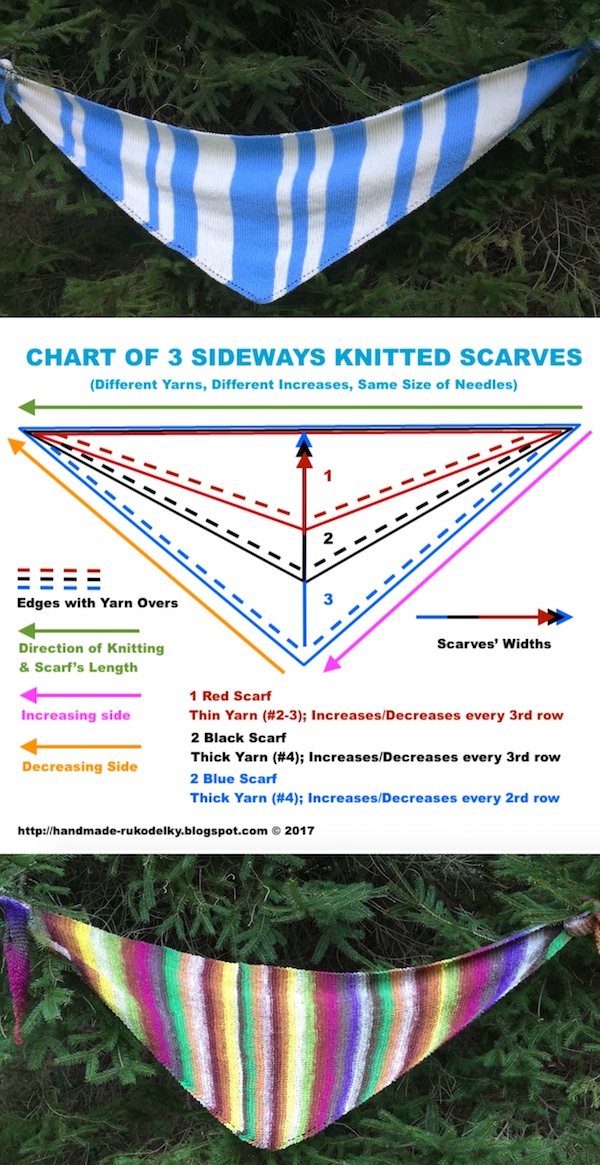
First, you have "grow" stitches toward one side only, and then you have to "reduce" these stitches back to form the narrow tip at the end. Most of the triangular scarves that are knitted sideways get an increase every other row. I am tall, my arms are long, and I didn't want scarf short in length and long in width (see the image below). That is why I decided to increase every third row - to make my scarf longer in length and slightly shorter in width (or height).
Feel free to use yarn of your choice. If you use a thicker yarn, you will knit slightly longer scarf in width (or height), but a thinner yarn will yield a scarf narrower while you will maintain the same length of your scarf. I knitted two scarves that have the same length, 36 inches, but because I knitted one scarf with worsted yarn (#4), and one with sport yarn (#3), the scarf knitted with thinner yarn is narrower. If you watch my video (links are below), you can see this difference.

FOR VISUAL KNITTERS, HERE ARE TWO VIDEOS:


Enjoy and spread the love of knitting and crocheting.


Materials (if you shop on-line via my affiliated links below, I would get few pennies, which would help to fund my future projects TXS):
Michaels on line store, OR Hobby Lobby, OR Jo-Ann Fabrics, OR Walmart 

Yarn - your choice (for Winter scarf I used THIS worsted yarn in antique white and light blue colors; and for Fall scarf I used 2 balls of Noro Taiyo Sport yarn, cotton/silk/wool blend; 100g/349yds.)
Knitting Needles - size #8 (5mm)
Yarn Needle (for weaving in the tail)
Scissors

Gauge:
Varried

Size:
One size fits all, but length & width will depend on your choice of yarn, size of the needles, and rows knitted before you will start decreasing. Increases/Decreases will also determine how many stitches you will maintain on your knitting needles, thus the width/height of the finished project may vary from scarf to scarf.

Abbreviations:
CO - cast on
EDGE - knit 2 sts
K - knit
pm - place marker
mm - move marker from one knitting needle onto the other
YO - yarn over
K3tog - knit 3 stitches together
BO - bind off

Scarves & Graph - to enlarge click on the image


Step-by-Step Directions:

CO 4 stitches and knit 2 rows

INCREASING PART:

Row 1          EDGE, pm; YO (after the marker), K to end
Row 2          K all sts
Row 3          K all sts
Row 4          K all the way to marker, YO (before the marker), mm, EDGE
Row 5          K all sts
Row 6          K all sts

Repeat these 6 rows until you reach 1/2 of your scarf's desired length (about 30"-40")


DECREASING PART:

Row 1          EDGE, mm; YO (after the marker), K to end
Row 2          K all way to 4 sts before the marker, K3tog, K1 (= YO from prev. row), mm, EDGE
Row 3          K all sts
Row 4          K all the way to marker, YO (before the marker), mm, EDGE
Row 5          EDGE, mm, K1 (= YO from prev. row), K3tog, K to end
Row 6          K all sts

Keep decreasing by repeating these 6 rows until you have 3 sts on your needles and then knit your three last stitches together. Weave in both tails.

Triangular Scarf For Winter Made From Thicker (Worsted) Yarn


***

DID YOU FIND ERRORS? Let me know on what page of my blog, and in which row by clicking HERE, and I will fix it as soon as I get to it. You can PM me on my FB Page HERE as well. Txs!
Also if you haven't subscribed to my HandmadeRukodelky Channel, you can do it HERE. There are many videos to be seen, too.

*******************************************************************************


Copyright page - click HERE


PLEASE, COMMENT ON YOUTUBE BELOW MY VIDEOS, AND/OR SHARE YOUR IMAGES OF YOUR RECREATED WORKS ON MY FB PAGE HERE :-)


Note: Most of the time I work as fast as I can to keep up with knitting and crocheting requests. I have to videotape, edit videos, then convert them & upload them to my channel. After that often I post on my blog patterns. I answer many questions, which means that often I work up to 16 hours a day. I would tremendously appreciate IF anyone of you who finds an error in the written pattern, so please, let me know - where (what rows) and what may be the problem. Many future knitters & crocheters from our artsy and crafty virtual world will thank you for your good deed, including myself.

Crocheted Sixtopus


Rainbow Sixtopus  
Over the years while living in my area, I met few ladies from my birth country, which of course I keep in touch via Facebook. Occasionally, I share my knitted or crocheted items with my friends, but not too much because they do not knit or crochet. For that, I have a separate page on Facebook for people who are interested in these artful projects. One of my friends tagged me in a post recently where one Czech hospital is looking for crocheted Octopuses for prematurely born babies or newborns in intensive care. I did a research and found out that it started in Norway when someone gave a newborn a crocheted octopus toy into a bassinet and the baby started doing better. So nurses in this hospital started giving babies handmade octopuses and realized that all children with octopuses were doing better than children without them. The word spread out, and now many hospitals in EU are accepting donations of handmade octopuses, and one of the hospitals is in my country, where I will be traveling to in a couple of weeks. I will be bringing them some Sixtopuses.

Now, when I was doing a research on these octopuses, I've read someone's comment that US hospitals do not accept these handmade toyes because of babies being vulnerable infections. Supposedly crochet items cannot be adequately cleaned to remove the bacteria. And that made me think: "WHY NOT?" There are UV-C light machines that kill bacteria and diseases by attacking their DNA. And I am sure hospitals have such machines. These toys with tentacles help premature babies to stabilize their heart rate and breathing. So it would be beneficial for babies to have octopuses next to them.

HERE IS A LIST OF HOSPITALS THAT ACCEPT OCTOPUSES

If you are a visual crocheter you can see Sixtopus video for righties HERE and video for lefties HERE. A free written pattern is below. Make a sixtopus for someone's newborn and make them happy - their baby does not have to be prematurely born to sleep with your Sixtopus :-) Do not forget to wash your sixtopus before you give it away to a tiny healthy newborn.

Sixtopus from my YouTube instructional video

Materials (if you shop on-line via my affiliated links below, I would get few pennies, which would help to fund my future projects TXS):
Michaels on line store, OR Hobby Lobby, OR Jo-Ann Fabrics, OR Walmart 

Yarn: leftovers of Loops & Thread, Snuggly Wuggly, light weight #3 yarn, your choice of colors  (these yarns were used in making of the video)
For "Rainbow Sixtopus" (pictured above) I used yarn by Premier, Cotton Fair; 52% Cotton/48% Acrylic; use your choice of colors
Hook - US size E,  3.50 mm
Scissors
Sewing/yarn needle for weaving your ends in

Size:
Length of the sixtopus is ~7" (about 17.50 cm)

Abbreviations:
ch - chain
sc - single crochet
pm - place marker
st(s) - stitch(es)
dc - double crochet
sc2tog - single crochet 2 stitches together (if possible do it invisible way - see my video)


Step-by-Step:

HEAD/BODY:

color #1

Foundation: magic circle

Rnd 1              6 sc into magic circle, connect into circle with sl. st
Rnd 2              *(2 sc in each st )* - 6x; work in a spiral manner, pm (total 12 sts)
Rnd 3              *(1 sc in 1st sts, 2 sc into next st)* - 6x; (total 18 sts), pm
Rnd 4              *(2 sc in 1st stitch, 1 sc in each of next two sts)* - 6x; (total 24 sts), pm
Rnd 5-9          1 sc in each of next 24 sts, pm
Row 10           *(1 sc in each of next two sts, sc2tog)* - 6x; (total 18 sts), pm
Row 11-12      1 sc in each of next 18 sts, pm
Row 13           *(sc2tog, 1 sc in each of next st)* - 6x; (total 12 sts), pm
Row 14-16     1 sc in each of next 12 sts, pm

Finish this with 2 slip stitches to slope down the row. Stuff the head with your preferred toy filling.

PLUG:

Crochet a circle (a plug) to close the head/body part.

Rnd 1              6 sc into magic circle, connect into circle with sl. st
Rnd 2              *(2 sc in each st )* - 6x; work in a spiral manner (total 12 sts)

Do not cut off the yarn. Place the circle (plug) over the opening of the stuffed Head/Body and crochet them together with slip stitches (see my video).

TENTACLES:

Tentacle 1            Either continue with same yarn or start a foundation of 30+ chain stitches with a different color; then on the "way back" toward the head work as such: make 3 dc into 4th st from the hook, *(make 3 dc into each st)* - repeat to end, then slip st into the second st of the circle

Tentacle 2-6        ch30+, 3 dc into 4th st from the hook, *(make 3 dc into each st)* - repeat to end, then slip st into the second st of the circle
Note: you can watch my video - link is above - how to crochet these tentacles

When finished weave in all the ends.


***

DID YOU FIND ERRORS? Let me know on what page of my blog, and in which row by clicking HERE, and I will fix it as soon as I get to it. You can PM me on my FB Page HERE as well. Txs!
Also if you haven't subscribed to my HandmadeRukodelky Channel, you can do it HERE. There are many videos to be seen, too.

*******************************************************************************


Copyright page - click HERE


PLEASE, COMMENT ON YOUTUBE BELOW MY VIDEOS, AND/OR SHARE YOUR IMAGES OF YOUR RECREATED WORKS ON MY FB PAGE HERE :-)


Note: Most of the time I work as fast as I can to keep up with knitting and crocheting requests. I have to videotape, edit videos, then convert them & upload them to my channel. After that often I post on my blog patterns. I answer many questions, which means that often I work up to 16 hours a day. I would tremendously appreciate IF anyone of you who finds an error in the written pattern, so please, let me know - where (what rows) and what may be the problem. Many future knitters & crocheters from our artsy and crafty virtual world will thank you for your good deed, including myself.