Celebrate your holiday season with crocheted snowflakes, icicles, and bells. You can have one done in just five rows. Get yourself a cotton thread (I used Aunt Lydia's) and make few snowflakes. Every two or three years I decorate our tree with just my crocheted decorations and some blue lights. Other times I use them for window or dinner table decorating. Either way, occasionally, I love to surround myself with a simple, elegant, white color.
Abbreviations: ch - chain
ch2sp - chain 2 space
ch4sp - chain 4 space
ch8sp - chain 4 space sc - single crochet dc - double crochet join - connect into a circle sl st - slip stitch
Rnd 1magic loop - ch1, then 12 sc - join into first sc Rnd 2ch5 (ch3=1dc, ch2=ch2sp), then in each st: *[1 dc, ch2]* - 11x, join
Rnd 3 ch1, then in each ch2sp 3 sc (total 12x), join into first sc
Rnd 4 ch1, then 1 sc in same st, 1 sc in next 2 st, *[ch8, 1 sc in each of next 3 sts, ch4, 1 sc in each of next 3 sts]* - 5x, ch8, 1 sc in each of next 3 sts, ch1, join with 1 dc into first sc
Rnd 5 *[ch2, then into next ch8sp: (2 dc, ch2, 3 dc, ch4, 3 dc, ch2, 2 dc, ch2); into next ch5sp: (1 sc)]* - repeat 6x, join into first dc
Optional: make a loop for hanging (or use a wire hook for Christmas decorations for hanging). Weave in all the tails with a yarn needle.
***
DID YOU FIND ERRORS? Let me know on what page of my blog, and in which row by clickingHERE,and I will fix it as soon as I get to it. You can PM me on my FB Page HERE as well. Txs!
Also if you haven't subscribed to my HandmadeRukodelky Channel, you can do it HERE. There are many videos to be seen, too.
PLEASE, COMMENT ON YOUTUBE BELOW MY VIDEOS, AND/OR SHARE YOUR IMAGES OF YOUR RECREATED WORKS ON MY FB PAGE HERE :-)
Note: Most of the time I work as fast as I can to keep up with knitting and crocheting requests. I have to videotape, edit videos, then convert them & upload them to my channel. After that often I post on my blog patterns. I answer many questions, which means that often I work up to 16 hours a day. I would tremendously appreciate IF anyone of you who finds an error in the written pattern, so please, let me know - where (what rows) and what may be the problem. Many future knitters & crocheters from our artsy and crafty virtual world will thank you for your good deed, including myself.
I love to crochet snowflakes - make them as I go. And it is that time of the year again - making winter decorations. Over the years I made many different "freehand" snowflakes. What I mean by that is that I didn't follow any patterns and I didn't write a pattern either. Today I present you a free pattern of a crocheted snowflake and a videotape of my outcome. I love to decorate my house with snowflakes in the winter time.
you can crochet snowflakes from a thin cotton yarn/thread or thick one. Your choice. I do prefer the thin cotton thread - they are much daintier.
Foundation: ch7 and connect into a circle with sl. st. Note: I make my connecting slip stitches tight so I do not count them as an extra stitch.
Rnd 1 ch1, 12 sc, sl st into ch1 to connect into circle (Note: if you crochet over the tail, you won't have to weave it in later) Rnd 2 ch3, 1 dc into 1st st, ch2; *[skip 1 st, 2 dc into next st, ch2]* - 5x; sl st into third ch of initial ch3 to connect into circle Rnd 3 *{ch10, sl st into 4th ch st from hook, *[ch4, sl st into same st]* - 2x; ch6, sl st into second dc from prev row; 2 sc into ch2-sp from prev row, ch4, sl st into last crocheted sc, 2 sc into ch2-sp from prev row, sl st into next dc from prev row}* - repeat all in { } brackets 5 more times (total 6x)
Finishing - weave in your tail(s), starch it, stretch it into the snowflake shape on a non-sticky surface, let it dry, decorate or give it as a gift.
***
DID YOU FIND ERRORS? Let me know on what page of my blog, and in which row by clickingHERE,and I will fix it as soon as I get to it. You can PM me on my FB Page HERE as well. Txs!
Also if you haven't subscribed to my HandmadeRukodelky Channel, you can do it HERE. There are many videos to be seen, too.
PLEASE, COMMENT ON YOUTUBE BELOW MY VIDEOS, AND/OR SHARE YOUR IMAGES OF YOUR RECREATED WORKS ON MY FB PAGE HERE :-)
Note: Most of the time I work as fast as I can to keep up with knitting and crocheting requests. I have to videotape, edit videos, then convert them & upload them to my channel. After that often I post on my blog patterns. I answer many questions, which means that often I work up to 16 hours a day. I would tremendously appreciate IF anyone of you who finds an error in the written pattern, to please, let me know - where (what rows) and what may be the problem. Many future knitters & crocheters from our artsy and crafty virtual world will thank you for your good deed, including myself.
I have many friends that celebrate Easter holiday. Every year I am invited to a house full of adults and kids, and all of us celebrate this holiday the Czech way. There is always a lot of food, a lot of games, and an egg decorating contest. All of us participate in this fun activity - and of course, we let the kids win.
Over the years I decorated eggs with crochet designs. But I never made a "stuffed crocheted egg amigurumi." I was going to design my own "Easter Egg," but my schedule is overloaded, and it would take me a long time. I needed to save time for my videotaping, editing, and uploading. I decided to google a pattern for a crocheted egg. I came across Kristi's website where she allowed people to use her "egg" pattern for their projects, including any free class or e-course or as part of a free pattern. She allows anyone to sell finished items made with her pattern as well, provided we all give her credit.
I contacted Kristi and told her about my video of "her egg." She was very gracious. You know, sometimes it takes a long time to finish just one project. I know, I have been in those shoes many times. So, I was delighted I could use "her egg pattern," because she saved me a lot of time. And so, YES, I will gladly give her credit and would like YOU to visit her WEBSITE (see a couple of links to her different stores in FAQ page) or her ETSY STORE - perhaps you will find there a toy pattern you would like to make.
I found her "egg" pattern clear and easy to follow - you can click HERE to see for yourself. And lastly, see links below if you are interested in crocheting along my very detailed video (sometimes it is too detailed, but I can't help myself - there is always a beginner crocheter on my mind.)
In the video I used leftover self striping sock yarn
hook 3.00 mm
fiberfill
scissors
Enjoy making many of them in different colors for display or as a toy or a gift!
***
DID YOU FIND ERRORS? Let me know on what page of my blog, and in which row by clickingHERE,and I will fix it as soon as I get to it. You can PM me on my FB Page HERE as well. Txs!
Also if you haven't subscribed to my HandmadeRukodelky Channel, you can do it HERE. There are many videos to be seen, too.
PLEASE, COMMENT ON YOUTUBE BELOW MY VIDEOS, AND/OR SHARE YOUR IMAGES OF YOUR RECREATED WORKS ON MY FB PAGE HERE :-)
Note: Most of the time I work as fast as I can to keep up with knitting and crocheting requests. I have to videotape, edit videos, then convert them & upload them to my channel. After that often I post on my blog patterns. I answer many questions, which means that often I work up to 16 hours a day. I would tremendously appreciate IF anyone of you who finds an error in the written pattern, so please, let me know - where (what rows) and what may be the problem. Many future knitters & crocheters from our artsy and crafty virtual world will thank you for your good deed, including myself.
Someone was asking me about pennants - decorations for a party. And I decided to make a video of crocheting triangles and turning them into pennants. In my video I crocheted several different combinations of color, but for me - I think I would like to make all of my pennants in light blue and white colors only. I did a search and the name of my blue color I have on my mind is called either Arctic Blue or Celeste. This blue looks really nice in combination with white yarn, IMHO. And if I would add to these colors medium gray that would not be bad either. But for now I will present you just very colorful pennants and you make yours in colors that please your eyes.
If you would prefer working along the video - then:
Of course, if you share my patterns or tutorial videos it will be greatly appreciated. I love sharing my efforts with the whole wide world on world wide web :-)
Enjoy.
Material:
any light worsted yarn, color of your choice
Hook size F (3.75 mm)
Scissors
Yarn Needle (optional)
Abreviations:
ch - chain
sc - single crochet
dc - double crochet
st(s) - stitch(es)
sl st - slip stitch
join - join with a slip st
ch3-sp - chain 3 space
C1 - choice of your color #1
C2 - choice of your color #2
C3 - choice of your color #3
Step-by-Step Directions:
Foundation: (C1) ch4, join with sl st
Rnd 1 (C1) into the ring: ch3, 2dc, ch3, 3dc, ch3, 3dc, ch3 - join, fasten off
Rnd 2 (C2) into first ch3-sp: ch3, 2 dc, ch3, 3 dc, ch3; into second ch3-sp: 3 dc, ch3, 3 dc, ch3; third ch3-sp: 3 dc, ch3, 3 dc, ch3; join, fasten off
Rnd 3 (if working with 2 colors C1; if working with 3 colors C3) start in one ch3-sp corner: ch3, 2 dc, ch3, 3 dc, ch3, into ch3-sp between corners 3 dc, ch3; into second ch3-sp corner: 3 dc, ch3, 3 dc, ch3, into ch3-sp between corners 3 dc, ch3; into third ch3-sp corner: 3 dc, ch3, 3 dc, ch3, into ch3-sp between corners 3 dc, ch3; join, fasten off
Rnd 4 (if working with 2 colors C2; if working with 3 colors C1 or C2) start in one ch3-sp corner: attach new yarn with a sl st, then ch1, 1 sc, then 1 sc into each st around, except in 2 ch3-sp corners make 4 sc, finish in last corner (=in the first one, where you started) with 1 sc, ch2, join and fasten off.
Make one tassel per triangle, which you will attach to ch2 space in your last crocheted corner AFTER you attach each triangle to your crocheted chain string.
Attaching Your Triangles:
Arrange triangles in the order you would like them to be attached - first triangle on top and last triangle on the bottom. Color coordinate them first so when they are next to each other colors do not clash.
Crochet a long chain (long enough to be able to tie it to your chosen spot). When the chain is long enough, hold first triangle facing you with the right side and the ch2-space corner toward the floor (remember, that will be your tassel corner). Slip stitch your long chain into right corner, then crochet a string (chains) of same length as the side of the triangle, then attach this chain to second (left) corner. (Lefties have these corners reversed = left to right). Now either make one chain and attach another triangle, or make about 5-10 chains and attach another triangle - your choice how you want them to be spaced. Continue until you attach all triangles, making sure not to forget about the ch2-space for tassel, otherwise you will have to frog your hard work and redo your efforts. When your last triangle is attached make again long chain so you can use it to tie your pennants to another spot. Block it if you need to.
Weave in all ends, then go and have fun at the party :-)
While all my friends were busy getting ready for their holidays in the past two weeks, I was getting well in bed. A really strong virus visited my body and didn't want to let go.
Today we finally got to decorate our Christmas tree - although I am not completely healthy yet. But Christmas is around the corner, and I cannot picture holidays without a Christmas tree.
This year, for decorations we used blue lights (I adore them with white decorations) and all my crocheted ornaments. When we were finished, I stepped back to look at our tree and I thought - "how nicely it turned out". It is simple (just blue and white).
Also, what I very much like is that our tree is "organic". It means that all my crocheted ornaments are biodegradable. They are made of cotton thread. Not that I plan to toss the ornaments out. I will store them in the box for later years. In the future, if needed, I can wash them and starch them again and they will look like new. And if I treat them right, they will never break. Another bonus is that I can store them in a couple of small boxes.
If you like my tree, see some of the ornaments in posts under "crochet".
Happy Holidays (any Holidays that you celebrate) and Prosperous and Healthy 2012 Year.
This year I decided to create all my Christmas decorations by hand for several reasons:
* I want my tree to be different and unique
* I love to create
* Handmade is the best
So, for the first time in my life, I am crocheting 3D Christmas decorations, like angels and bells. After I will add my snowflakes to 3D decorations it will be a real pleasure to look at my tree (which is purely mine), while I sip some hot chocolate.
Abbreviations:
ch - chain
sc - single crochet
sc decrease - single crochet decrease (you can do "invisible sc decrease" - see the video 4 LEFTIES & 4 RIGHTIES)
dc - double crochet
join - connect into a circle
sl st - slip stitch
Rnd 1 ch5 - join
Rnd 2 ch2, sc8, join
Rnd 3 ch2, in each stitch make 2 sc - total of 18, join
Rnd 4 ch3, three dc, skip 2 st, *[four dc, skip 2 st] - repeat from * 4 more times, join
Rnd 5 make 2 sl st. to get in the middle of "four dc cluster" from prev. row, ch3, 3 dc in the same st, ch2, *[four dc in the middle of "four dc cluster" from prev. row, ch2] - repeat from * 4 more times, join
Rnd 6 make 2 sl st. to get in the middle of "four dc cluster" from prev. row, ch3, three dc, ch3, *[four dc in the middle of "four dc cluster" from prev. row, ch3] - repeat from * 4 more times, join
Rnd 7-9 repeat row six
Rnd 10 make 2 sl st. to get in the middle of "four dc cluster" from prev. row, ch3, three dc, ch4, *[four dc in the middle of "four dc cluster" from prev. row, ch4] - repeat from * 4 more times, join
Rnd 11 without making sl st. and without ch2 crochet immediately * [6 dc in the middle of "four dc cluster" from prev. row (creating a "fan looking" cluster), along the ch4 from prev. row crochet 5 sc] - from * repeat 5 more times
Wash the bell, starch and stretch into a 3D bell shape.
How to make and attach the ball to the bell:
Rnd 1 ch4, join
Rnd 2 ch2, 6 sc, join
Rnd 3 ch2, into each st 2 sc (total 12 sc along the perimeter), join
Rnd 4-6 ch2, sc into every stitch from prev. row, join
Rnd 7 ch2, * [sc, sc decrease]; from * repeat to end, join
at this point stuff the forming ball with some filling (ie. white thick yarn, pillow filling etc.)
Rnd 8-9 repeat row 7
Rnd 10 close the hole with one stitch an crochet long string of chains (ch80 - ch100) - depending how long you want the loop for hanging
After the bell is dry, fold the long string in such way that the ball can hang long enough inside the bell, but that at the same time it is not too long - make a knot. Pull the loop through the small hole at the top of the bell and make another knot - securing the ball well onto the bell and not to get lost in the future.
After the holidays take care to wrap and store your precious 3D decorations, so they do not get crushed.
I love to crochet snowflakes. This snowflake has five rows therefore it is quick - and easy even for advanced beginners.
I give them out as gifts to my friends and family. Place them on a long string - they make a nice hanging for any window.
Make few of them for your holidays - as a decoration on your christmas tree, or make several snowflakes to place on dinner tables - when having a feast with friends, of for the winter wedding.
BTW - did you know that I made a video and you could crochet this snowflake along with me? CLICK HERE
Abbreviations:
ch - chain
sc - single crochet
dc - double crochet
tr - tripple crochet
sl st - slip stitch
join - join into circle with slip stitch
Step-by-Step Directions:
Row 1 ch10; join into circle Rnd 2 ch2, 17 sc; join Rnd 3 (ch3, 1 dc, ch1, 2 dc) into same stitch, ch3, skip 2 stitches; *[( 2 dc, ch1, 2 dc) into same stitch, ch3; skip 2 stitches]* - repeat from * to * 4 more times (total 6x); join Rnd 4 slip stitch into the middle of double crochets; (ch4, 1 tr, ch1, 2 tr) into same stitch, ch5; *[(2 tr, ch1, 2 tr) into the middle of double crochets, ch5]* - repeat from * to * 4 more times, (total 6x); join Rnd 5 *[ch5, 1 sc into space btw 2 tr, ch 5, sl st into the end of tr, ch15, then connect sl st into 11th chain (= 5 chains back), ch5, sl st into 11th ch again (you'll have two miniature circles/bow like looking shapes), ch10, and sl st into beginning of next tr]* - repeat from * to * 5 more times
Finishing: Weave in loose ends, wash it, squeeze as much water out as possible, then starch it with a thick starch goop, stretch it into the shape (block it) and let air dry, or gently speed up drying by using a blowdryer.
DID YOU FIND ERRORS? Let me know on what page and in which row by clickingHERE,and I will fix it as soon as I get to it. You can PM me on my FB Page HERE as well. Txs!
Also if you haven't subscribed to my HandmadeRukodelky Channel, you can do it HERE. There are many videos to be seen, too.
Tato vlocka je celkem rychla a dokonce i zacatecnici by nemeli mit temer zadne problemy.
1. 12 ret ok, spojit do kruhu
2. 2 ret ocka, 18 kr sl
3. (3 ret. ocka, jeden 1x nahoz sl, ret. ocko, dva 1x nahoz sl, 3 ret. oka) do stejneho ocka, *( dva 1x nahoz sl, ret. ocko, dva 1x nahoz sl, 3 ret. oka) do stejneho ocka, - od * opakovat jeste 4x
4. (4 ret. ocka, jeden 2x nahoz sl, ret. ocko, dva 2x nahoz sl, 5 ret. ok) do stejneho ocka, *( dva 2x nahoz sl, ret. ocko, dva 2x nahoz sl, 5 ret. ok) do stejneho ocka, - od * opakovat jeste 4x
5. * 5 ret ok, kr sl do mezery mezi dl sl, 5 ret ok a spojovaci ocko na konci dl sloupku, 15 ret. ok , spojit do krouzku v 11 ret. ocku (= 5 re. ocek nazpet), uhackovat 5 ret ok a opet vpichonot do 11ho ocka (budete mit dva miniaturni krouzky/okrasne smycky) 10 ret ok a vpichnout spojovaci ocko na pocatku dalsich dl sloupku - opakovat od * jeste 5x
Vyprat - Naskrobit - Povesit (na stromecek nebo i do okna). At se vam vlocka podari a hlavne libi.
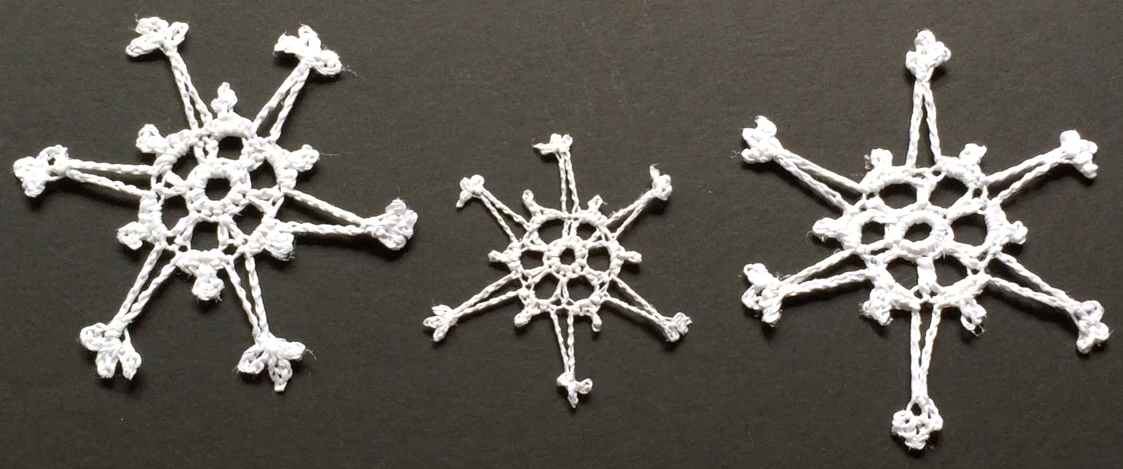
The other day I was crocheting snowflakes again. Just like last year around this time. I wanted to create simple, yet beautiful snowflakes. I took a hook (number 7 = 1.65mm) and my white jumbo size cotton crochet thread and started creating. My husband made us fire, and that made me feel kind of festive and creative. These snowflakes I made out of my head - perhaps there are some like these elsewhere on the net, or maybe similar ones, but I assure you that these I created with my own imagination listening to cracking of our fire sipping my favorite tea. Hopefully these images will inspire you and unleash your creativity, too. Happy snowflake making!
Pred par dny jsem se zase pustila do hackovani vlocek. Vzala jsem 1.65mm hacek a velike klubko hackovaci prize a zacala jsem tvorit. Manzel udelal ohen v krbu, a ja jsem citila ze jsou vanoce za rohem a hned mne ovladly inspiracni napady. Tyto vlocky jsou delane z moji vlastni hlavy, mozna jsou nekde na netu stejne nebo podobne fotografie, ale ujistuji vas,z e tyto vlocky jsou hackovane podle me imaginace. Tak treba vas budu inspirovat. Preji vam vsem prijemne tvoreni vlocek.
I love angels. In paintings, in drawings, crochet angels.... Here is my variation of a crocheted angel. It makes a nice decoration for your Christmas tree.
Head and Halo:
1. ch 18, connect into circle with a sl st
2. ch2, then 28 sc
3. seven sl st into 1-7 stitches of the previous row, ch20, then sl st into 8th stitch from the end- turn
4. ch2, 20 sc - turn
5. sl st. into the 7th stitch from row 3, then 2 sl st, ch4, 4 sl st, ch4 - repeat 3 more times, finish wit 2 sl st + one more sl st into the 7th stitch from the end in the 3rd row
6. finish head with seven sl sts
Body:
7. start neck with ch4, tr crochet into same stitch as ch4, two tr crochet into next stitch, turn
8. ch4, three tr crochet into "2 tr cr" space from prev. row, skip one space between tr crochets, four tr crochet into the space between the last two tr crochets on the end, turn
9. sl st, ch4 + three tr crochet into space between second and third tr crochets in prev. row, skip one space (bet. 3rd & 4th tr crochets in prev. row), four tr crochet into same space between 4th and 5th tr crochets from in prev. row, skip one space (bet. 5th & 6th tr crochets in prev. row), four tr crochet into same space between 6th and 7th tr crochets from in prev. row = total 12 tr cr, incl ch4 stitch in row 9, turn
10. repeat row 9 - you will end up with total 20 tr cr, incl ch4 stitch in row 10
11. sl st, ch4 + two tr crochet into space between second and third tr crochets in prev. row, skip two spaces, *three tr crochet into space, skip one space, - repeat 4 more times, three tr crochet into space, skip two spaces, finish with three tr cr, turn
12. ch4 + two tr cr into same stitch, then always between cluster of three tr st crochet another cluster of three tr st, finish at the end with a cluster of three tr st in the last stitch, turn
13. repeat row 12
14. *ch10, sl st into 5th ch, ch5, sc bet. 2nd cluster of tr stitches - rep 4 more times
15. work along the side of the skirt (from the bottom toward head) - ch4 and sl st for each row - 5x
Wings:
16. crochet ch4 + 4 tr crochet into the side of the next row (= right below the neck row), turn
17. ch4, tr cr into same stitch, *ch1, 2 tr cr into same stitch - repeat 3 more times, turn
18. ch4, tr cr into same stitch, *ch2, 3 tr cr into the space - repeat 3 more times, finish the row wit 2 tr cr in the last stitch, turn
19. *ch4, 3 sc, repeat until the end - finishing up with ch4 and sl st., cut of the string
Do the second wing starting on the bottom of the skirt with the same stitches as in row 15 and continue up to row 19.
Clean up the ends, starch your Angel and hang it on your Christmas tree. Happy Holidays.
***********************************************
Mam rada andilky v jakekoliv forme. Zde je hackovana variace meho andela.
Hlava a Svatozar:
1. retzek z 18ti ocek, spojit
2. 2 retizky, pote 28 kr sl
3. 7 spojovacich ocek do kazdeho kr sl, 20 retiskovych ocek, pote spoj ocko do 8meho ocka od konce/pocatku kruhu, ototcit
4. 2 retizky, 20 kr sl (kolem obvodu svatozare) - otocit
5. spojovaci ocko do 7 ocka (na hlave), pote 2 spoj ocka do kr sl na svatozari, 4 retizky, 2 spoj ocka do kazdeho kr sl, 4 retizky, 2 spoj ocka do kazdeho kr sl - opakovat (budete mit celkem 5 obloucku), ukoncit s 2 spojovacimi ocky + plus jeste jedno spoj ocko na zpevneni do 3 rady (hlava)
6. dokoncit hlavu s dalsimi 7 spojovacimi ocky podel strany hlavy
Telo:
7. krk zacneme se 4 retizky, pak dvojity sl do stejneho ocka, do dalsiho ocka 2 dl sl, otocit
8. retizek ze 4 ocek, 3 dl sl mezi dva sl sl z predesle rady, preskocit dalsi mezeru mezi sloupky, a do dalsi mezery uhackovat 4 dl sl, otocit
9. spojovaci ocko, a pak 4 ret ocka + 3 dl sl do mezery, pak do kazde druhe mezery uhackovat 4 dl sl - na konci rady by jste mely mit celkem 12 dl sl (vcetne dl sl ze 4 ret ocek)
10. opakovat 9-tou radu - v 10te rade by jste mely mit 20 dl sl (vcetne dl sl ze 4 ret ocek)
11. spjovaci ocko, 4 ret ocka + 2 dl sl do mezery, preskocit 2 mezery = uhackovat 3 dl sl, pote hackovat 3 dl sl v kazde druhe mezere - opakovat jeste 4x, preskocit 2 mezery a uhackovat 3 dl sl na konci rady, otocit
12. 4 ret ocka + 2 dl sl do stejneho ocka, pote uhackovat vzdy 3 dl sl v mezere mezi troj-dlouhymi sloupky, a nakonec do posledniho ocka opet 3 dl sl, otocit
13. opakovat 12-tou radu
14. *10 retisku, do pateho retisku spojovaci ocko, 5 retizku, kr sl do mezery kazde 2 trojite dl sl - opakovat jeste 4x
15. pokracujeme po strane tela (od spodu ke hlavicce) - 4 ret ocka, sl st do kazde rady - 5x
Wings:
16. uhackovat 4 ret. ocka + 4 dl sl po delce dlouheho sl v dalsi rade (je to rada hned pod radou, ktera tvori krk), otocit
17. 4 ret ocka, dl sl do stejneho oka * retizkove oko, 2 dl sl do stejneho oka - opakovat 3x, otocit
18. 4 ret ocka, dl sl do stejneho oka * 2 ret oka, 3 dl sl do stejneho oka - opakovat 3x, dokoncit radu 2-mi dl sl v poslednim ocku rady, otocit
19. *4 ret ocka, 3 kr sl - opakovat do konce rady a ukoncit 4 ret ocky a spojovacim ockem, ustrihnout prizi
Druhe kridelko zaciname opet odspodu sukynky = opakovat podle rady 15 - 19.
Zacistit vsechny konce, naskrobte vaseho Andilka a poveste na stromecek. Stastne a Vesele Vanoce.
If you want to make your house more festive for your Easter and if you like crochet, perhaps you could make for your windows a decoration - Crocheted Easter Nest. You can fill the nest with Spanish moss, put a little chick inside and hang it in your windows. Below you can see how it is made.
Pokud si chcete vyzdobit na Velikonoce svuj pribytek, tak si muzete uhackovat Velikonocni hnizdecko, naskrobit, vystlat ho, dat do neho kuratko a povesit do vasich oken na hacek s prisavkou.Nize muzete videt, jak to je hackovane.
Years back, when I moved to my first own apartment, I started making my place "livable". One day I walked to a store and I saw plain wooden coasters that I liked a lot and, which I needed for cups and glasses to protect my furniture. They were not expensive at all and I decided, that I will decorate them to make them look very special. At that time "gold leafing" was very fashionable, so after I purchased the coaster, I stopped at the art store on the way home and bought a gold leafing kit. I painted the middle of the coaster with red color and the rest (including a coaster holder) I painted with gold paint. I gave the coasters two coats. I made sure that my lines would be straight - I like to be neat. When the paint dried, I gold-leafed the red part (the middle). Gold leafing requires a lot of patience. Hands must be clean and dry, so the gold leaf doesn't stick to them much. And I remember vaguely that I also used brand new clean brush to smooth the gold leaf onto the coaster. When placing the gold leaf onto the object, you need to keep on mind that some of the red paint needs to show. That is the effect of antique gold leafing. To make my coasters more interesting, I glued images from the magazine onto the holder. After I was all done I painted clear varnish all over the holder and the coasters to make sure that the gold leaf would not peel.
I had these coasters for many years. You can see that they still look good, although they are a bit used. But it doesn't matter - it is giving it an antique feel. My friends usually ask where I bought my coasters. I always tell them how I did it and about a gold leaf kit which has a step-by-step directions in the package.
Later on, I even gold leafed an old and ugly chair, and gave it a new fabric. After I was done with it, the chair looked like brand new chair. Unfortunately I do not have any image to show you. I do not even have that chair. It is now in the possesion of another person.
Kdyz jsem se pred mnoha lety prestehovala do meho prvniho vlastniho bytu, zacala jsem si upravovat moje hnizdecko. Jednou jsem vesla do obchodu, kde jsem natrefila na male tacky pod hrnicky a sklenicky, ktere byly ze dreva. Byly levne a tak jsem si rekla, ze si je "ozdobim". V te dobe bylo velmi popularni tzv. "gold leafing" - zdobeni zlatymi tenouckymi listy. Takze jsem se okamzite zastavila v obchode pro malire a koupila jsem si sadu. Stred kazdeho tacku jsem natrela cervenou barvou z teto sady, zbytek jsem pomalovala zlatou barvou. Taktez jsem natrela zlatou barvou stojan na tacky. Dve vrstvy. A davala jsem pozor, aby prace byla odvedena dobre. Jakmile barva zaschla, vzala jsem "gold leaf" (zlaty list) a nanasela jsem ho na cervenou plochu tak, aby mezi kouskami listu prosvitala cervena barva. Na stojan jsem nalepila "utrzene" obrazky z casopisu. Pote jsem vse natrela prusvitnym lakem.
Tyto tacky mam jiz mnoho let, takze jsou jiz mirne opotrebovane, coz nevadi nebot jim pridava starozitny efekt. Pratele se me ptaji, kde jsem tyto tacky koupila a ja jim vzdy rikam at si koupi "gold leafing" sadu a taky si neco hezkeho vytvori.
Pozdeji jsem jeste "o-gold-leafovala" stare osklive kreslo. Sedadlo a operadlo jsem potahla novou latkou. Kreslo bylo jako nove. Bohuzel fotografii meho kresla nemam nebot uz mnoho let je u jineho majitele.




 and
and  and started creating. My husband made us fire, and that made me feel kind of festive and creative. These snowflakes I made out of my head - perhaps there are some like these elsewhere on the net, or maybe similar ones, but I assure you that these I created with my own imagination listening to cracking of our fire sipping my favorite tea. Hopefully these images will inspire you and unleash your creativity, too. Happy snowflake making!


 that I liked a lot and, which I needed for cups and glasses to protect my furniture. They were not expensive at all and I decided, that I will decorate them to make them look very special. At that time "gold leafing" was very fashionable, so after I purchased the coaster, I stopped at the art store on the way home and bought a
  . I painted the middle of the coaster with red color and the rest (including a coaster holder) I painted with gold paint. I gave the coasters two coats. I made sure that my lines would be straight - I like to be neat. When the paint dried, I gold-leafed the red part (the middle). Gold leafing requires a lot of patience. Hands must be clean and dry, so the gold leaf doesn't stick to them much. And I remember vaguely that I also used brand new clean brush to smooth the gold leaf onto the coaster. When placing the gold leaf onto the object, you need to keep on mind that some of the red paint needs to show. That is the effect of antique gold leafing. To make my coasters more interesting, I glued images from the magazine onto the holder. After I was all done I painted clear varnish all over the holder and the coasters to make sure that the gold leaf would not peel.
 " - zdobeni zlatymi tenouckymi listy. Takze jsem se okamzite zastavila v obchode pro malire a koupila jsem si sadu. Stred kazdeho tacku jsem natrela cervenou barvou z teto sady, zbytek jsem pomalovala zlatou barvou. Taktez jsem natrela zlatou barvou stojan na tacky. Dve vrstvy. A davala jsem pozor, aby prace byla odvedena dobre. Jakmile barva zaschla, vzala jsem "gold leaf" (zlaty list) a nanasela jsem ho na cervenou plochu tak, aby mezi kouskami listu prosvitala cervena barva. Na stojan jsem nalepila "utrzene" obrazky z casopisu. Pote jsem vse natrela prusvitnym lakem.