Search This Blog and The Web

Showing posts with label Scarves. Show all posts

Earth Day Shawl - When You Take A Variegated Yarn And Use A Granny Square Pattern No 6


I bought a beautiful variegated green-brown yarn by Plymouth Yarns and I had it stashed away for like three years. About a year ago I pulled my yarn out from my hiding place, I took my granny square pattern number six and started crocheting my newest project. First I wanted to make a poncho. But then I decided that a shawl will be better for me since I could wrap it around or use it as a wide scarf.

I realized I am on the right track to creating something beautiful as soon as I attached few squares together - I attached each square immediately to the one already finished - see my videos for righties and lefties. The way the colors blended and came together I knew I will hold soon (well actually as soon as I finish) an elegant and alluring piece of garment. 

If you would like to work on this project be aware that, unfortunately, they do not make this yarn anymore. That is what happens when we hide your yarns away from our husbands for too long 😉and you forget about them. But, I found a replacement of similar yarns for you - click HERE.  One of the yarns they suggest is Lana Grossa, which I love a lot. Recently I finished a couple of projects using Lana Grossa yarns and I am using another type of their yarns to knit a blouse for my petite daughter. Don't forget to scroll down to see many other choices. Maybe you will like the idea of using Madelintosh yarns. Or try to find online "one-ply lace yarn" that is baby alpaca/merino blend and that is variegated.

Anyway... I used my granny square #6 design (a link for the pattern is below) to turn these squares into a wide and long rectangle. I used 84 squares - 6 squares along the width of the shawl and 14 squares along the length. I still may do the 15th row to make my shawl even longer since I have about 1/2 a ball leftover.

I can also envision a really gorgeous baby blanket using this granny square. Or a throw. Or a scarf. You could make your own version of this design.

So, if you would like to crochet this shawl (or any suggested projects) check out the links and information below:

Materials:

Yarn - 6+ balls of Plymouth Yarns, Revel (depending on how wide and long your shawl/scarf/blanket you want); color: #16 Moss; weight: lace; 85% baby alpaca, 15% Merino Wool;
Hook - 2.75 mm (or use the link above for any similar yarn)
Yarn needle
Scissors

Size of each square:

Approximately 4"x4"

Links:

GRANNY SQUARE PATTERN NO. 6

VIDEO HOW TO ATTACH GRANNY SQUARES NO. 6 FOR RIGHTIES

VIDEO HOW TO ATTACH GRANNY SQUARES NO. 6 FOR LEFTIES 


***

DID YOU FIND ERRORS? Let me know on what page of my blog, and in which row by clicking HERE, and I will fix it as soon as I get to it. You can PM me on my FB Page HERE as well. Txs!
Also if you haven't subscribed to my HandmadeRukodelky Channel, you can do it HERE. There are many videos to be seen, too.

*******************************************************************************


Copyright page - click HERE


PLEASE, COMMENT ON YOUTUBE BELOW MY VIDEOS, AND/OR SHARE YOUR IMAGES OF YOUR RECREATED WORKS ON MY FB PAGE HERE :-)


Note: Most of the time I work as fast as I can to keep up with knitting and crocheting requests. I have to videotape, edit videos, then convert them & upload them to my channel. After that often I post on my blog patterns. I answer many questions, which means that often I work up to 16 hours a day. I would tremendously appreciate IF anyone of you who finds an error in the written pattern, so please, let me know - where (what rows) and what may be the problem. Many future knitters & crocheters from our artsy and crafty virtual world will thank you for your good deed, including myself.

B&W Fuzzy Scarf With iCord Edge For Fashion-conscious

Today, I would like to write about knitting my black and white fuzzy scarf, which I absolutely love.

Not too long ago I went to check out a yarn store that I like to visit occasionally. In this store, they had a knitted dark gray caplet with green fuzzy pieces sticking out and green edging around it. The effect of the green edging vs. green fuzzy pieces sticking out of the gray yarn was divine.

Then, I noticed they had these fuzzies in different colors too. One of them was a yarn with fuzzy white tufts. I knew right away that this yarn would be perfect for a scarf, which would go well with my white jacket that has black trim. So I bought four skeins of the fuzzy yarn and two skeins (per store owner's recommendation) for the trim. I had a hunch that I will not need two skeins for the trim. Instead, I should have bought five of the fuzzy yarns and one for the trim. Well, that's OK, I will make good use of the leftover white yarn in the future.

Knitting with "Lang Yarns" is not complicated. For my project, I used a seed stitch so my edges would not curl and my scarf would have a reversible effect. I could have used a garter stitch also, but I thought that seed stitch would allow for a longer scarf.

After wearing my scarf, I noticed that the tufts shed, which is fine with me because I wear my new scarf with my white jacket that has a nylon surface. But I cannot wear it with a cotton fabric, because I would look like I played with a dog.

I made a detailed video too. Enjoy.


VIDEO FOR RIGHT-HANDED

VIDEO FOR LEFT-HANDED


Materials:
Yarn

  • Lang Yarns, "Drago"; Color: 999.0094 (white tufts); Fiber: 41% Mohair - 25% Wool - 18% Nylon - 16% Acrylic; 50g/1.75 oz; 110 yds/100 m; Care: Use detergent for fine wash without softener
  • Berrocco, "Comfort"; Color: 9700 Chalk; Fiber: 50% Super Fine Nylon, 50% Super Fine Acrylic; 100g/3.5 oz; 210 yds; 


Knitting Needles - Long needles - 6.00 mm (for scarf); 2 short DPNs - size 5.5mm (for an i-cord)
Yarn needle
Scissors

Abbreviations:
CO - cast on
K - knit
P - purl
st, sts - stitch, stitches
WS - wrong side
RS - right side
K2togtbl - knit two stitches together through the back loop
BO - bind off


Gauge:
My gauge corresponds to a manufacturer's gauge on the yarn label

Size:
Length: 33"
Width: 7"

Step-by-Step:

Using Lang Yarns knit a rectangle of our desired width and length

Working with two long knitting needles CO 49 sts (or your desired number of stitches). I CO an odd number of stitches to work every row the same way (the seed stitch)

Row 1-??          (RS) *[K1, P1]* repeat to last st, K1

Knit as many rows as desired, do not bind off.

Work along the last row

CO 3 (or 4) stitches onto DPN and bind off using an i-cord technique. When finished with binding off, work using two DPNs - knit 3 rows in the round (K3), then (if you are right-handed) work i-cord as such:

Work along 1st long side

Rnd 1               pick one loop (leading yarn) along the side with your left END of your DPN (that has 3 sts on it), slide all 4 stitches toward the right side, K2, K2togtbl (white and dark stitches)

Rnd 2               pick second loop (leading yarn) along the side with your left END of your DPN (that has 3 sts on it), slide all 4 stitches toward the right side, K2, K2togtbl (= white and dark stitches)

Rnd 3               slide all 3 stitches toward the right side, K3

Repeat until you reach next corner, then knit 3 rows in the round (K3)

Work along the CO side (the bottom)

Rnd 1-49          pick each loop (every CO stitch) along the bottom with your left END of your DPN (that has 3 sts on it), slide all 4 stitches toward the right side, K2, K2togtbl (white and dark stitches)

Repeat until you reach next corner, then knit 3 rows in the round (K3)

Work along 1st long side

Rnd 1               pick one loop (leading yarn) along the side with your left END of your DPN (that has 3 sts on it), slide all 4 stitches toward the right side, K2, K2togtbl (white and dark stitches)

Rnd 2               pick second loop (leading yarn) along the side with your left END of your DPN (that has 3 sts on it), slide all 4 stitches toward the right side, K2, K2togtbl (= white and dark stitches)

Rnd 3               slide all 3 stitches toward the right side, K3

Repeat until you reach next corner, then knit 2 rows in the round (K3) - finish the i-cord by sewing both ends together and weave in all loose ends.


***

DID YOU FIND ERRORS? Let me know on what page of my blog, and in which row by clicking HERE, and I will fix it as soon as I get to it. You can PM me on my FB Page HERE as well. Txs!
Also if you haven't subscribed to my HandmadeRukodelky Channel, you can do it HERE. There are many videos to be seen, too.

*******************************************************************************


Copyright page - click HERE


PLEASE, COMMENT ON YOUTUBE BELOW MY VIDEOS, AND/OR SHARE YOUR IMAGES OF YOUR RECREATED WORKS ON MY FB PAGE HERE :-)


Note: Most of the time I work as fast as I can to keep up with knitting and crocheting requests. I have to videotape, edit videos, then convert them & upload them to my channel. After that often I post on my blog patterns. I answer many questions, which means that often I work up to 16 hours a day. I would tremendously appreciate IF anyone of you who finds an error in the written pattern, so please, let me know - where (what rows) and what may be the problem. Many future knitters & crocheters from our artsy and crafty virtual world will thank you for your good deed, including myself.

My Mom's Old Fashioned Scarf

When I was a child, my mom used to make scarves for my siblings and me. These scarves' one end would go through an opening on the other end that my mom made while knitting our scarves. That way we would not lose them.
Today I would like to share with you my mom's design (which was very popular then) for such a scarf. I also made videos for knitters (for lefties and righties - see below) who prefer to knit along. The pattern can be adjusted by simply changing stitches to lower or higher number when increasing or decreasing, and knitting the middle part shorter or longer than I described it below and in my videos. I used worsted (#4) yarn, but you may knit this scarf from thinner or thicker yarn as well - then you will have to adjust a number of increases and decreases, and a number of rows in the middle as well.
To knit this scarf, you need to know: how to cast on, knit, purl, knit two together, increase, transfer stitches from one needle onto two needles and then back, and how to bind off.

VIDEO TUTORIAL FOR RIGHTIES

VIDEO TUTORIAL FOR LEFTIES

Materials:
Yarn - any yarn of medium weight (#4, worsted) - your choice;
In the video I am using: Cascade Yarns, Cascade 220, worsted weight #4, 100g/3.5 oz; 220 yds/200 m; Colors: #1 - 9559 (light gray), #2 - 8505 (white)
Knitting Needles - US #8 (5.00 mm): 3 long DPNs (minimum 8" or longer; three 10" would be better) OR 2-3 circular needles (EITHER one 30"+ long, plus one 16"long, OR three 9" to 16" circulars)
Scissors

The scarf weighs 85g in total.

Abbreviations:
CO - cast on
K - knit
P - purl
st, sts - stitch, stitches
WS - wrong side
RS - right side
incr - increase; insert your needle purlwise through the back loop, knit it, don't take the stitch off the needle yet, knit the same stitch regular way, only then take the stitch off the needle - you increased by 1 stitch
K1-ptbl - knit one stitch purlwise through the back loop
K2tog - knit two stitches together
BO - bind off

Gauge:
My gauge corresponds to a manufacturer's gauge on the yarn label

Size:
Length: 33"
Width: 7"


Step-by-Step:

  • HEART/LEAF SHAPED END #1
Yarn color #1 (gray)

Working with two long DPNs, OR one long 30" circular (knitting back and forth with each end), OR two shorter circular (using them the same way as DPNs)  CO 4 sts

Row 1          (WS) K4

Row 2          (RS) incr, K to end
Row 3          (WS) incr, K to end

repeat Rows 2 & 3 as many times as you need, I increased my stitches in each row until I had total 32 stitches on my needles

Row 30       (RS) K32
Row 31       (WS) K32

Repeat Rows 30 & 31 as many times as you need. For my width of 32 stitches, I knitted total 16 rows (half of 32 sts), which means I finished with Row 45.

  • OPENING #1
Before you will continue knitting do this first:
While you have your 32 (or your desired even number of stitches, that can be divided by two into another even number) stitches on your needle take either two DPNs, OR two shorter circulars, OR the other end of your long circular and one short circular and transfer stitches from the one needle onto two needles in alternating fashion - first transfer one stitch onto needle #1, then transfer the second stitch onto needle #2 and repeat to end. You should end up with 16 sts on needle #1 and 16 sts on needle #2

Knit stitches on needle #1, the one closer to your body, first:
Row 46     (RS) *[K1, P1]* - to end
Row 47     (WS) *[K1, P1]* - to end

Repeat Rows 46 & 47 nine more times, until you are finished with Row 65, then fasten off the yarn while keeping a tail long about 8"-10"

Fold the first knitted piece forward toward your body, then knit stitches on needle #2, the one further away from your body, starting on the same side as you started when you were working with needle #1, second:
Row 46     (RS) *[K1, P1]* - to end
Row 47     (WS) *[K1, P1]* - to end

Repeat Rows 46 & 47 seven more times, until you are finished with Row 65, DO NOT fasten off the yarn

Transfer stitches in the alternating fashion from two needles onto just one needle as such: starting with the back needle #2 move your first stitch onto the single knitting needle, then take the first stitch from needle #1 and move it onto the same single knitting needle - repeat until you have all 32 stitches back on one knitting needle only.

  • MIDDLE PANEL
Note: if you knit this scarf with only one color yarn, knit as many rows as needed to wrap around your neck. My middle part measures 14.5".

This is how I knitted my middle panel:

Row 66              combine tail from the knitting needle #1 and the yarn from the knitting needle #2 and K all stitches to end (with combo tail/yarn you will knit only a few stitches, then continue with yarn only - this will eliminate weaving in the ends)
Row 67-105       K32

Color #2 (white)
Row 106-113    K32

Yarn color #1 (gray)
Row 114-121    K32

Color #2 (white)
Row 122-125    K32

Yarn color #1 (gray)
Row 126-129    K32

Color #2 (white)

Row 130-137    K32

Yarn color #1 (gray)
Row 138-145    K32

Color #2 (white, from now on till end)
Row 146-185    K32

  • OPENING #2
In Rows 186 through 205 repeat knitting this opening same way as in Opening #1 - separation of your stitches onto 2 knitting needles, then knit side #1, then side #2, then put these two sides back together onto one knitting needle only.

  • HEART/LEAF SHAPED END #2
Continue working as such:

Row 206-221   K32

Row 222          (RS) K1-ptbl, K2tog, K to end
Row 223          (WS) K1-ptbl, K2tog, K to end

Repeat Rows 222 and 223 until you have 4 sts on your needle.

In your last row BO all your stitches. Then weave in all the tails/ends.

***

DID YOU FIND ERRORS? Let me know on what page of my blog, and in which row by clicking HERE, and I will fix it as soon as I get to it. You can PM me on my FB Page HERE as well. Txs!
Also if you haven't subscribed to my HandmadeRukodelky Channel, you can do it HERE. There are many videos to be seen, too.

*******************************************************************************


Copyright page - click HERE


PLEASE, COMMENT ON YOUTUBE BELOW MY VIDEOS, AND/OR SHARE YOUR IMAGES OF YOUR RECREATED WORKS ON MY FB PAGE HERE :-)


Note: Most of the time I work as fast as I can to keep up with knitting and crocheting requests. I have to videotape, edit videos, then convert them & upload them to my channel. After that often I post on my blog patterns. I answer many questions, which means that often I work up to 16 hours a day. I would tremendously appreciate IF anyone of you who finds an error in the written pattern, so please, let me know - where (what rows) and what may be the problem. Many future knitters & crocheters from our artsy and crafty virtual world will thank you for your good deed, including myself.


Very Easy Fuzzy Puff Stitch Scarf

Fuzzy Puff Stitch Scarf 
I have been working on my "Foggy Dawn Sweater Project" for quite some time, and I needed a break. When I was teaching knitting and crocheting class one of my students brought Caron's "Latte Cake" yarn. Since I haven't been to a yarn store for quite some time, I decided to drive after class to buy this yarn. I checked on my Michaels app if they have "Late Cake" on sale and yes they did - for $7 plus 20% off including sale price items. So, I went and bought me 2 balls for a scarf and a hat.

I decided to make my scarf wider than I usually make them, and to my surprise, I used both balls! So I had to go to the store get one more ball for my hat (Pattern for this hat coming soon). So please be aware that you will need a lot of yarn for this project. However, it will look great when you are finished. I love it. And so did my daughter because she requested one for her in her preferred color.

This scarf took me 2 full days to finish (and I am reasonably fast in crocheting) - so depending on your width (make your own), length (make your own also), and speed you may be done with it within two (or more days).

Look for a pattern and video of a matching hat in the near future.

If you want to crochet along my video, click on one of the links:

RIGHT-HANDED CROCHETERS CLICK HERE

LEFT-HANDED CROCHETERS CLICK HERE

Material:
Yarn - 2 balls of Caron's "Latte Cake"; Self-Striping Yarn; Color: Starfruit; 8.8 oz. / 250g; 530 Yards / 485 Meters; OR any worsted yarn of your choice
Hook - 5 mm
Yarn needle (for weaving in the ends)
Scissors

Abbreviations:
ch - chain
st - stitch
dc - double crochet
sc - single crochet
sl st - slip stitch
sp - space
ch1-sp - chain one space
puff - puff stitch: YO and insert the hook into the next stitch (or space). YO and pull through to the height of dc - repeat this process 3 times and you will end up with 6 loops plus an initial stitch on your hook. YO and pull through 6 loops, YO and pull through last 2 stitches on the hook

Step-by-Step Direction:

Foundation: multiple of 2 sts + 1 st (OR odd number of stitches); my foundation is 51 chain stitches

Foundation Row 1          Foundation: multiple of 2sts + 1 st; my foundation was ch51
Foundation Row 2          1 sc in third chain from hook, *[1 sc in next ch st]* - repeat to end, turn
Puff Stitch Row 1            ch3, 1 dc in next st, *[puff in next st, ch1, skip st]* - repeat to last 3 sts, then after skipping stitch make 1 dc in each of next 2 last sts, turn
Puff Stitch Row 2             ch3, 1 dc in next st, *[puff in ch1-sp, ch1, skip st]* - repeat to last 3 sts, then after your last puff stitch, make 1 dc in each of next 2 last sts, turn

Repeat "Puff Stitch Row 2" as many times as needed for your desired length.

Last Row - ch1, then *[1 sc in next st]* - repeat to end; fasten off, weave in your tails. Wear it proudly.

***

DID YOU FIND ERRORS? Let me know on what page of my blog, and in which row by clicking HERE, and I will fix it as soon as I get to it. You can PM me on my FB Page HERE as well. Txs!
Also if you haven't subscribed to my HandmadeRukodelky Channel, you can do it HERE. There are many videos to be seen, too.

*******************************************************************************


Copyright page - click HERE


PLEASE, COMMENT ON YOUTUBE BELOW MY VIDEOS, AND/OR SHARE YOUR IMAGES OF YOUR RECREATED WORKS ON MY FB PAGE HERE :-)


Note: Most of the time I work as fast as I can to keep up with knitting and crocheting requests. I have to videotape, edit videos, then convert them & upload them to my channel. After that often I post on my blog patterns. I answer many questions, which means that often I work up to 16 hours a day. I would tremendously appreciate IF anyone of you who finds an error in the written pattern, so please, let me know - where (what rows) and what may be the problem. Many future knitters & crocheters from our artsy and crafty virtual world will thank you for your good deed, including myself.

Knitted Daily Sky Scarf

Hello, my fellow knitters. I am starting an ongoing project. I will be recording a daily sky in my approximately 72" long scarf. Every day, I will be posting my progress on THIS particular page. If you would like to join me in this knit-along project then save this page and return to it for day-by-day short narratives updates, including images, charts, links to other pages, and videos of this pattern.

This scarf is for knitters that love cables. It is knitted back and forth - each row starts with a long tail and each row ends with a long tail (fringe).

 Observe a sky every day to create a unique scarf for anyone. It is to be cast on many stitches and knitted lengthwise, where rows create the width of the scarf. I used worsted yarn, but you can use thinner yarn, provided you will adjust both, the number of stitches and rows that are important for pattern repeats. Each row is started with a new string (depending on the color of the sky), leaving long tails for a fringe on both sides. If you know how to knit basic knitting stitches and a cable you can knit this scarf. I provide several "how-to" videos to help knitters that would love to try a cable project.


Today, I will share with you:
  • some tables and charts I made for you (see below)
  • for the CHART of this scarf's "CABLE PATTERN" CLICK HERE
  • see what materials I will be using
If you would like to print any of the charts, you can click on the image to make it bigger and then print it. About the materials - you can substitute with your own choice of yarn - a scarf doesn't need to be exact, it can be a little narrower/wider or shorter/longer. Your knitting needles should correspond with a manufacturer's recommendation that is printed on the label. So let's do it.

*PRINTABLE WRITTEN PATTERN COMING SOON

VIDEO TUTORIALS (only for right-handed knitters):

FOR VIDEO "INTRO TO THIS PROJECT" CLICK HERE

VIDEO #2 - Per WRITTEN PATTERN Rows 7-10;  (Per CHART Rows 1-4)

VIDEO #3 - Per WRITTEN PATTERN Rows 11-16; (Per CHART Rows 5-10)

VIDEO #4 - Per WRITTEN PATTERN Rows 17-22; (Per CHART Rows 11-16)

VIDEO #5 - Per WRITTEN PATTERN Rows 23-26; (Per CHART Rows 17-20)

Keep track of your yarn (next to each sky image), date and what # of the daily sky (in the empty rectangles)

In the image below I am showing how I calculated my stitches for the scarf. I will make either two to three (and possibly even four) 20-row repeats - I am not sure just yet.
  1. In a first step, I figured out total stitches I will need for 72" long scarf (I like them long). If there are ~20 stitches in 4", then in 72" there are 360 sts (if you want a shorter scarf, you need to figure out how many stitches will fit into your inches, then you will have to figure out how many repeats will fit into your total stitches)
  2. My pattern calls for 16-stitch repeats, I figured that I will need about 21 repeats + extra stitches for each to get as close to 360 sts. With 21 repeats of 16-stitch pattern plus 10 sts for both 

This chart will help you figure out stitches for the length of your scarf


Materials:

Me and my Cascade 220 yarn skeins

Yarn - any yarn of medium weight (#4, worsted) - your choice;
In the video I am using: Cascade Yarns, Cascade 220, worsted weight #4, 100g/3.5 oz; 220 yds/200 m; Colors: 8905 (light blue), 8505 (white), 9559 (light gray), 9325 (medium blue), 9567 (dark blue), 8400 (dark gray)
Knitting Needles -  circular, US #8 (5.00 mm), length: 40" or longer
Scissors

These are my Yarn Samples paired with different types of skies

Abbreviations:
CO - cast on
K - knit
P - purl
sts - stitches
M - place marker between the stitches
CR(K2/K2) - right-leaning cable with K2/K2 sts = slip 2 sts on the cable needle and place the cable needle in the back of your work, knit next 2 sts, then knit 2 sts from cable needle
CL(K2/K2) - left-leaning cable with K2/K2 sts = slip 2 sts on the cable needle and place the cable needle in the front of your work, knit next 2 sts, then knit 2 sts from cable needle
CR(K2/P2) - right-leaning cable with K2/P2 sts = slip 2 sts on the cable needle and place the cable needle in the back of your work, knit next 2 sts, then purl 2 sts  from cable needle
CL(P2/K2) - left-leaning cable with P2/K2 sts = slip 2 sts on the cable needle and place  the cable needle in the front of your work, purl next 2 sts, then knit 2 sts from cable needle
BO - bind off


Gauge:
My gauge corresponds to a manufacturer's gauge on the yarn label, however, it is not as important in this project


Size:
Length: ~72"
Width: finished width is ~7"


Step-by-Step:

CO 346 sts on circular needles (5.00 mm)
Please, note that day = row, ie. Day 1 = Row 1 or Day 23 = Row 23

Day 1-5           K346
Day 6              K5, M, *[K16, M]* - repeat until your last 5 sts, K5


  • Update #1 - February 11, 2018

Today I finished my 5 rows. Tomorow I have to knit one more row of knit stitches. As I will be knitting the row I will be inserting markers between the stitches for my next row, that is for row 7 - I made a change to my pattern above. And below are my skies in the last 5 days 😊

YARN COLORS BY DAILY SKY:  Day 1 - #2, Day 2 - #3, Day 3 - #3, Day 4 - #2, Day 5 - #4


  • Update #2 - February 14, 2018 (HAPPY VALENTINE'S DAY, BTW 💝 )

    Now we are getting into cables. You will have to pay big attention to right-leaning and left-leaning cables, PLUS if you will be knitting all four sts of your cable, or purling2/knitting2 OR knitting2/purling2. It is very important to concentrate on your knitting (no distractions!!) so you get that beautiful 3D pattern. You do not want to frog anything, right?
Day 7                   K-edge, M, *[P4, CR(K2/K2)CL(K2/K2), P4, M]* - repeat; then K-edge
Day 8 (Feb14th)  K-edge, M, *[P16, M]* - repeat; then K-edge
Day 9                   K-edge, M, *[P2, CR(K2/P2),  K4,  CL(P2/K2), P2, M]* - repeat; then K-edge

    • Update #3 - February 16, 2018

    Link to the finished VIDEO #2 (for righties) is mentioned above. But I must warn you - I made a big "booboo" which I am explaining somewhere toward the end of the video (on day 10) - so pay attention to what happened. It is not affecting the pattern if you did it right - unlike me 🙄. Luckily I didn't have to re-record the rows again - but the number of stitches in my scarf's edge are different now, so I altered "K5" to "K-edge" in the written pattern.
    As you see it is turning into an adventure 😀. By the time I am finished with this scarf, we should have this pattern written without mistakes. Hopefully 😁.
Day 10                 K-edge, M, *[P4, K2, P4, K2, P4, M]* - repeat; then K-edge

  • Update #4 - February 22, 2018
    Link to the finished VIDEO #3 (for righties) is mentioned above.

Day 11                  K-edge, M, *[CR(K2/P2), P2, K4,  P2, CL(P2/K2), M]* - repeat; then K-edge
Day 12                  K-edge, M, *[P2, K4, P4, K4, P2, M]* - repeat; then K-edge
Day 13                  K-edge, M, *[K2, P2, CR(K2/P2), CL(P2/K2), P2, K2, M]* - repeat; then K-edge
Day 14                  K-edge, M, *[P2, K2, P8, K2, P2, M]* - repeat; then K-edge
Day 15                  K-edge, M, *[K2, CR(K2/P2),  P4, CL(P2/K2), K2, M]* - repeat; then K-edge
Day 16                  K-edge, M, *[P16, M]* - repeat; then K-edge


  • Update #4 - March 2, 2018
    Link to the finished VIDEO #4 (for righties) is mentioned above.

Day 17                 K-edge, M, *[CL(K2/K2), P8, CR(K2/K2), M]* - repeat; then K-edge
Day 18                 K-edge, M, *[P16, M]* - repeat; then K-edge
Day 19                 K-edge, M, *[K2, CL(P2/K2),  P4, CR(K2/P2)K2, M]* - repeat; then K-edge
Day 20                 K-edge, M, *[P2, K2, P8, K2, P2, M]* - repeat; then K-edge
Day 21                 K-edge, M, *[K2, P2 CL(P2/K2), CR(K2/P2), P2K2, M]* - repeat; then K-edge
Day 22                 K-edge, M, *[P2, K4, P4, K4, P2, M]* - repeat; then K-edge

  • Update #5 - March 7, 2018
    Link to the finished VIDEO #5 (for righties) is mentioned above.

Day 23                 K-edge, M, *[CL(P2/K2), P8, CR(K2/P2), M]* - repeat; then K-edge
Day 24                 K-edge, M, *[P4, K2, P4, K2, P4, M]* - repeat; then K-edge
Day 25                 K-edge, M, *[P2, CL(P2/K2),  K4, CR(K2/P2)P2, M]* - repeat; then K-edge
Day 26                 K-edge, M, *[P16, M]* - repeat; then K-edge


REPEAT ROWS 7-26 TWO TO THREE MORE TIMES (DEPENDING ON HOW WIDE YOU WANT YOUR SCARF. 

Then knit 6 rows of knit stitches only and when finished with your second edge BO all the stitches. Leave the tail long enough for a fringe

TIGHTEN UP ALL THE TAILS (IF YOU DIDN'T DO IT ALREADY) AND MAKE KNOTS USING 2 YARN TAILS (1 TAIL FROM EACH OF THE ADJACENT ROWS) AS CLOSE TO YOUR KNIT AS POSSIBLE. WHEN FINISHED TIE-ING ALL THE KNOTS MAKE ANOTHER ROW OF KNOTS BY SEPARATING EACH PAIR AND PAIR STRINGS AGAIN WITH EACH YARN TAIL FROM THE OTHER PAIR - MAKE KNOTS IN A STRAIGHT LINE. EVEN OUT YOUR FRINGE BY CUTTING IT STRAIGHT ACROSS IN THE DESIRED LENGTH.

Materials (if you shop online via my affiliate links below, I would get few pennies, which would help to fund my future projects TXS):
Michaels online store, OR Hobby Lobby, OR Jo-Ann Fabrics, OR Walmart 

***

DID YOU FIND ERRORS? Let me know on what page of my blog, and in which row by clicking HERE, and I will fix it as soon as I get to it. You can PM me on my FB Page HERE as well. Txs!
Also if you haven't subscribed to my HandmadeRukodelky Channel, you can do it HERE. There are many videos to be seen, too.

*******************************************************************************


Copyright page - click HERE


PLEASE, COMMENT ON YOUTUBE BELOW MY VIDEOS, AND/OR SHARE YOUR IMAGES OF YOUR RECREATED WORKS ON MY FB PAGE HERE :-)


Note: Most of the time I work as fast as I can to keep up with knitting and crocheting requests. I have to videotape, edit videos, then convert them & upload them to my channel. After that often I post on my blog patterns. I answer many questions, which means that often I work up to 16 hours a day. I would tremendously appreciate IF anyone of you who finds an error in the written pattern, so please, let me know - where (what rows) and what may be the problem. Many future knitters & crocheters from our artsy and crafty virtual world will thank you for your good deed, including myself.

Purple Rain Lacy Scarf

Purple Rain Lacy Scarf  
In August (2017) I posted a free pattern for a purple hat for Shaken Baby Syndrome (SBS). I used a purple part of Lion Brand yan for Shawls. However, I still had about 3/4 of the ball left over, and I wanted to use it up. Instead of a shawl, I decided to knit a scarf. I am a very busy person, and I was hoping to find an easy pattern that will look very rich. I looked through my books and found a chart I thought it could work. Believe it or not, this project turned out great - exactly what I wanted.
The yarn has two different fibers - cotton and acrylic. Cotton is making this scarf strong, and acrylic is making the yarn very soft - when I touch it, it feels plush against my fingers. Of course, I made videos for right-handed knitters and for left-handed knitters, too.


Materials (if you shop on-line via my affiliated links below, I would get few pennies, which would help to fund my future projects TXS):
Michaels on line store, OR Hobby Lobby, OR Jo-Ann Fabrics, OR Walmart 

Yarn: the purple part of Lion Brand; Shawl in a Ball; color: Mindful Mauve; 58% cotton/39% acrylic; 3 % other fiber; 5.3 oz/150 g; 518 yd/473 m; Note: I made 2 hats from the purple part of this yarn, which is surprisingly soft to the touch - see the link about the hats above

Knitting Needles - size #8 (5mm)
Hook - size #D
Yarn Needle (for weaving in the tail)
Scissors

Size:
Width of the scarf: 11"
Length: I just used leftover (about 3/4) of the yarn ball

Abbreviations:
CO - cast on
EDGE - knit 3 sts (or your desired # of stitches)
K - knit
P - purl
YO - yarn over
K2tog - knit 2 stitches together
SSK - slip knitwise, slip knitwise, knit both slipped stitches through the back loop
BO - bind off

Gauge:
My gauge corresponds with a manufacturer's gauge on any yarn label


Step-by-Step Directions:

CO 50 stitches (4 repeats of 11 sts + 3 sts for the first edge + 3 sts for the second edge).
Note: you can adjust a number of your repeats and edge stitches per your desire.


Row 1-6             K50

Pattern:
Note: you will repeat 10 rows of this lacy pattern until your desired length (we will start counting again from Row 1)

Row 1                 EDGE, pm; *(K2tog - 2x; YO, K, YO, K, YO, K, YO , SSK - 2x; pm)* - repeat total 4x; EDGE
Row 2                 EDGE; P44; EDGE
Row 3                 EDGE, pm; *(K2tog - 2x; YO, K, YO, K, YO, K, YO , SSK - 2x; pm)* - repeat total 4x; EDGE
Row 4                 EDGE; P44; EDGE
Row 5                 EDGE, pm; *(K2tog - 2x; YO, K, YO, K, YO, K, YO, SSK - 2x; pm)* - repeat total 4x; EDGE
Row 6                 EDGE; K44; EDGE
Row 7                 EDGE; K44; EDGE
Row 8                 EDGE; P44; EDGE
Row 9                 EDGE; K44; EDGE
Row 10               EDGE; P44; EDGE


After you knit your desired number of ROW repetitions, you will finish your scarf this way:

Row 1                 EDGE, pm; *(K2tog - 2x; YO, K, YO, K, YO, K, YO, SSK - 2x; pm)* - repeat total 4x; EDGE
Row 2                 EDGE; P44; EDGE
Row 3                 EDGE, pm; *(K2tog - 2x; YO, K, YO, K, YO, K, YO, SSK - 2x; pm)* - repeat total 4x; EDGE
Row 4                 EDGE; P44; EDGE
Row 5                 EDGE, pm; *(K2tog - 2x; YO, K, YO, K, YO, K, YO , SSK - 2x; pm)* - repeat total 4x; EDGE
Row 6                 K50 (take your markers out as you knit)
Row 7                 K50
Row 8                 K50
Row 9                 K50
Row 10               K50
Row 11               BO all your stitches and weave in your tails/ends


Click on the image to enlarge this chart


***

DID YOU FIND ERRORS? Let me know on what page of my blog, and in which row by clicking HERE, and I will fix it as soon as I get to it. You can PM me on my FB Page HERE as well. Txs!
Also if you haven't subscribed to my HandmadeRukodelky Channel, you can do it HERE. There are many videos to be seen, too.

*******************************************************************************


Copyright page - click HERE


PLEASE, COMMENT ON YOUTUBE BELOW MY VIDEOS, AND/OR SHARE YOUR IMAGES OF YOUR RECREATED WORKS ON MY FB PAGE HERE :-)


Note: Most of the time I work as fast as I can to keep up with knitting and crocheting requests. I have to videotape, edit videos, then convert them & upload them to my channel. After that often I post on my blog patterns. I answer many questions, which means that often I work up to 16 hours a day. I would tremendously appreciate IF anyone of you who finds an error in the written pattern, to please, let me know - where (what rows) and what may be the problem. Many future knitters & crocheters from our artsy and crafty virtual world will thank you for your good deed, including myself.

1 Pattern - 2 Knitted Triangular Scarves

Triangular Scarf For Fall   
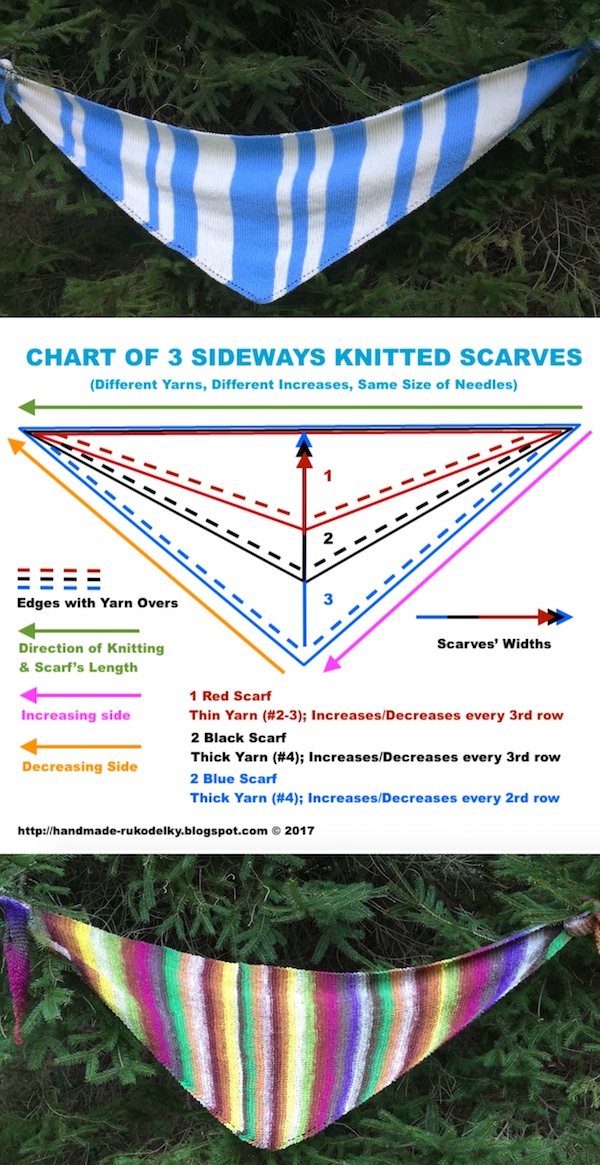
There are many easy projects for knitting, and this triangular scarf is one of them. It is knitted sideways.
First, you have "grow" stitches toward one side only, and then you have to "reduce" these stitches back to form the narrow tip at the end. Most of the triangular scarves that are knitted sideways get an increase every other row. I am tall, my arms are long, and I didn't want scarf short in length and long in width (see the image below). That is why I decided to increase every third row - to make my scarf longer in length and slightly shorter in width (or height).
Feel free to use yarn of your choice. If you use a thicker yarn, you will knit slightly longer scarf in width (or height), but a thinner yarn will yield a scarf narrower while you will maintain the same length of your scarf. I knitted two scarves that have the same length, 36 inches, but because I knitted one scarf with worsted yarn (#4), and one with sport yarn (#3), the scarf knitted with thinner yarn is narrower. If you watch my video (links are below), you can see this difference.

FOR VISUAL KNITTERS, HERE ARE TWO VIDEOS:


Enjoy and spread the love of knitting and crocheting.


Materials (if you shop on-line via my affiliated links below, I would get few pennies, which would help to fund my future projects TXS):
Michaels on line store, OR Hobby Lobby, OR Jo-Ann Fabrics, OR Walmart 

Yarn - your choice (for Winter scarf I used THIS worsted yarn in antique white and light blue colors; and for Fall scarf I used 2 balls of Noro Taiyo Sport yarn, cotton/silk/wool blend; 100g/349yds.)
Knitting Needles - size #8 (5mm)
Yarn Needle (for weaving in the tail)
Scissors

Gauge:
Varried

Size:
One size fits all, but length & width will depend on your choice of yarn, size of the needles, and rows knitted before you will start decreasing. Increases/Decreases will also determine how many stitches you will maintain on your knitting needles, thus the width/height of the finished project may vary from scarf to scarf.

Abbreviations:
CO - cast on
EDGE - knit 2 sts
K - knit
pm - place marker
mm - move marker from one knitting needle onto the other
YO - yarn over
K3tog - knit 3 stitches together
BO - bind off

Scarves & Graph - to enlarge click on the image


Step-by-Step Directions:

CO 4 stitches and knit 2 rows

INCREASING PART:

Row 1          EDGE, pm; YO (after the marker), K to end
Row 2          K all sts
Row 3          K all sts
Row 4          K all the way to marker, YO (before the marker), mm, EDGE
Row 5          K all sts
Row 6          K all sts

Repeat these 6 rows until you reach 1/2 of your scarf's desired length (about 30"-40")


DECREASING PART:

Row 1          EDGE, mm; YO (after the marker), K to end
Row 2          K all way to 4 sts before the marker, K3tog, K1 (= YO from prev. row), mm, EDGE
Row 3          K all sts
Row 4          K all the way to marker, YO (before the marker), mm, EDGE
Row 5          EDGE, mm, K1 (= YO from prev. row), K3tog, K to end
Row 6          K all sts

Keep decreasing by repeating these 6 rows until you have 3 sts on your needles and then knit your three last stitches together. Weave in both tails.

Triangular Scarf For Winter Made From Thicker (Worsted) Yarn


***

DID YOU FIND ERRORS? Let me know on what page of my blog, and in which row by clicking HERE, and I will fix it as soon as I get to it. You can PM me on my FB Page HERE as well. Txs!
Also if you haven't subscribed to my HandmadeRukodelky Channel, you can do it HERE. There are many videos to be seen, too.

*******************************************************************************


Copyright page - click HERE


PLEASE, COMMENT ON YOUTUBE BELOW MY VIDEOS, AND/OR SHARE YOUR IMAGES OF YOUR RECREATED WORKS ON MY FB PAGE HERE :-)


Note: Most of the time I work as fast as I can to keep up with knitting and crocheting requests. I have to videotape, edit videos, then convert them & upload them to my channel. After that often I post on my blog patterns. I answer many questions, which means that often I work up to 16 hours a day. I would tremendously appreciate IF anyone of you who finds an error in the written pattern, so please, let me know - where (what rows) and what may be the problem. Many future knitters & crocheters from our artsy and crafty virtual world will thank you for your good deed, including myself.

Knitting Scarf With Boucle Yarn

To some of us knitters, boucle yarn can give us a hard time. Our knitting needles get caught in those little bumpy areas causing us to split the yarn. If you have the same problem, give this textured yarn another chance, just as I did.

Use a size bigger knitting needles. Instead of size US 11, use size US 13, which are 9 mm needles. With the chunkier tip of your knitting "sticks," it will be much harder to poke into the yarn. On top of that, you can emphasize already textured yarn to look even more 3D by using a seed stitch for any of your future boucle projects. That is exactly what I did with my donated yarn - I knitted a lovely plush scarf for the library, where I teach knitting. The staff will give it away to someone as a prize for summer reading. All librarians loved it.

Video For Righties
Video For Lefties


Measurements of the scarf:
Width - 11" (27 stitches)
Lenght - 52" after using entire ball of yarn


Materials (I may receive a commission if you make an online purchase using these links - thank you if you do):
Michaels on line store, OR Hobby Lobby, OR Jo-Ann Fabrics, OR Walmart 

1 big ball of donated Boucle Yarn, Lion Brand, Homespun - most likely 6 oz, 185 yds
Knitting needles #13 (9 mm)
Scissors


Abbreviations:
CO - cast on
K - knit
P - purl
BO - bind off


Step-by-Step

CO 27 sts

Row 1           *(K1, P1)* - 13x, K last st, turn

Repeat Row 1 until you have left about 56" long tail, then BO all the stitches and weave both ends in.


***

DID YOU FIND ERRORS? Let me know on what page of my blog, and in which row by clicking HERE, and I will fix it as soon as I get to it. You can PM me on my FB Page HERE as well. Txs!
Also if you haven't subscribed to my HandmadeRukodelky Channel, you can do it HERE. There are many videos to be seen, too.

*******************************************************************************


Copyright page - click HERE


PLEASE, COMMENT ON YOUTUBE BELOW MY VIDEOS, AND/OR SHARE YOUR IMAGES OF YOUR RECREATED WORKS ON MY FB PAGE HERE :-)


Note: Most of the time I work as fast as I can to keep up with knitting and crocheting requests. I have to videotape, edit videos, then convert them & upload them to my channel. After that often I post on my blog patterns. I answer many questions, which means that often I work up to 16 hours a day. I would tremendously appreciate IF anyone of you who finds an error in the written pattern, so please, let me know - where (what rows) and what may be the problem. Many future knitters & crocheters from our artsy and crafty virtual world will thank you for your good deed, including myself.

Baby Blue Blanket And Scarf - Lacy Patterns

Many of you know that my passion lays in art, knitting, and crocheting. My brain is thinking about creating something all the time. Even in my dreams.
When I saw many different types of variegated yarns from various makers, I thought it would be wonderful to knit a beautiful baby blanket in a lace pattern with lovely color changes. I wanted a design that would make this baby blanket look luxurious yet that it would be relatively easy to knit for a wider group of knitters.
I found a chart for a beautiful lacy pattern and made a couple of changes to it; then I graphed it again. While I filmed a detailed video, I wrote a pattern simultaneously (in between the takes) for a blanket and a scarf.
You can use practically any yarn weight for this project. For my scarf and baby blanket, I used yarn of medium weight (#4) and US needles #8 (5 mm). If you decide to knit a blanket, scarf or any other item from a thinner yarn, you will have to do more stitch and row repeats.

Should you need a pdf of this written pattern, it is available for purchase. I priced it, so it is very affordable to many of you. Thank you to all of you who bought my patterns in the past, and thank you to anyone who will purchase them in the future. These purchases will help me finance future videos for my YouTube Channel and writing patterns.

To purchase 15-page pdf click on one of the links:

  • If you are on Ravelry, click "buy now" below:


Visual knitters and knitters that like to knit along can click on either VIDEO link below (one is for righties and the other is for lefties). These are free links:

How 2 Knit Scarf Video 4 RIGHTIES: https://youtu.be/GPmQrZ3o4KU
How 2 Knit Scarf Video 4 LEFTIES: https://youtu.be/u0mNs-UG2pI
How to make TASSELS: https://youtu.be/9iLDxvi9u0o


***

DID YOU FIND ERRORS? Let me know on what page of my blog, and in which row by clicking HERE, and I will fix it as soon as I get to it. You can PM me on my FB Page HERE as well. Txs!
Also if you haven't subscribed to my HandmadeRukodelky Channel, you can do it HERE. There are many videos to be seen, too.

*******************************************************************************


Copyright page - click HERE


PLEASE, COMMENT ON YOUTUBE BELOW MY VIDEOS, AND/OR SHARE YOUR IMAGES OF YOUR RECREATED WORKS ON MY FB PAGE HERE :-)


Note: Most of the time I work as fast as I can to keep up with knitting and crocheting requests. I have to videotape, edit videos, then convert them & upload them to my channel. After that often I post on my blog patterns. I answer many questions, which means that often I work up to 16 hours a day. I would tremendously appreciate IF anyone of you who finds an error in the written pattern, so please, let me know - where (what rows) and what may be the problem. Many future knitters & crocheters from our artsy and crafty virtual world will thank you for your good deed, including myself.