Search This Blog and The Web

Showing posts with label Adults. Show all posts

CROCHETED WOOL BOOTS WITH RUBBER SOLES

I crocheted boots before, but never a pair with rubber soles. And let me tell you, this was a challenge. I had to pull a thick yarn through a very tight cotton string base on the rubber soles. 
I started first with a yarn needle. That didn't work, so II switched to a 1.65 mm stainless steel hook. That worked, but I destroyed it after working on my first boot. I tossed it and went rummaging into my hook box. I found another stainless steel hook, this time a 2 mm one. This hook worked out fine, but it was harder to push it through and then pull it out with the yarn. I worked slowly to distribute all slip stitches (my base) evenly. I pulled 51 slip stitches on my first boot but 52 on my second. I solved my problem by crocheting two single crochet stitches together in the second row in order to have both my boots sized identically.
When I was attaching the top part (instep), I made sure I achieved the same number of stitches for both ankles. Each boot took me one day to finish. I think these boots would make a great gift. 

You may not be able to find the same yarn (I bought it a while ago) - I pulled it out of my considerable stash. I would suggest using any ribbon type of yarn because my yarn is in a shape of a ribbon.

ALSO:
Please, consider supporting my blog and YouTube Channel by shopping on Amazon via MY AFFILIATE LINK. Thank you if you purchase anything. And I mean anything. Just click on the link and purchase anything you need. It won't cost you anything extra and I will get a tiny portion of the sale. 💛

Material:

  • 7+ balls (depending on the size of the shoe) of ARTFUL YARNS, Palace, Super Bulky Weight; 48% wool,45% acrylic, 7% nylon; 50g; approx. 27 yards. OR any ribbon-like yarn.
  • Hooks: 2 mm stainless steel (for the foundation around the rubber sole's perimeter) and 6 mm to crochet the boot
  • Rubber soles (I bought mine from Etsy, which was shipped to me from Spain)
  • Scissors
  • Yarn Needle (for weaving in the tails)

Size:
Women's shoe EU 35 (US size 5; 22 cm foot length)
Height of the boot - 7"
Circumference at the top of the boot 11"
However, you can adjust your rows to different sizes and heights of your boots.

Gouge:
2" = 8 sts
1.5" = 3 double crochet rows

Abbreviations:
RS - right side
WS - wrong side
ch - chain
sl st - slip stitch
sc - single crochet
hdc - half double crochet
2 sctog - two single crochet together
st, sts - stitch, stitches
prev - previous

Step-by-Step Directions:

Make 2 of each: Sole Inserts, Instep Pieces, and Boots.

SOLE INSERTSMake 2 identical, but use one on the right side and the other on wrong side

I used my sole as a template for my increases and decreases

I made my sole inserts a little bigger than the rubber soles so I could connect them together with the first row while crocheting the boot.
I used my rubber soles as my template in order to crochet the shape of the sole, which means I increased or decreased according to the shape, checking in each row. In order to make an identical sole I penned down all my rows - this is how I proceeded:

Foundation - ch5

Row 1                 (RS) insert hook into 2nd ch from hook - make 1 sc, then 1 sc in each stitch to end (total 4 sc), turn
Row 2                 (WS) 2 sc in first st, then 1 sc in each stitch to end (5 sc), turn
Row 3                 2 sc in first st, then 1 sc in each stitch to end (6 sc), turn
Row 4                 1 sc in each of 3 stitches, in next st 2 sc, 1 sc in each of 2 stitches, turn
Row 5                 1 sc in each of 3 stitches, in next st 2 sc, 1 sc in each of 3 stitches  (8 sc), turn
Row 6                 1 sc in each of 4 stitches, in next st 2 sc, 1 sc in each of 3 stitches  (9 sc), turn
Row 7-9              1 sc in each of 9 stitches (9 sc), turn
Row 10               1 sc in each of 4 stitches, next 2 sc tog, 1 sc in each of 3 stitches (8 sc), turn
Row 11               1 sc in each of 8 stitches (8 sc), turn
Row 12               1 sc in each of 3 stitches, next 2 sc tog, 1 sc in each of 3 stitches (7 sc), turn
Row 13-19          1 sc in each of 7 stitches (7 sc), turn
Row 20               1 sc in each of 2 stitches, next 2 sc tog, 1 sc in each of 3 stitches (6 sc), turn
Row 21-22          1 sc in each of 6 stitches (6 sc), turn
Row 23               *[1 sc, next 2 sctog]* - 2x,  (4 sc),  fasten off


INSTEP - TOP OF THE BOOT

The bottom piece is my INSTEP piece (top of the boot)

Foundation - ch5

Row 1                1 sc into 2nd ch from hook, 1 sc in each ch st to end, turn (total 4 sts)
Row 2                2
 sc into 1st st, 1 sc in each of the next 2 sts, 2 sc into last st to, turn (6 sts)
Row 3                1 sc in each of the next 6 sts, turn (6 sts)
Row 4                2 sc in 1st st, 1 sc in each of the next 4 sts, 2 sc in last st, turn (8 sts)
Row 5-8            1 sc in each of the next 8 sts, turn (8 sts)
Row 9                1 sc into in each of the next 3 sts, 2 sc in next, 1 sc into in each of the next 4 sts, turn (9 sts)
Row 10              1 sc in each of the next 9 sts, turn (9 sts)
Row 11              1 sc into in each of the next 4 sts, 2 sc in next, 1 sc into in each of the next 4 sts, turn (10 sts)
Row 12              1 sc in each of the next 10 sts, turn (10 sts)

Fasten off your yarn

BOOT

Note: My starting point was at the back (heel) of the rubber sole.

Prep your rubber sole by crocheting slip stitches around the entire perimeter of the sole. For this hard job I used a 1.65 mm hook, which I inserted under each thread (on the side of the rubber sole) and pulled a loop big enough to make a slip stitch, I skipped the next thread, and then I made another slip stitch. I continued this way around, which means each time I skipped one thread and made a slip stitch in the next one.

I was able to make 51 stitches slip stitches around. Place your SOLE INSERT inside the rubber sole - you will crochet both together. Make sure the SOLE INSERT is placed correctly

    The Foot Area

Rnd 1                1 hdc into each slip st and to the side of the crocheted SOLE INSERT (to end)
                          Note: don't use slip st, just continue crocheting in a spiral pattern

This is how finished Rnd 1 looks like


Rnd 2
                1 sc into each hdc (to end)
Rnd 3                1 sc into each sc from prev row (to end)

Place the INSTEP (see above) over the front part of the shoe and pin it so it doesn't shift. Make sure it is not crooked. Make sure that you will place the second INSTEP on the other boot exactly the same way.

Instep before & after crocheted together with the boot

Rnd 4                1 sc into each sc from prev row until you reach the INSTEP part, then crochet around 1 sc into sc and the side of the crocheted INSTEP, then continue with 1 sc into each sc from prev row to last st before the row ends

    The Ankle Area

Rnd 5                Decrease by crocheting the last sc and 1st sc stitches together (= 2 sctog), then 1 sc into each stitch until you have one stitch before the INSTEP part (corner),  decrease again by crocheting last sc st on the side and the first sc Instep stitch together, then crochet across to last Instep sc st and decrease in that corner again with 2 sctog, finish the row with 1 sc into each sc from prev row (to end)


The green arrows represent the ankle ("tube") part,
the yellow arrows point to the 2 sctog in Rnd 5


Rnd 6-11           1 sc into each sc from prev row (I ended up with 26 ankle stitches)
Rnd 12              2 sc in first st, then 1 sc into each sc from prev row (27 sts)
Rnd 13              1 sc into each sc from prev row  (27 sts)
Rnd 14              2 sc in first st, then 1 sc into each sc from prev row (28 sts)
Rnd 15-17        1 sc into each sc from prev row (28 sts)
Rnd 18             1 sc into each sc from prev row until 5 sts from end, then do 1 sl st into each sc from prev row, fasten off (23 sts + 5 sl sts), weave in all tails


***

DID YOU FIND ERRORS? Let me know on what page of my blog, and in which row by clicking HERE, and I will fix it as soon as I get to it. You can PM me on my FB Page HERE as well. Txs!
Also if you haven't subscribed to my HandmadeRukodelky Channel, you can do it HERE. There are many videos to be seen, too.

*******************************************************************************


Copyright page - click HERE


PLEASE, COMMENT ON YOUTUBE BELOW MY VIDEOS, AND/OR SHARE THE IMAGES OF YOUR RECREATED WORKS ON MY FB PAGE HERE :-)


Note: Most of the time I work as fast as I can to keep up with knitting and crocheting requests. I have to videotape, edit videos, then convert them & upload them to my channel. After that often I post on my blog patterns. I answer many questions, which means that often I work up to 16 hours a day. I would tremendously appreciate it IF anyone of you finds an error in the written pattern, so please, let me know - where (what rows) and what may be the problem. Many future knitters & crocheters from our artsy and crafty virtual world will thank you for your good deed, including myself.

TANGERINE TOP

ENJOY MY LATEST PROJECT - AN AIRY TOP (BLOUSE OR SWEATER) KNITTED FROM A LACY FUZZY YARN WITH LARGER-SIZED KNITTING NEEDLES, WITH 3D SLEEVES.


Please, consider supporting my blog and YouTube Channel by shopping on Amazon via MY AFFILIATE LINK. Thank you if you purchase anything.


Material:

  • Yarn - DIABLO; Colors: 4 balls of Yellow Ochre (#18); Lace (#1); 30% Mohair, 30% Nylon, 40% Acrylic; 0.9 oz/25g; 246 yds/225 m; 
  • Knitting needles #9 (5.5 mm)
  • Markers
  • Yarn needle (to weave in the ends)
  • Scissors


Abbreviations:
CO - cast on
K - knit
P - purl
st/sts - stitch/stitches
K2tog - knit two stitches together (decrease)
SSK - slip 2 stitches (one at a time), place them back on the needle and knit them through the back loop (decrease)
CO extra st - cast on an extra stitch between short rows to close the hole
PM - place marker
K1B - increase by knitting 1 stitch below the next stitch (then knit next st)
YO - yarn over
BO - bind off

Gauge (stockinette st):
4" x 4" = 16 sts x 22 rows

Size:
Oversized small, or regular medium women's size

Measurements (measured flat): 


Step-by-Step Directions:

This blouse is knitted from bottom to top. 

BODY PART

CO 140 sts. Knit in the round.

Row 1-12             *[K1, P1]* - repeat to end of row (70x)
Row 13-80            K140

Divide 140 stitches into 2 halves - 70 sts for your back, and 70 sts for the front. Knit back and forth. Work your back first, then the front. 

BACK PART OF THE BODY

Row 81               K68
Row 82               P66, put the first 2 sts and last 2 sts on the stitch holder made from yarn, they will be part of the sleeves
Row 83               K66
Row 84               P66

Repeat Rows 83 & 84 thirteen more times, up to Row 110.

Row 111              BO 7 sts, K to end
Row 112              BO 7 sts, P to end

Repeat Rows 111 & 112 two more times, up to Row 116.

Row 117              K24
Row 118              P24


FRONT PART OF THE BODY

Row 81               put the first 2 sts on the stitch holder made from yarn, start the new ball, and K66; put the last 2 sts on the stitch holder made from yarn, they will be part of the sleeves
Row 82               P66
Row 83               K66
Row 84               P66

Repeat Rows 83 & 84 nine more times, up to Row 102.

We will make a "U" shaped neck area, and then BO for the shoulders. Start on the first side of the front on the RIGHT (KNIT) side.

FIRST HALF OF THE UPPER FRONT

Row 103              K28, do not work with the last 38 sts on the needle (you may put them on the stitch holder)
Row 104              P28
Row 105              K25, three stitches left on the needle
Row 106              P25
Row 107              K23, three + two stitches left on the needle
Row 108              P23
Row 109              K21, three + two + two stitches left on the needle
Row 110              P21
Row 111              K21
Row 112              P21
Row 113              BO 7 sts, K13
Row 114              P14
Row 115              BO 7 sts, K6
Row 116              P7
Row 117              BO 7 sts, leave a long tail for sewing the shoulder area together

SECOND HALF OF THE UPPER FRONT

Start on the second side of the front on the RIGHT (KNIT) side; from the middle.

Row 103              Leave the first 10 sts on the stitch holder, then K28 to end
Row 104              P25, three stitches left on the needle
Row 105              K25
Row 106              P23, three + two stitches left on the needle (total 5 sts)
Row 107              K23
Row 108              P21, three + two + two stitches left on the needle  (total 7 sts)
Row 109              K21
Row 110              P21
Row 111              K21
Row 112              BO 7 sts, P13
Row 113              K14
Row 114              BO 7 sts, P6
Row 115              K 7
Row 116              BO 7 sts, do not fasten off the yarn, use it for knitting the edge

Sew the front and back shoulder areas together (on both sides). Knit a neckband/edge in the round as such:

Row 1                  Starting at your back part and on the RIGHT side of the knit, K24; CO 8 sts along straight side; K2; CO extra st; K2; CO extra st; K3; CO extra st; K10; CO extra st; K3;  CO extra st; K2;  CO extra st; K2; CO 8 sts along straight side; (total 70 sts = 24+8+2+1+2+1+3+1+10+1+3+1+2+1+2+8)
Row 2-6               *[K1, P1]* - to end (35x)
Row 7                   BO


SLEEVES - make two

Start in the underarm area. 

Row 1                    CO 24 stitches along the front (or back) arm area, then CO 24 stitches along the back (or front) area, and K4 (stitchers that are on your stitch holder) - make sure there are no holes between the CO stitches and 4 underarm stitches, PM
Row 2                    K2tog, K44, SSK, K4 (50 sts total)
Row 3-10               *[K7, P3]* - 5x (total 50 sts)

Row 11                   *[K1; then increase by K1B & K1 regularly - 5x; K1, P3]* - 5x (total 75 sts)
Row 12-19             *[K12, P3]* - 5x (total 75 sts)
Row 20                  *[K1; then decrease by K2tog - 5x; K1, P3]* - 5x (total 50 sts)
Row 21-30             *[K7, P3]* - 5x (total 50 sts)

Repeat Rows 11-30 three more times (90 rows more)

Finish with 10 more rows (or as many as you need)

Row 121-130        *[K7, P3]* - 5x (total 50 sts)
Row 131                BO all sts

When you knit both sleeves, weave in all the ends. 


Copyright:
You may not sell my written pattern to anyone, and you may not publish it as your own.
However, you may sell a finished product (sweater/blouse/top) made by you.

Thank you.

***

DID YOU FIND ERRORS? Let me know on what page of my blog, and in which row by clicking HERE, and I will fix it as soon as I get to it. You can PM me on my FB Page HERE as well. Txs!
Also if you haven't subscribed to my HandmadeRukodelky Channel, you can do it HERE. There are many videos to be seen, too.

*******************************************************************************


Copyright page - click HERE


PLEASE, COMMENT ON YOUTUBE BELOW MY VIDEOS, AND/OR SHARE YOUR IMAGES OF YOUR RECREATED WORKS ON MY FB PAGE HERE :-)


Note: Most of the time I work as fast as I can to keep up with knitting and crocheting requests. I have to videotape, edit videos, then convert them & upload them to my channel. After that often I post on my blog patterns. I answer many questions, which means that often I work up to 16 hours a day. I would tremendously appreciate it IF anyone of you finds an error in the written pattern, so please, let me know - where (what rows) and what may be the problem. Many future knitters & crocheters from our artsy and crafty virtual world will thank you for your good deed, including myself.

SOCKS FOR 9 INCH LONG FOOT - WITH CAST ON 56 STITCHES

This is my standard, simple sock pattern, where I knit the heel and the toe area with a complementary color. For my complimentary color, I use usually a leftover sock yarn of the same thickness. In these socks, I also added a stripe in my ribbing for an extra effect.

I love my sock cuff to be knitted long, and stretchy all the way down to my ankles - to keep my leg warm.

If you would like to watch my sock musings - HERE IS THE VIDEO that I recorded for my New Year 2022. In it, I talk about these particular socks as well.

I also have SOCK playlists:

For RIGHT HANDED-KNITTERS HERE

and for LEFT-HANDED KNITTERS HERE


Please, consider supporting my blog and YouTube Channel by shopping on Amazon via MY AFFILIATE LINK. Thank you if you purchase anything.


Material:

  • Approximately 400 m of any combination sock yarn; I used one ball of MC - Mayflower 1 Class, 75% Wool/25% Nylon, 210 m, 50 grams; for CC I used leftovers of ONline, Supersocke 100, Color - Savanne, Fingering, 75% Wool/25% Polyamide - about 140 m (total 420 m/100 grams in the ball)
  • DPNs, or long Circulars Knitting Needles #2 (2.75 mm) - if you knit loosely then 2.5mm needles
  • Scissors
  • Yarn Needle (for Kitchener Stitch & for weaving in the tails)


Size:
  • Shoe size: ~ US size 7-8
  • Ankle Area: ~ circumference of K1/P1 ribbing is 5"(unstretched) to ~10" (stretched)
  • Ribbing (Cuff) Height: 6.75” or make your preferred height
  • Heel Flap: 2.25" (reinforced flap - 28 rows)
  • Sole width: 4” flat; (circumference is ~ 8”)
  • Length of the sole heel to toe: 9” (you can make it longer if you chose so)


Gouge (stockinette stitch):

  • on knitting needles size US #2 (2.75 mm) - 2"x2" = 15 sts x 21 rows


Abbreviation:

DPN(s) - double-pointed needle(s)
CO - cast on
MC - main color
CC - complimentary color
K - knit
P - purl
sl 1st st - slip first stitch purl-wise
SSK - slip knit-wise, slip knit-wise, and then knit them together through the back loop
P2tog - purl two stitches together
K2tog - knit two stitches together
wyb-slPst - with yarn in back slip purl stitch purl-wise
RS - right side
WS - wrong side
st(s) - stitch(es)
N1, N2, N3, N4 - if knitting with DPNs - needle #1, #2, #3, #4 respectively


Step-by-Step Directions:

We will work in sections (the cuff, the flap, the turning heel, the gusset, the foot, the toe part) and each of these sections will start with Row 1.

Make 2 identical socks.

Foundation: on knitting needles size US #2 (2.75 mm) cast on 56 stitches

The Cuff

Rnd 1          *[K1, P1]* - to end of the row, then distribute the stitches evenly, among 4 DPNs (or use either 2 pairs of short circular needles or circular needles with a long cable), without twisting your knitted row, connect needles into a circle, start knitting in the round

Rnd 2-70      *[K1, P1]* - to end of each row. Make your cuff as long as you want. I knitted this cuff really tall, about 7.5" tall

Do not cut off  MC - you will continue working with it on the gusset and part of your sock after you are finished with Turning The Heel.

The Heel Flap

NOTE: For the Heel Flap & Turning The Heel I used CC. 

If knitting on DPN's divide your stitches as such: needle #1 -28 sts, needles #2 and #3 - 14 sts each. If you are using circular needles you most likely have stitches divided to 28 + 28 between your magic loops. Work on your first 28 sts (needle #1) only, back and forth (NOT in the round) as such:

Row 1            (RS) *[K1, P1]* - repeat to end, turn
Row 2            (WS) *[K1, wyb-slPst]* - repeat to last 2 sts, then K1, P1

Repeat these 2 rows thirteen more times (total 14x = 28 rows)


Turning The Heel (row by row)

Keep working your sock with CC back and forth (NOT in the round), starting with Row 1. 


Row 1         (RS) sl. 1st st, K15, SSK, K1, (9 sts left on the needle), turn
Row 2         (WS) sl. 1st st, P5, P2tog, P1, (9 sts left on the needle), turn
Row 3         (RS) sl. 1st st, K6, SSK, K1, (7 sts left on the needle), turn
Row 4         (WS) sl. 1st st, P7, P2tog, P1, (7 sts left on the needle), turn
Row 5         (RS) sl. 1st st, K8, SSK, K1, (5 sts left on the needle), turn
Row 6         (WS) sl. 1st st, P9, P2tog, P1, (5 sts left on the needle), turn
Row 7         (RS) sl. 1st st, K10, SSK, K1, (3 sts left on the needle), turn
Row 8         (WS) sl. 1st st, P11, P2tog, P1, (3 sts left on the needle), turn
Row 9         (RS) sl. 1st st, K12, SSK, K1, (1 sts left on the needle), turn)
Row 10       (WS) sl. 1st st, P13, P2tog, P1, (1 sts left on the needle), turn
Row 11       (RS) sl. 1st st, K14, SSK,  (0 sts left on the needle), turn
Row 12       (WS) sl. 1st st, P14, P2tog, (0 sts left on the needle), fasten off yarn (16 sts)

The Gusset (in the round)

Note: For the gusset and the part of the foot (excluding the toe area), use MC color.
You will work from now on RS only in the round. 


You should have 16 sts on your needle #1, and you are ready to pick up stitches along the sides of your flap. Note: If you are knitting on DPNs you will need 5 knitting needles to continue knitting this sock. If you are using circular needles insert markers between the 17-16-17-28 sts (while you're picking up your stitches on the side) to keep track of your sections. 

You will proceed as such:

  • N1 - turn your sock sideways and pick up 17 stitches with MC along the first side - distribute these 17 sts evenly, making sure there are no "holes" between the needles; (this will be the BEGINNING of the row now)
  • N2 - then knit 16 sts; (the "turning the heel stitches")
  • N3 - turn your sock sideways and pick up 17 stitches along the second side - distribute these 17 sts evenly; (second side of the flap)
  • N4 - then K28; (top of the foot - combined needles #2 & #3); 

Note: You should have 78 sts total. Now, we have to decrease stitches on both sides of your flap to get back to 56 sts total on all four needles (or on your circular needles). Do it as such:

Rnd 1            (N1) SSK, K15; (N2) K16; (N3) K15, K2tog; (N4) K28 (76 sts)
Rnd 2            (N1) SSK, K14; (N2) K16; (N3) K14, K2tog; (N4) K28 (74 sts)
Rnd 3            (N1) SSK, K13; (N2) K16; (N3) K13, K2tog; (N4) K28 (72 sts)
Rnd 4            (N1) SSK, K12; (N2) K16; (N3) K12, K2tog; (N4) K28 (70 sts)
Rnd 5            (N1) SSK, K11; (N2) K16; (N3) K11, K2tog; (N4) K28 (68 sts)
Rnd 6            (N1) SSK, K10; (N2) K16; (N3) K10, K2tog; (N4) K28 (66 sts)
Rnd 7            (N1) SSK, K9; (N2) K16; (N3) K9, K2tog; (N4) K28 (64 sts)
Rnd 8            (N1) SSK, K8; (N2) K16; (N3) K8, K2tog; (N4) K28 (62 sts)
Rnd 9            (N1) SSK, K7; (N2) K16; (N3) K7, K2tog; (N4) K28 (60 sts)
Rnd 10          (N1) SSK, K6; (N2) K16; (N3) K6, K2tog; (N4) K28 (58 sts)
Rnd 11          (N1) SSK, K5; (N2) K16; (N3) K5, K2tog; (N4) K28 (56 sts)


The Foot Part

Note: If you need to, reshuffle your stitches on your DPNs for ease of knitting. Each of my DPN had 14 sts. If you are knitting on circular needles, put a marker in the beginning and after 28th st. Knit as many rows as needed - for US foot size 7.5 I knitted 50 rows.

Rnd 1-44                K56

Note: Before you will start your toe part knit 6 rows with CC color (or a few more if you need your socks a tad longer). Then keep knitting the Toe Part with CC. 

Rnd 45-50              (CC) K56


The Toe Part

Rnd 1                    *[K2, K2tog, K20, SSK, K2]* - 2x
Rnd 2-3                 K52
Rnd 4                    *[K2, K2tog, K18, SSK, K2]* - 2x
Rnd 5-6                 K48
Rnd 7                    *[K2, K2tog, K16, SSK, K2]* - 2x
Rnd 8-9                 K44
Rnd 10                 *[K2, K2tog, K14, SSK, K2]* - 2x
Rnd 11-12             K40
Rnd 13                 *[K2, K2tog, K12, SSK, K2]* - 2x
Rnd 14                 K36
Rnd 15                 *[K2, K2tog, K10, SSK, K2]* - 2x
Rnd 16                 K32
Rnd 17                 *[K2, K2tog, K8, SSK, K2]* - 2x
Rnd 18                 *[K2, K2tog, K6, SSK, K2]* - 2x (24 sts)


To Finish Each Sock:

Move the first 12 sts onto one DPN, then move the last 12 sts onto another DPN, cut off about a foot-long tail, thread it into your yarn needle, and using the Kitchener Stitch close the toe gap. Weave in all the ends/tails. Then wear it or gift it.


My Other Project:

TINY HAT AND SOCKS FOR NEWBORN TWINS
Tiny Hat and Socks For Newborn Twins - HandMadeRukodelky ©2020


Copyright:
You may not sell my written pattern to anyone, and you may not publish it as your own.
However, you may sell a finished product (socks) made by you.

Thank you.

***

DID YOU FIND ERRORS? Let me know on what page of my blog, and in which row by clicking HERE, and I will fix it as soon as I get to it. You can PM me on my FB Page HERE as well. Txs!
Also if you haven't subscribed to my HandmadeRukodelky Channel, you can do it HERE. There are many videos to be seen, too.

*******************************************************************************


Copyright page - click HERE


PLEASE, COMMENT ON YOUTUBE BELOW MY VIDEOS, AND/OR SHARE YOUR IMAGES OF YOUR RECREATED WORKS ON MY FB PAGE HERE :-)


Note: Most of the time I work as fast as I can to keep up with knitting and crocheting requests. I have to videotape, edit videos, then convert them & upload them to my channel. After that often I post on my blog patterns. I answer many questions, which means that often I work up to 16 hours a day. I would tremendously appreciate IF anyone of you who finds an error in the written pattern, so please, let me know - where (what rows) and what may be the problem. Many future knitters & crocheters from our artsy and crafty virtual world will thank you for your good deed, including myself.

QUICK KNITTED CAPLET


Capelet
- a small cape covering the shoulders and part of the arms. 

I decided to knit a capelet for myself to cover my shoulders and arms when I feel chilly - such as when I am dining in very cold restaurants, or sitting outside on our deck during the cold nights, or walking along the beach on a windy cool evening. I am sure there will be other situations/places where I can wear my capelet. If you use a very fine yarn you could knit it even as a cover over a wedding gown, and/or have capelets made for your bridesmaids over their dresses to keep them warm in a church.

The length of your capelet will depend on how much of your arms you would like to cover. My capelet reaches to elbows, but you could also alter rows between the patterns "A" and "B" and make the capelet longer or shorter. You can also decide on a different pattern that fits the number of stitches after you are finished with increases, however before you will start any pattern of your choice, you may have to add few extra (1+) stitches to accommodate the number of needed stitches for your repeats.

For my capelet I used worsted yarn and a bigger size knitting needles than recommended by the manufacturer. My yarn is Casablanka by Cascade Yarns - a blend of wool, silk and mohair. I used this yarn for my husband's sweater which he loves and wears often. You can see my husband's raglan sweater in the video as well. I had two skeins left over from my husband's sweater project and wanted to make a good use of it. Although it is a little itchy, so you may have to substitute this yarn for a different, softer yarn.

Beware: I used both 2 skeins in their entirety. If you are loose knitter you may either use 5.5 mm knitting needles, or make 1-2 row less between the patterns, or purchase one extra skein.

FOR A VIDEO CLICK HERE (it will be published 7-14-21 @ 8am EST)

Please, consider supporting my blog and YouTube Channel by shopping on Amazon via MY AFFILIATE LINK. Thank you if you purchase anything.


Materials:

  • 2 skeins of Cascade Yarns, Casablanca;
    Fiber Content: 60% Wool, 25% Silk, 15% Mohair;
    Color: 10, Seaside;
    Weight: Medium / Worsted / Aran (4);
    Weight/Yardage: 100g / 218 yards;
    Care: Hand Wash, Dry Flat;
  • Circular Knitting Needles (or DPNs) Size: #10 (6 mm)
  • Yarn needle (to weave in the ends)
  • Scissors

Abbreviations:
CO - cast on
K - knit
P - purl
M1R - pick a leading strand between the stitches by inserting a needle back to front and knit a stitch leaning to the right
YO - yarn over
K2tog - knit 2 stitches together
BO - bind off

Gauge (stockinette st):
4" x 4" = 16 sts x 20 rows

Measurements (measured flat): 


Step-by-Step Directions:


This caplet is knitted top-down. CO 78 sts.

Row 1                *[K1, P1]* - repeat to end,  join without twisting
Row 2-6             *[K1, P1]* - repeat to end
Rnd 7                 *[K7, M1R]* - 10x, K8 (Note: do not increase after last 8 sts, as you already have 1 extra stitch for the repeat)
Rnd 8                 K88
Rnd 9                 *[K8, M1R]* - 11x
Rnd 10               K99
Rnd 11               *[K9, M1R]* - 11x
Rnd 12               K110
Rnd 13               K110
Rnd 14               *[K10, M1R]* - 11x
Rnd 15               K121
Rnd 16               K121
Rnd 17               K121
Rnd 18               *[K11, M1R]* - 11x
Rnd 19               K132
Rnd 20               K132
Rnd 21               K132
Rnd 22               K132
Rnd 23               *[K12, M1R]* - 11x
Rnd 24               K143
Rnd 25               K143
Rnd 26               K143
Rnd 27               K143

Note: Keep increasing in this manner (increase in one row, knit 4 rows with no increases) until you have 187 sts on your needles (Rows 28-47). Then:

Rnd 48               *[K17, M1R]* - 11x 
Rnd 49-53          K198

PATTERN "A"

Rnd 54                P198
Rnd 55                *[K2tog, YO, K4] - 33x
Rnd 56                K198
Rnd 57                P198

Rnd 58-62          K198

Rnd 63-71         Repeat  your last 9 rows again (as in Rnd 54 - 62)

PATTERN "B"
Rnd 72                P198
Rnd 73                *[K2tog, YO] - to end
Rnd 74                K198
Rnd 75                P198

Rnd 76-78          K198

Rnd 79-85         Repeat  your last 7 rows again (as in Rnd 72 - 78)

Rnd 86            BO with purl stitch

Weave in all the ends.


***

DID YOU FIND ERRORS? Let me know on what page of my blog, and in which row by clicking HERE, and I will fix it as soon as I get to it. You can PM me on my FB Page HERE as well. Txs!
Also if you haven't subscribed to my HandmadeRukodelky Channel, you can do it HERE. There are many videos to be seen, too.

*******************************************************************************


Copyright page - click HERE


PLEASE, COMMENT ON YOUTUBE BELOW MY VIDEOS, AND/OR SHARE THE IMAGES OF YOUR RECREATED WORKS ON MY FB PAGE HERE :-)


Note: Most of the time I work as fast as I can to keep up with knitting and crocheting requests. I have to videotape, edit videos, then convert them & upload them to my channel. After that often I post on my blog patterns. I answer many questions, which means that often I work up to 16 hours a day. I would tremendously appreciate IF anyone of you who finds an error in the written pattern, so please, let me know - where (what rows) and what may be the problem. Many future knitters & crocheters from our artsy and crafty virtual world will thank you for your good deed, including myself.

Knitted Chunky Sweater

I love yarn, and often I want to buy more. I search various yarn websites and marvel at all those beautiful skeins and dream what I could knit or crochet with them. But lately, I have been trying to be strict with myself. Seriously. I need to de-stash my yarn from all the hiding places. What can be quite sad is that by the time I get to knit some of the projects, the yarn is discontinued. Ugh, grrrr. 

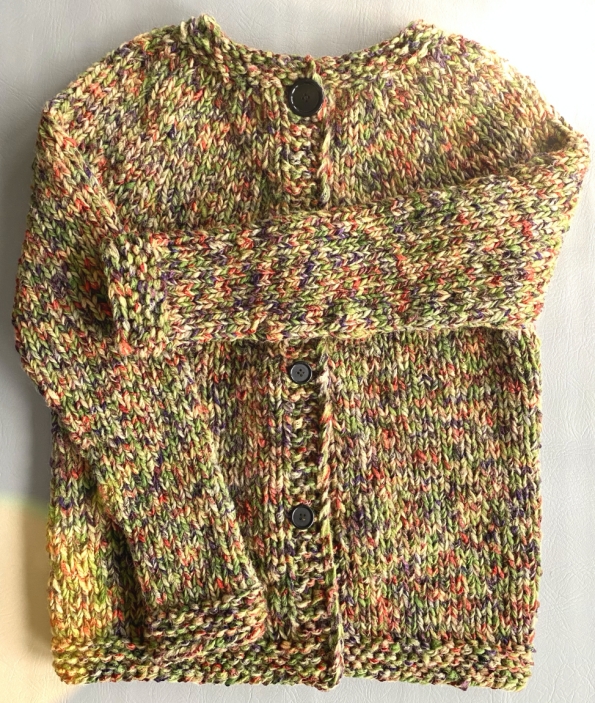
I bought this extravagant-looking yarn about five years ago. Four bags. Twenty balls of a greenish and twenty balls of a pinkish color. About two weeks ago, I pulled out the yummy green one with orange and purple speckles. I thought: "This will make a nice warm sweater for my petite daughter." 

Here we are today - let me share a finished written pattern of the top-down sweater for XS/S women. Although the company discontinued this yarn, you may opt for another super bulky one, which yields 8 sts and 11 rows in 4", and you should be fine. Yes, the sweater will look different, but it will be your design knitted with my pattern.

f you are interested in watching my video about this sweater where I am presenting how to start a sleeve, you may click on one of the links below.

Please, consider supporting my blog and YouTube Channel by shopping on Amazon via MY AFFILIATE LINK. Thank you if you purchase anything.


VIDEO FOR RIGHTIES

VIDEO FOR LEFTIES 

Enjoy.


Materials:
16 balls of ARTFUL YARNS, Palace; 48% wool, 45% acrylic, 7% nylon; Color: 366; 50g/1.75 oz; 27 yds/ 24.7 m;
Knitting needles - circular and DPNs, US size #15, 10 mm
Hook 9mm (see the sleeve part in the video)
Yarn needle
Buttons

Abbreviations:
CO - cast on
KE - knit edge (= knit 4 sts for edge)
K - knit
K1tbl - knit one stitch through the back loop
sl1wyf - slip one (last) stitch with yarn in front 
P - purl
M1 - increase by making 1 st between the stitches
K2tog - knit 2 stitches together
YO - yarn over
SSK - slip knitwise, slip knitwise, knit both stitches through the back loop
BO - bind of your stitches


Size:
women XS/S

Measurements:


YOKE

CO 48 sts

Note: place buttonholes every 20, 22, or 24 rows after the first initial buttonhole in the seventh row. Your choice of how close/far together you would like to have them.

Row 1-4              K48
Row 5                 K1tbl, K3; *[M1, K4]* - 10x,  M1; K3, sl1wyf
Row 6                 K1tbl, K3; P51; K3, sl1wyf
Row 7                 K1tbl, K3; *[M1, K5]* - 10x, M1, K1; K2tog, YO (button hole), K1, sl1wyf
Row 8                 K1tbl, K3; P62; K3, sl1wyf
Row 9                 K1tbl, K3; K1, *[M1, K6]* - 10x,  M1, K1; K3, sl1wyf
Row 10               K1tbl, K3; P73; K3, sl1wyf
Row 11               K1tbl, K3; K2, *[M1, K7]* - 10x, M1, K1; K3, sl1wyf
Row 12               K1tbl, K3; P84; K3, sl1wyf
Row 13               K1tbl, K3; K6, *[M1, K8]* - 9x, M1, K6; K3, sl1wyf
Row 14               K1tbl, K3; P94; K3, sl1wyf
Row 15               K1tbl, K3; K94; K3, sl1wyf
Row 16               K1tbl, K3; P94; K3, sl1wyf
Row 17               K1tbl, K3; K6, *[M1, K9]* - 9x, M1, K7; K3, sl1wyf
Row 18               K1tbl, K3; P104; K3, sl1wyf
Row 19               K1tbl, K3; K104; K3, sl1wyf
Row 20               K1tbl, K3; P104; K3, sl1wyf
Row 21               K1tbl, K3; K7, *[M1, K10]* - 9x, M1, K7; K3, sl1wyf
Row 22               K1tbl, K3; P114; K3, sl1wyf
Row 23               K1tbl, K3; K114; K3, sl1wyf
Row 24               K1tbl, K3; P114; K3, sl1wyf
Row 25               K1tbl, K3; K114; K3, sl1wyf
Row 26               K1tbl, K3; P114; K3, sl1wyf
Row 27               K1tbl, K3; K8, *[M1, K11]* - 9x, M1, K7; K3, sl1wyf
Row 28               K1tbl, K3; P124; K3, sl1wyf
Row 29               K1tbl, K3; K124; K3, sl1wyf
Row 30               K1tbl, K3; P124; K3, sl1wyf
Row 31               K1tbl, K3; K124; K3, sl1wyf
Row 32               K1tbl, K3; P124; K3, sl1wyf
Row 33               K1tbl, K3; K19 ( front #1), move 24 sts on holder/string - stitches on your holder will be knitted later (sleeve #1), CO 2 sts, connect the front part to the back part by knitting next 38 sts, move 24 sts on holder/string - stitches on your holder will be knitted later (sleeve #2), CO 2 stsconnect the back part to the front part by knitting next 19 stitches (front #2); K3, sl1wyf

Note: you should have stitches as such:
EDGE: 4 sts;
FRONT: 19 sts; plus 
2 extra sts for underarm;
BACK: 38 sts; plus 
2 extra sts for underarm; 
FRONT: 19 sts; 
EDGE: 4 sts;

Also - if your arms' circumference is bigger add more underarm stitches, but remember to change the stitch count below.

The back of the sweater


BODY - repeat Row 1 & Row 2 many times until you have desired length. I knitted 14 inches (40 rows) measured from the underarm.

Row 1               K1tbl, K3; P80; K3, sl1wyf
Row 2               K1tbl, K3; K80; K3, sl1wyf

BOTTOM BODY EDGE

Row 1-6           K88 (After knitting your desired length of the body, knit 6 rows of garter stitch), BO your last row and weave in the tail


SLEEVES

Work in the round. Start with the underarm area (for reference RIGHTIES can watch my video HERE, and LEFTIES can watch the video HERE). There are 2 extra stitches (but it looks like there are 4 sts).

Rnd 1                Start in the middle of your underarm area - CO one stitch of the 2 underarm sts, then CO one extra stitch to close the gap between your CO stitch and the first stitch of the sleeve; then K24; then  CO 2 more sts - again closing the gap between the sleeve stitches and underarm stitches - total 28 stitches (4 CO + 4 sleeve sts)
Rnd 2-10            K28
Rnd 11                K2tog, K24, SSK
Rnd 12-20          K26
Rnd 21                K2tog, K22, SSK
Rnd 22-30          K24
Rnd 31                K2tog, K20, SSK
Rnd 32-40          K22
Rnd 41                K2tog, K18, SSK
Rnd 42-52          K20
Rnd 53                P20
Rnd 54                K20
Rnd 55                P20
Rnd 56                K20
Rnd 57                P20
Rnd 58                K20
Rnd 59                BO 20sts and weave in the tail

Copyright:
You may not sell my written pattern to anyone, and you may not publish it as your own.
However, you may sell a finished product (socks) made by you.

Thank you.

***

DID YOU FIND ERRORS? Let me know on what page of my blog, and in which row by clicking HERE, and I will fix it as soon as I get to it. You can PM me on my FB Page HERE as well. Txs!
Also if you haven't subscribed to my HandmadeRukodelky Channel, you can do it HERE. There are many videos to be seen, too.

*******************************************************************************


Copyright page - click HERE


PLEASE, COMMENT ON YOUTUBE BELOW MY VIDEOS, AND/OR SHARE YOUR IMAGES OF YOUR RECREATED WORKS ON MY FB PAGE HERE :-)


Note: Most of the time I work as fast as I can to keep up with knitting and crocheting requests. I have to videotape, edit videos, then convert them & upload them to my channel. After that often I post on my blog patterns. I answer many questions, which means that often I work up to 16 hours a day. I would tremendously appreciate IF anyone of you who finds an error in the written pattern, so please, let me know - where (what rows) and what may be the problem. Many future knitters & crocheters from our artsy and crafty virtual world will thank you for your good deed, including myself.

Adriatic Summer Sky Blouse - Medium Size

I find myself often looking at all different yarns, thick and thin, colorful or natural, single or multi-color, hand-painted - I find the artistry behind the yarn-making fascinating. I also adore variegated yarns - the ones that appeal to my eye and style.

The other day I was scrolling through some websites with yarns and came across Lana Grossa, Gomitolo Puno. There were several pretty variegated balls on display, but the one in blue/lavender combo looked the most appealing. So I bought four skeins. Then I added to my cart one more neutral ball in muted green/gray color with purple undertones.

Below is my pattern of a summer blouse, which I knitted for my birthday using the blue/lavender color, which reminds me of the Adriatic Summer Sky. This yarn, which is predominantly cotton, has a nice drape to it, and it's soft and pleasant to wear it. Knitting with this yarn was enjoyable. I used a beautiful stitch pattern from a Japanese "Knitting Patterns Book 250". I could not be more pleased with my finished blouse. I sure gave myself a nice birthday gift. 

You may want to look for my second blouse from the sage/gray color too. I will post the link when I finish writing the pattern and edit videos.

In the meantime, if you need some help knitting "Adriatic Sky Blouse", please refer to the videos below.

Videos Part 2 - Japanese Stitch Pattern Knitted Flat (back & forth) coming next week 
  • VIDEO "ADRIATIC SKY STITCH PATTERN KNITTED FLAT" FOR RIGHT-HANDED 
  • VIDEO "ADRIATIC SKY STITCH PATTERN KNITTED FLAT" FOR LEFT-HANDED


Material:

  • Approximately 200g of Lana Grossa, Gomitolo Puno; color 013; 70% Cotton, 19% Merino, 11% Alpaca; 570m/150 g per ball
  • DPNs, Circulars Knitting Needles, Long Knitting Needles - US size #5 (3.75 mm)
  • Stitch Holder or short DPNs 
  • Scissors
  • Yarn Needle (for weaving in the tails)

Size:

IF ANYONE WOULD LIKE TO DO A TEST KNIT FOR A SMALLER OR BIGGER SIZE, SEND ME A MESSAGE VIA INSTAGRAM - WE COULD DO SOME MATH TOGETHER
  • Women US Medium (chest 36")


Gouge (stockinette stitch):

  • on US knitting needles #5 (3.75 mm) - 1"x1" = 6.5 sts x 8 rows


Abbreviations:

DPN(s) - double-pointed needle(s)
CO - cast on
K - knit
P - purl
YO - yarn over
SSK - slip knit-wise, slip knit-wise, and then knit these two stitches together through the back loop
K2tog - knit two stitches together
M - stitch marker
CDD - slip the next two stitches together as if to knit, knit the next stitch, then pass two slipped stitches over the knitted stitch
S1K2P - slip one stitch, then knit next two stitches together, finally pass slipped stitch over your K2tog stitches
incr - this is a 2 stitch increase - insert knitting needle into the stitch three rows below your next stitch, pull up a loop, YO, insert knitting needle again into the same stitch and pull up another loop, release your next stitch you didn't knit into after this increase (for your reference watch either video mentioned above)
P2tog - purl two stitches together
KTBL - knit through the back loop
SLS - slip last stitch purl-wise with yarn in front
~ (before a row) - marks a decrease row (for example ~Row 3 = row 3 is a decrease row)
S2TwistP2tog - slip 2 sts together purl-wise, insert a knitting needle back into both stitches as if to knit backward and twist the stitches so that first stitch is second and second stitch is first, place them back onto initial needle and purl them together (see THIS video)
RS - right side
WS - wrong side

NOTE:
While knitting this blouse I used 3 types of knitting needles - long needles, DPNs, and circular needles, each time switching to the best type to knit with.


Step-by-Step Directions:

SECTION #1

Foundation:  cast on 230 stitches

Rnd 1             *[K1, P1]* - to end of the row, then distribute the stitches evenly, among 4 DPNs (or use either 2 pairs of short circular needles or circular needles with a long cable), and without twisting your knitted row, join needles into a circle
Rnd 2-12        *[K1, P1]* - to end of each row

Rnds 13-96    Work 10 stitch/14 Row "Pattern In The Round". In each row work, "10-Stitch repeats" 23 times, and repeat "14-Row pattern" six times (total 84 rows) 

Pattern In The Round:


Rnd 1               *[K10]* - repeat to end
Rnd 2               *[P3, K3, P4]* - repeat
Rnd 3               *[SSK, YO, SSK, K4, YO, SSK, YO]* - repeat
Rnd 4               *[P3, K3, P4]* - repeat
Rnd 5-6            *[K10]* - repeat
Rnd 7               *[K2, K2tog, YO, incr, YO, SSK, K3]* - repeat; (total 12 sts in each repeat)
Rnd 8               *[K1, K2tog, K5, SSK, K2]* - repeat; (back to 10 sts in each repeat)
Rnd 9               *[K2tog, YO, K2tog, YO, K1, YO, SSK, YO, SSK, K1]* - repeat
Rnd 10             *[K10]* - repeat
Rnd 11             *[YO, K2tog, YO, K2tog, K3, YO, SSK, YO, S1K2P]* - repeat
Rnd 12             *[K10]* - repeat
Rnd 13             *[K3, YO, CDD, YO, K4]* - repeat
Rnd 14             *[K10]* - repeat

Work 24 rows straight up

Rnds 97-200      K230

Rnd 201-208      *[P1, K1]* - 5x, P1, K98, *[P1, K1]* - 10x, P1, K90, *[P1, K1]* - 5x

The next row is a set up for knitting Front and Back Parts separately. They will be knitted back and forth. 

Rnd 209             *[P1, K1]* - 5x, P1, place M, K98, place M, *[P1, K1]* - 3x, BO 9 sts, (beginning of the Back Part) *[K1, P1]* - 3x, place M, K90, place M, *[P1, K1]* - 3x (end of the Back Part); BO 4 sts (end of the row) and BO 5 sts (5 front sts) - do not fasten off your yarn, keep knitting on your front.


SECTION #2

Front Part (knit back and forth): 

Row 1             *[K1, P1]*- 3x, M, K98, M, *[P1, K1]* - 2x, P1, SLS
Row 2             KTBL, K1, *[P1, K1]* - 2x, M, P98, M, *[K1, P1]* - 2x, K1, SLS
~Row 3             KTBL, P1, *[K1, P1]*- 2x, M, K2tog, K94, SSK, M, *[P1, K1]* - 2x, P1, SLS
Row 4             KTBL, K1, *[P1, K1]* - 2x, M, P96, M, *[K1, P1]* - 2x, K1, SLS
~Row 5             KTBL, P1, *[K1, P1]*- 2x, M, K2tog, K92, SSK, M, *[P1, K1]* - 2x, P1, SLS
Row 6             KTBL, K1, *[P1, K1]* - 2x, M, P94, M, *[K1, P1]* - 2x, K1, SLS
~Row 7             KTBL, P1, *[K1, P1]*- 2x, M, K2tog, K90, SSK, M, *[P1, K1]* - 2x, P1, SLS
Row 8             KTBL, K1, *[P1, K1]* - 2x, M, P92, M, *[K1, P1]* - 2x, K1, SLS
~Row 9             KTBL, P1, *[K1, P1]*- 2x, M, K2tog, K88, SSK, M, *[P1, K1]* - 2x, P1, SLS
Row 10            KTBL, K1, *[P1, K1]* - 2x, M, P90, M, *[K1, P1]* - 2x, K1, SLS
~Row 11            KTBL, P1, *[K1, P1]*- 2x, M, K2tog, K86, SSK, M, *[P1, K1]* - 2x, P1, SLS
Row 12            KTBL, K1, *[P1, K1]* - 2x, M, P88, M, *[K1, P1]* - 2x, K1, SLS
~Row 13            KTBL, P1, *[K1, P1]*- 2x, M, K2tog, K84, SSK, M, *[P1, K1]* - 2x, P1, SLS
Row 14            KTBL, K1, *[P1, K1]* - 2x, M, P86, M, *[K1, P1]* - 2x, K1, SLS


Stitch Pattern Knitted Flat (Back & Forth = at the top of the blouse) in bold letters - counting from 1
Odd numbers - the RIGHT side, even numbers - the WRONG side


Row 1          KTBL, P1, *[K1, P1]*- 2x, M, K3, *[K10]* - 8x, K3, M, *[P1, K1]* - 2x, P1, SLS 
Row 2          KTBL, K1, *[P1, K1]* - 2x, M, P3, *[K4, P3, K3]* - 8x, P3, M, *[K1, P1]* - 2x, K1, SLS
~Row 3          KTBL, P1, *[K1, P1]*- 2x, M, K2tog, K1, *[SSK, YO, SSK, K4, YO, SSK, YO]* - 8x, K1, SSK, M, *[P1, K1]* - 2x, P1, SLS
Row 4          KTBL, K1, *[P1, K1]* - 2x, M, P2, *[K4, P3, K3]* - 8x, P2, M, *[K1, P1]* - 2x, K1, SLS
Row 5          KTBL, P1, *[K1, P1]*- 2x, M, K2, *[K10]* - 8x, K2, M, *[P1, K1]* - 2x, P1, SLS
Row 6          KTBL, K1, *[P1, K1]* - 2x, M, P2, *[P10]* - 8x, P2, M, *[K1, P1]* - 2x, K1, SLS
~Row 7          KTBL, P1, *[K1, P1]*- 2x, M, K2tog, *[K2, K2tog, YO, incr, YO, SSK, K3]* - 8x, SSK, M, *[P1, K1]* - 2x, P1, SLS; (total 12 sts in each repeat)
Row 8          KTBL, K1, *[P1, K1]* - 2x, M, P1, *[P2, S2TwistP2tog, P5, P2tog, P1]* - 8x, P1, M, *[K1, P1]* - 2x, K1, SLS; (back to 10 sts in each repeat)
Row 9          KTBL, P1, *[K1, P1]*- 2x, M, K1, *[K2tog, YO, K2tog, YO, K1, YO, SSK, YO, SSK, K1]* - 8x, K1, M, *[P1, K1]* - 2x, P1, SLS
Row 10        KTBL, K1, *[P1, K1]* - 2x, M, P1, *[P10]* - 8x, P1, M, *[K1, P1]* - 2x, K1, SLS
Row 11        KTBL, P1, *[K1, P1]*- 2x, M, K1, *[YO, K2tog, YO, K2tog, K3, YO, SSK, YO, S1K2P]* - 8x, K1, M, *[P1, K1]* - 2x, P1, SLS
Row 12        KTBL, K1, *[P1, K1]* - 2x, M, P1, *[P10]* - 8x, P1, M, *[K1, P1]* - 2x, K1, SLS
Row 13        KTBL, P1, *[K1, P1]*- 2x, M, K1, *[K3, YO, CDD, YO, K4]* - 8x, K1, M, *[P1, K1]* - 2x, P1, SLS
Row 14        KTBL, K1, *[P1, K1]* - 2x, M, P1, *[P10]* - 8x, P1, M, *[K1, P1]* - 2x, K1, SLS

~Row 15      KTBL, P1, *[K1, P1]*- 2x, M, K2tog, K78, SSK, M, *[P1, K1]* - 2x, P1, SLS (92 sts)
Row 16        KTBL, K1, *[P1, K1]* - 2x, M, P80, M, *[K1, P1]* - 2x, K1, SLS
Row 17        KTBL, P1, *[K1, P1]*- 2x, M, K80, M, *[P1, K1]* - 2x, P1, SLS
Row 18        KTBL, K1, *[P1, K1]* - 2x, M, P80, M, *[K1, P1]* - 2x, K1, SLS 

Row 19-24   Repeat Rows 17 & 18 three more times (total six more rows)

Row 25        KTBL, P1, *[K1, P1]*- 2x, M, K10, M, *[P1,K1]* - 14x, P2tog, *[K1, P1]*- 15x, K10, M, *[P1, K1]* - 2x, P1, SLS (91 sts)
Row 26        KTBL, K1, *[P1, K1]* - 2x, M, P10, M, *[K1, P1]* - 29x, K1, M, P10, M, *[K1, P1]* - 2x, K1, SLS
Row 27        KTBL, P1, *[K1, P1]*- 2x, M, K10, M, *[P1,K1]* - 29x, P1, K10, M, *[P1, K1]* - 2x, P1, SLS
Row 28        KTBL, K1, *[P1, K1]* - 2x, M, P10, M, *[K1, P1]* - 29x, K1, M, P10, M, *[K1, P1]* - 2x, K1, SLS

Row 29-32   Repeat Rows 27 & 28 two more times (total four more rows)

Row 33        KTBL, P1, *[K1, P1]*- 2x, M, K10, M, *[P1,K1]* - 3x, BO 47 sts, *[K1, P1]* - 3x, M, K10, M, *[P1, K1]* - 2x, P1, SLS, turn, do not fasten off your yarn, keep knitting  with the yarn

SECTION #3

Front Right Strap (knit back and forth), counted from 1: 

Row 1        (WS) KTBL, K1, *[P1, K1]* - 2x, M, P10, M, *[K1, P1]* - 2x, K1, SLS
Row 2        (RS) KTBL, P1, *[K1, P1]*- 2x, M, K10, M, *[P1, K1]* - 2x, P1, SLS

Row 3-16   Repeat Rows 1 & 2 seven more times (total fourteen more rows) 

If the depth of your armhole is bigger than 9" (measured flat) add 2, 4, 6, or 8 more rows and make a note of it.

Row 17      (WS) KTBL, K1, *[P1, K1]* - 2x, M, P10, M, *[K1, P1]* - 2x, K1, SLS - place stitches on a stitch holder, leave a long tail for Kitchener stitch

Front Left Strap (knit back and forth), use a new yarn strand, & counting  from 1 (rows should be equal with rows on the right strap): SAME AS THE RIGHT STRAP


SECTION #4

Back Part (knit back and forth): 

Row 1             *[K1, P1]*- 3x, M, K90, M, *[P1, K1]* - 2x, P1, SLS
Row 2             KTBL, K1, *[P1, K1]* - 2x, M, P90, M, *[K1, P1]* - 2x, K1, SLS
~Row 3             KTBL, P1, *[K1, P1]*- 2x, M, K2tog, K86, SSK, M, *[P1, K1]* - 2x, P1, SLS
Row 4             KTBL, K1, *[P1, K1]* - 2x, M, P88, M, *[K1, P1]* - 2x, K1, SLS
~Row 5             KTBL, P1, *[K1, P1]*- 2x, M, K2tog, K84, SSK, M, *[P1, K1]* - 2x, P1, SLS
Row 6             KTBL, K1, *[P1, K1]* - 2x, M, P86, M, *[K1, P1]* - 2x, K1, SLS
~Row 7             KTBL, P1, *[K1, P1]*- 2x, M, K2tog, K82, SSK, M, *[P1, K1]* - 2x, P1, SLS
Row 8             KTBL, K1, *[P1, K1]* - 2x, M, P84, M, *[K1, P1]* - 2x, K1, SLS
~Row 9             KTBL, P1, *[K1, P1]*- 2x, M, K2tog, K80, SSK, M, *[P1, K1]* - 2x, P1, SLS
Row 10            KTBL, K1, *[P1, K1]* - 2x, M, P82, M, *[K1, P1]* - 2x, K1, SLS
~Row 11            KTBL, P1, *[K1, P1]*- 2x, M, K2tog, K78, SSK, M, *[P1, K1]* - 2x, P1, SLS
Row 12            KTBL, K1, *[P1, K1]* - 2x, M, P80, M, *[K1, P1]* - 2x, K1, SLS
~Row 13            KTBL, P1, *[K1, P1]*- 2x, M, K2tog, K76, SSK, M, *[P1, K1]* - 2x, P1, SLS
Row 14            KTBL, K1, *[P1, K1]* - 2x, M, P78, M, *[K1, P1]* - 2x, K1, SLS

Count from 1, just like the front

Row 1            KTBL, P1, *[K1, P1]*- 2x, M, K78, M, *[P1, K1]* - 2x, P1, SLS
Row 2            KTBL, K1, *[P1, K1]* - 2x, M, P78, M, *[K1, P1]* - 2x, K1, SLS
~Row 3          KTBL, P1, *[K1, P1]*- 2x, M, K2tog, K74, SSK, M, *[P1, K1]* - 2x, P1, SLS
Row 4            KTBL, K1, *[P1, K1]* - 2x, M, P76, M, *[K1, P1]* - 2x, K1, SLS
Row 5            KTBL, P1, *[K1, P1]*- 2x, M, K76, M, *[P1, K1]* - 2x, P1, SLS
Row 6            KTBL, K1, *[P1, K1]* - 2x, M, P76, M, *[K1, P1]* - 2x, K1, SLS
~Row 7          KTBL, P1, *[K1, P1]*- 2x, M, K2tog, K72, SSK, M, *[P1, K1]* - 2x, P1, SLS
Row 8            KTBL, K1, *[P1, K1]* - 2x, M, P74, M, *[K1, P1]* - 2x, K1, SLS
Row 9            KTBL, P1, *[K1, P1]*- 2x, M, K74, M, *[P1, K1]* - 2x, P1, SLS
Row 10          KTBL, K1, *[P1, K1]* - 2x, M, P74, M, *[K1, P1]* - 2x, K1, SLS
Row 11          KTBL, P1, *[K1, P1]*- 2x, M, K74, M, *[P1, K1]* - 2x, P1, SLS
Row 12          KTBL, K1, *[P1, K1]* - 2x, M, P74, M, *[K1, P1]* - 2x, K1, SLS
Row 13          KTBL, P1, *[K1, P1]*- 2x, M, K74, M, *[P1, K1]* - 2x, P1, SLS
Row 14          KTBL, K1, *[P1, K1]* - 2x, M, P74, M, *[K1, P1]* - 2x, K1, SLS
~Row 15          KTBL, P1, *[K1, P1]*- 2x, M, K2tog, K70, SSK, M, *[P1, K1]* - 2x, P1, SLS
Row 16          KTBL, K1, *[P1, K1]* - 2x, M, P72, M, *[K1, P1]* - 2x, K1, SLS
Row 17          KTBL, P1, *[K1, P1]*- 2x, M, K72, M, *[P1, K1]* - 2x, P1, SLS
Row 18          KTBL, K1, *[P1, K1]* - 2x, M, P72, M, *[K1, P1]* - 2x, K1, SLS

Row 19-42   Repeat Rows 17 & 18 twelve more times (total 24 more rows)

~Row 43        KTBL, P1, *[K1, P1]*- 2x, M, K10, M, *[P1,K1]* - 12x, P2tog, *[K1, P1]*- 13x, K10, M, *[P1, K1]* - 2x, P1, SLS (91 sts)
Row 44        KTBL, K1, *[P1, K1]* - 2x, M, P10, M, *[K1, P1]* - 25x, K1, M, P10, M, *[K1, P1]* - 2x, K1, SLS
Row 45        KTBL, P1, *[K1, P1]*- 2x, M, K10, M, *[P1,K1]* - 25x, P1, K10, M, *[P1, K1]* - 2x, P1, SLS
Row 46        KTBL, K1, *[P1, K1]* - 2x, M, P10, M, *[K1, P1]* - 25x, K1, M, P10, M, *[K1, P1]* - 2x, K1, SLS

Row 47-50   Repeat Rows 45 & 46 two more times (total four more rows)

Row 51        KTBL, P1, *[K1, P1]*- 2x, M, K10, M, *[P1,K1]* - 3x, BO 39 sts, *[K1, P1]* - 3x, M, K10, M, *[P1, K1]* - 2x, P1, SLS, turn, do not fasten off your yarn, keep knitting  with the yarn

Back Straps (knit back and forth) - knit two, counting from 1, you will continue knitting the left strap first: 

Row 1        (WS) KTBL, K1, *[P1, K1]* - 2x, M, P10, M, *[K1, P1]* - 2x, K1, SLS
Row 2        (RS) KTBL, P1, *[K1, P1]*- 2x, M, K10, M, *[P1, K1]* - 2x, P1, SLS
Row 3        (WS) KTBL, K1, *[P1, K1]* - 2x, M, P10, M, *[K1, P1]* - 2x, K1, SLS - place stitches on a stitch holder, leave a long tail for Kitchener stitch

If the depth of your armhole is bigger than 9" (measured flat) add 2, 4, 6, or 8 more rows after Row 3 and make a note of it.

Back Right Strap (knit back and forth), use a new yarn strand, start on the wrong side & count from 1: KNITTED SAME WAY AS THE RIGHT STRAP (rows should be equal with left strap rows)


Copyright:

You may not sell my written pattern to anyone, and you may not publish it as your own.
However, you may sell a finished product (socks) made by you.

Thank you.
***

DID YOU FIND ERRORS? Let me know on what page of my blog, and in which row by clicking HERE, and I will fix it as soon as I get to it. You can PM me on my FB Page HERE as well. Txs!
Also if you haven't subscribed to my HandmadeRukodelky Channel, you can do it HERE. There are many videos to be seen, too.

*******************************************************************************


Copyright page - click HERE


PLEASE, COMMENT ON YOUTUBE BELOW MY VIDEOS, AND/OR SHARE YOUR IMAGES OF YOUR RECREATED WORKS ON MY FB PAGE HERE :-)


Note: Most of the time I work as fast as I can to keep up with knitting and crocheting requests. I have to videotape, edit videos, then convert them & upload them to my channel. After that often I post on my blog patterns. I answer many questions, which means that often I work up to 16 hours a day. I would tremendously appreciate IF anyone of you who finds an error in the written pattern, so please, let me know - where (what rows) and what may be the problem. Many future knitters & crocheters from our artsy and crafty virtual world will thank you for your good deed, including myself.