Celebrate your holiday season with crocheted snowflakes, icicles, and bells. You can have one done in just five rows. Get yourself a cotton thread (I used Aunt Lydia's) and make few snowflakes. Every two or three years I decorate our tree with just my crocheted decorations and some blue lights. Other times I use them for window or dinner table decorating. Either way, occasionally, I love to surround myself with a simple, elegant, white color.
Abbreviations: ch - chain
ch2sp - chain 2 space
ch4sp - chain 4 space
ch8sp - chain 4 space sc - single crochet dc - double crochet join - connect into a circle sl st - slip stitch
Rnd 1magic loop - ch1, then 12 sc - join into first sc Rnd 2ch5 (ch3=1dc, ch2=ch2sp), then in each st: *[1 dc, ch2]* - 11x, join
Rnd 3 ch1, then in each ch2sp 3 sc (total 12x), join into first sc
Rnd 4 ch1, then 1 sc in same st, 1 sc in next 2 st, *[ch8, 1 sc in each of next 3 sts, ch4, 1 sc in each of next 3 sts]* - 5x, ch8, 1 sc in each of next 3 sts, ch1, join with 1 dc into first sc
Rnd 5 *[ch2, then into next ch8sp: (2 dc, ch2, 3 dc, ch4, 3 dc, ch2, 2 dc, ch2); into next ch5sp: (1 sc)]* - repeat 6x, join into first dc
Optional: make a loop for hanging (or use a wire hook for Christmas decorations for hanging). Weave in all the tails with a yarn needle.
***
DID YOU FIND ERRORS? Let me know on what page of my blog, and in which row by clickingHERE,and I will fix it as soon as I get to it. You can PM me on my FB Page HERE as well. Txs!
Also if you haven't subscribed to my HandmadeRukodelky Channel, you can do it HERE. There are many videos to be seen, too.
PLEASE, COMMENT ON YOUTUBE BELOW MY VIDEOS, AND/OR SHARE YOUR IMAGES OF YOUR RECREATED WORKS ON MY FB PAGE HERE :-)
Note: Most of the time I work as fast as I can to keep up with knitting and crocheting requests. I have to videotape, edit videos, then convert them & upload them to my channel. After that often I post on my blog patterns. I answer many questions, which means that often I work up to 16 hours a day. I would tremendously appreciate IF anyone of you who finds an error in the written pattern, so please, let me know - where (what rows) and what may be the problem. Many future knitters & crocheters from our artsy and crafty virtual world will thank you for your good deed, including myself.
I love to crochet snowflakes - make them as I go. And it is that time of the year again - making winter decorations. Over the years I made many different "freehand" snowflakes. What I mean by that is that I didn't follow any patterns and I didn't write a pattern either. Today I present you a free pattern of a crocheted snowflake and a videotape of my outcome. I love to decorate my house with snowflakes in the winter time.
you can crochet snowflakes from a thin cotton yarn/thread or thick one. Your choice. I do prefer the thin cotton thread - they are much daintier.
Foundation: ch7 and connect into a circle with sl. st. Note: I make my connecting slip stitches tight so I do not count them as an extra stitch.
Rnd 1 ch1, 12 sc, sl st into ch1 to connect into circle (Note: if you crochet over the tail, you won't have to weave it in later) Rnd 2 ch3, 1 dc into 1st st, ch2; *[skip 1 st, 2 dc into next st, ch2]* - 5x; sl st into third ch of initial ch3 to connect into circle Rnd 3 *{ch10, sl st into 4th ch st from hook, *[ch4, sl st into same st]* - 2x; ch6, sl st into second dc from prev row; 2 sc into ch2-sp from prev row, ch4, sl st into last crocheted sc, 2 sc into ch2-sp from prev row, sl st into next dc from prev row}* - repeat all in { } brackets 5 more times (total 6x)
Finishing - weave in your tail(s), starch it, stretch it into the snowflake shape on a non-sticky surface, let it dry, decorate or give it as a gift.
***
DID YOU FIND ERRORS? Let me know on what page of my blog, and in which row by clickingHERE,and I will fix it as soon as I get to it. You can PM me on my FB Page HERE as well. Txs!
Also if you haven't subscribed to my HandmadeRukodelky Channel, you can do it HERE. There are many videos to be seen, too.
PLEASE, COMMENT ON YOUTUBE BELOW MY VIDEOS, AND/OR SHARE YOUR IMAGES OF YOUR RECREATED WORKS ON MY FB PAGE HERE :-)
Note: Most of the time I work as fast as I can to keep up with knitting and crocheting requests. I have to videotape, edit videos, then convert them & upload them to my channel. After that often I post on my blog patterns. I answer many questions, which means that often I work up to 16 hours a day. I would tremendously appreciate IF anyone of you who finds an error in the written pattern, to please, let me know - where (what rows) and what may be the problem. Many future knitters & crocheters from our artsy and crafty virtual world will thank you for your good deed, including myself.
While all my friends were busy getting ready for their holidays in the past two weeks, I was getting well in bed. A really strong virus visited my body and didn't want to let go.
Today we finally got to decorate our Christmas tree - although I am not completely healthy yet. But Christmas is around the corner, and I cannot picture holidays without a Christmas tree.
This year, for decorations we used blue lights (I adore them with white decorations) and all my crocheted ornaments. When we were finished, I stepped back to look at our tree and I thought - "how nicely it turned out". It is simple (just blue and white).
Also, what I very much like is that our tree is "organic". It means that all my crocheted ornaments are biodegradable. They are made of cotton thread. Not that I plan to toss the ornaments out. I will store them in the box for later years. In the future, if needed, I can wash them and starch them again and they will look like new. And if I treat them right, they will never break. Another bonus is that I can store them in a couple of small boxes.
If you like my tree, see some of the ornaments in posts under "crochet".
Happy Holidays (any Holidays that you celebrate) and Prosperous and Healthy 2012 Year.
Everyone, who celebrates Christmas, is getting ready for this holiday. Some people shop, some people bake, and others create handmade crafty gifts. I do all of the above and the other day I decided to make another item for my collection of ornaments that I could hang on our Christmas tree - an icicle.
If you love crocheted tree decorations and would like to make this icicle, you can download now my FREE .pdf pattern from Ravelry.com.
Feel free to click on the link "Pattern - Free" in CATEGORIES to see many more free patterns.
I WISH YOU VERY HAPPY HOLIDAYS Note: This pattern is for an icicle, but if you like to crochet vegetables for your child to play with, you can use some thin orange color yarn and crochet a carrot.
This year I decided to create all my Christmas decorations by hand for several reasons:
* I want my tree to be different and unique
* I love to create
* Handmade is the best
So, for the first time in my life, I am crocheting 3D Christmas decorations, like angels and bells. After I will add my snowflakes to 3D decorations it will be a real pleasure to look at my tree (which is purely mine), while I sip some hot chocolate.
Abbreviations:
ch - chain
sc - single crochet
sc decrease - single crochet decrease (you can do "invisible sc decrease" - see the video 4 LEFTIES & 4 RIGHTIES)
dc - double crochet
join - connect into a circle
sl st - slip stitch
Rnd 1 ch5 - join
Rnd 2 ch2, sc8, join
Rnd 3 ch2, in each stitch make 2 sc - total of 18, join
Rnd 4 ch3, three dc, skip 2 st, *[four dc, skip 2 st] - repeat from * 4 more times, join
Rnd 5 make 2 sl st. to get in the middle of "four dc cluster" from prev. row, ch3, 3 dc in the same st, ch2, *[four dc in the middle of "four dc cluster" from prev. row, ch2] - repeat from * 4 more times, join
Rnd 6 make 2 sl st. to get in the middle of "four dc cluster" from prev. row, ch3, three dc, ch3, *[four dc in the middle of "four dc cluster" from prev. row, ch3] - repeat from * 4 more times, join
Rnd 7-9 repeat row six
Rnd 10 make 2 sl st. to get in the middle of "four dc cluster" from prev. row, ch3, three dc, ch4, *[four dc in the middle of "four dc cluster" from prev. row, ch4] - repeat from * 4 more times, join
Rnd 11 without making sl st. and without ch2 crochet immediately * [6 dc in the middle of "four dc cluster" from prev. row (creating a "fan looking" cluster), along the ch4 from prev. row crochet 5 sc] - from * repeat 5 more times
Wash the bell, starch and stretch into a 3D bell shape.
How to make and attach the ball to the bell:
Rnd 1 ch4, join
Rnd 2 ch2, 6 sc, join
Rnd 3 ch2, into each st 2 sc (total 12 sc along the perimeter), join
Rnd 4-6 ch2, sc into every stitch from prev. row, join
Rnd 7 ch2, * [sc, sc decrease]; from * repeat to end, join
at this point stuff the forming ball with some filling (ie. white thick yarn, pillow filling etc.)
Rnd 8-9 repeat row 7
Rnd 10 close the hole with one stitch an crochet long string of chains (ch80 - ch100) - depending how long you want the loop for hanging
After the bell is dry, fold the long string in such way that the ball can hang long enough inside the bell, but that at the same time it is not too long - make a knot. Pull the loop through the small hole at the top of the bell and make another knot - securing the ball well onto the bell and not to get lost in the future.
After the holidays take care to wrap and store your precious 3D decorations, so they do not get crushed.
Last weekend I crocheted few more snowflakes for my Christmas tree. However, I do not have time to write the patterns at this time. But I'd love to share the images with you. Soon I will post couple of crochet angels, which I am working on.
Minuly vikend jsem uhackovala par vlocek pro nas vanocni stromecek. Bohuzel v momentalni situaci nemam cas napsat postup prace. Tak se alespon s vami podelim o fotografie. Take pro vas pripravuji hackovane andelicky.
One of these days I will find the time to knit a Christmas Stocking or two or three... Actually, now that I think of it, I knitted one long time ago - but I have no idea where it is! Probably packed all the way on the bottom of some box along with other forgotten Christmas decorations.
For now, I will share few websites, which posted patterns for Christmas Stockings (and one of these days I may design another stocking myself):
I love to crochet snowflakes. This snowflake has five rows therefore it is quick - and easy even for advanced beginners.
I give them out as gifts to my friends and family. Place them on a long string - they make a nice hanging for any window.
Make few of them for your holidays - as a decoration on your christmas tree, or make several snowflakes to place on dinner tables - when having a feast with friends, of for the winter wedding.
BTW - did you know that I made a video and you could crochet this snowflake along with me? CLICK HERE
Abbreviations:
ch - chain
sc - single crochet
dc - double crochet
tr - tripple crochet
sl st - slip stitch
join - join into circle with slip stitch
Step-by-Step Directions:
Row 1 ch10; join into circle Rnd 2 ch2, 17 sc; join Rnd 3 (ch3, 1 dc, ch1, 2 dc) into same stitch, ch3, skip 2 stitches; *[( 2 dc, ch1, 2 dc) into same stitch, ch3; skip 2 stitches]* - repeat from * to * 4 more times (total 6x); join Rnd 4 slip stitch into the middle of double crochets; (ch4, 1 tr, ch1, 2 tr) into same stitch, ch5; *[(2 tr, ch1, 2 tr) into the middle of double crochets, ch5]* - repeat from * to * 4 more times, (total 6x); join Rnd 5 *[ch5, 1 sc into space btw 2 tr, ch 5, sl st into the end of tr, ch15, then connect sl st into 11th chain (= 5 chains back), ch5, sl st into 11th ch again (you'll have two miniature circles/bow like looking shapes), ch10, and sl st into beginning of next tr]* - repeat from * to * 5 more times
Finishing: Weave in loose ends, wash it, squeeze as much water out as possible, then starch it with a thick starch goop, stretch it into the shape (block it) and let air dry, or gently speed up drying by using a blowdryer.
DID YOU FIND ERRORS? Let me know on what page and in which row by clickingHERE,and I will fix it as soon as I get to it. You can PM me on my FB Page HERE as well. Txs!
Also if you haven't subscribed to my HandmadeRukodelky Channel, you can do it HERE. There are many videos to be seen, too.
Tato vlocka je celkem rychla a dokonce i zacatecnici by nemeli mit temer zadne problemy.
1. 12 ret ok, spojit do kruhu
2. 2 ret ocka, 18 kr sl
3. (3 ret. ocka, jeden 1x nahoz sl, ret. ocko, dva 1x nahoz sl, 3 ret. oka) do stejneho ocka, *( dva 1x nahoz sl, ret. ocko, dva 1x nahoz sl, 3 ret. oka) do stejneho ocka, - od * opakovat jeste 4x
4. (4 ret. ocka, jeden 2x nahoz sl, ret. ocko, dva 2x nahoz sl, 5 ret. ok) do stejneho ocka, *( dva 2x nahoz sl, ret. ocko, dva 2x nahoz sl, 5 ret. ok) do stejneho ocka, - od * opakovat jeste 4x
5. * 5 ret ok, kr sl do mezery mezi dl sl, 5 ret ok a spojovaci ocko na konci dl sloupku, 15 ret. ok , spojit do krouzku v 11 ret. ocku (= 5 re. ocek nazpet), uhackovat 5 ret ok a opet vpichonot do 11ho ocka (budete mit dva miniaturni krouzky/okrasne smycky) 10 ret ok a vpichnout spojovaci ocko na pocatku dalsich dl sloupku - opakovat od * jeste 5x
Vyprat - Naskrobit - Povesit (na stromecek nebo i do okna). At se vam vlocka podari a hlavne libi.
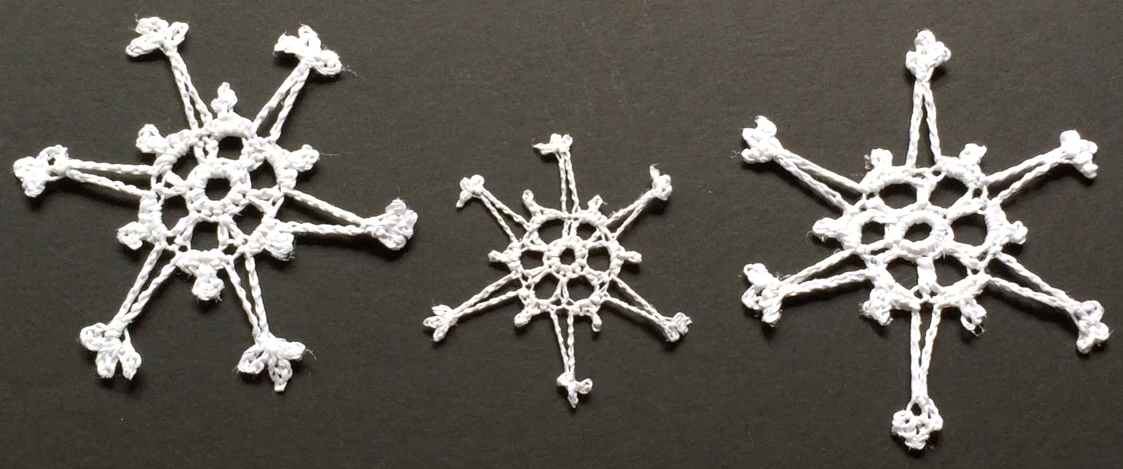
The other day I was crocheting snowflakes again. Just like last year around this time. I wanted to create simple, yet beautiful snowflakes. I took a hook (number 7 = 1.65mm) and my white jumbo size cotton crochet thread and started creating. My husband made us fire, and that made me feel kind of festive and creative. These snowflakes I made out of my head - perhaps there are some like these elsewhere on the net, or maybe similar ones, but I assure you that these I created with my own imagination listening to cracking of our fire sipping my favorite tea. Hopefully these images will inspire you and unleash your creativity, too. Happy snowflake making!
Pred par dny jsem se zase pustila do hackovani vlocek. Vzala jsem 1.65mm hacek a velike klubko hackovaci prize a zacala jsem tvorit. Manzel udelal ohen v krbu, a ja jsem citila ze jsou vanoce za rohem a hned mne ovladly inspiracni napady. Tyto vlocky jsou delane z moji vlastni hlavy, mozna jsou nekde na netu stejne nebo podobne fotografie, ale ujistuji vas,z e tyto vlocky jsou hackovane podle me imaginace. Tak treba vas budu inspirovat. Preji vam vsem prijemne tvoreni vlocek.
I love angels. In paintings, in drawings, crochet angels.... Here is my variation of a crocheted angel. It makes a nice decoration for your Christmas tree.
Head and Halo:
1. ch 18, connect into circle with a sl st
2. ch2, then 28 sc
3. seven sl st into 1-7 stitches of the previous row, ch20, then sl st into 8th stitch from the end- turn
4. ch2, 20 sc - turn
5. sl st. into the 7th stitch from row 3, then 2 sl st, ch4, 4 sl st, ch4 - repeat 3 more times, finish wit 2 sl st + one more sl st into the 7th stitch from the end in the 3rd row
6. finish head with seven sl sts
Body:
7. start neck with ch4, tr crochet into same stitch as ch4, two tr crochet into next stitch, turn
8. ch4, three tr crochet into "2 tr cr" space from prev. row, skip one space between tr crochets, four tr crochet into the space between the last two tr crochets on the end, turn
9. sl st, ch4 + three tr crochet into space between second and third tr crochets in prev. row, skip one space (bet. 3rd & 4th tr crochets in prev. row), four tr crochet into same space between 4th and 5th tr crochets from in prev. row, skip one space (bet. 5th & 6th tr crochets in prev. row), four tr crochet into same space between 6th and 7th tr crochets from in prev. row = total 12 tr cr, incl ch4 stitch in row 9, turn
10. repeat row 9 - you will end up with total 20 tr cr, incl ch4 stitch in row 10
11. sl st, ch4 + two tr crochet into space between second and third tr crochets in prev. row, skip two spaces, *three tr crochet into space, skip one space, - repeat 4 more times, three tr crochet into space, skip two spaces, finish with three tr cr, turn
12. ch4 + two tr cr into same stitch, then always between cluster of three tr st crochet another cluster of three tr st, finish at the end with a cluster of three tr st in the last stitch, turn
13. repeat row 12
14. *ch10, sl st into 5th ch, ch5, sc bet. 2nd cluster of tr stitches - rep 4 more times
15. work along the side of the skirt (from the bottom toward head) - ch4 and sl st for each row - 5x
Wings:
16. crochet ch4 + 4 tr crochet into the side of the next row (= right below the neck row), turn
17. ch4, tr cr into same stitch, *ch1, 2 tr cr into same stitch - repeat 3 more times, turn
18. ch4, tr cr into same stitch, *ch2, 3 tr cr into the space - repeat 3 more times, finish the row wit 2 tr cr in the last stitch, turn
19. *ch4, 3 sc, repeat until the end - finishing up with ch4 and sl st., cut of the string
Do the second wing starting on the bottom of the skirt with the same stitches as in row 15 and continue up to row 19.
Clean up the ends, starch your Angel and hang it on your Christmas tree. Happy Holidays.
***********************************************
Mam rada andilky v jakekoliv forme. Zde je hackovana variace meho andela.
Hlava a Svatozar:
1. retzek z 18ti ocek, spojit
2. 2 retizky, pote 28 kr sl
3. 7 spojovacich ocek do kazdeho kr sl, 20 retiskovych ocek, pote spoj ocko do 8meho ocka od konce/pocatku kruhu, ototcit
4. 2 retizky, 20 kr sl (kolem obvodu svatozare) - otocit
5. spojovaci ocko do 7 ocka (na hlave), pote 2 spoj ocka do kr sl na svatozari, 4 retizky, 2 spoj ocka do kazdeho kr sl, 4 retizky, 2 spoj ocka do kazdeho kr sl - opakovat (budete mit celkem 5 obloucku), ukoncit s 2 spojovacimi ocky + plus jeste jedno spoj ocko na zpevneni do 3 rady (hlava)
6. dokoncit hlavu s dalsimi 7 spojovacimi ocky podel strany hlavy
Telo:
7. krk zacneme se 4 retizky, pak dvojity sl do stejneho ocka, do dalsiho ocka 2 dl sl, otocit
8. retizek ze 4 ocek, 3 dl sl mezi dva sl sl z predesle rady, preskocit dalsi mezeru mezi sloupky, a do dalsi mezery uhackovat 4 dl sl, otocit
9. spojovaci ocko, a pak 4 ret ocka + 3 dl sl do mezery, pak do kazde druhe mezery uhackovat 4 dl sl - na konci rady by jste mely mit celkem 12 dl sl (vcetne dl sl ze 4 ret ocek)
10. opakovat 9-tou radu - v 10te rade by jste mely mit 20 dl sl (vcetne dl sl ze 4 ret ocek)
11. spjovaci ocko, 4 ret ocka + 2 dl sl do mezery, preskocit 2 mezery = uhackovat 3 dl sl, pote hackovat 3 dl sl v kazde druhe mezere - opakovat jeste 4x, preskocit 2 mezery a uhackovat 3 dl sl na konci rady, otocit
12. 4 ret ocka + 2 dl sl do stejneho ocka, pote uhackovat vzdy 3 dl sl v mezere mezi troj-dlouhymi sloupky, a nakonec do posledniho ocka opet 3 dl sl, otocit
13. opakovat 12-tou radu
14. *10 retisku, do pateho retisku spojovaci ocko, 5 retizku, kr sl do mezery kazde 2 trojite dl sl - opakovat jeste 4x
15. pokracujeme po strane tela (od spodu ke hlavicce) - 4 ret ocka, sl st do kazde rady - 5x
Wings:
16. uhackovat 4 ret. ocka + 4 dl sl po delce dlouheho sl v dalsi rade (je to rada hned pod radou, ktera tvori krk), otocit
17. 4 ret ocka, dl sl do stejneho oka * retizkove oko, 2 dl sl do stejneho oka - opakovat 3x, otocit
18. 4 ret ocka, dl sl do stejneho oka * 2 ret oka, 3 dl sl do stejneho oka - opakovat 3x, dokoncit radu 2-mi dl sl v poslednim ocku rady, otocit
19. *4 ret ocka, 3 kr sl - opakovat do konce rady a ukoncit 4 ret ocky a spojovacim ockem, ustrihnout prizi
Druhe kridelko zaciname opet odspodu sukynky = opakovat podle rady 15 - 19.
Zacistit vsechny konce, naskrobte vaseho Andilka a poveste na stromecek. Stastne a Vesele Vanoce.
My snowflake #004 was one of my first ones, I ever made. At that time I didn't think about how many "sides" snowflake has. I saw other crocheted snowflakes that had different number of "sides". Later on, I got this book about snowflakes for my inspiration on crocheting different shapes, and I realized that snowflakes are only six sided due to the water molecules and how they attach themselves to each other. The shape of each snowflake is determined by temperature and by humidity. The most intricate snowflakes come from very cold environment (high clouds). On the other hand plate like looking snowflakes come from low clouds, where it is not so cold.
Step-by-Step directions for Snowflake #004:
1. Chain 8, connect into circle.
2. 12 sc
3. Ch 4, 5 times tr into same spot, ch 1[stitch into third chain - 6 times tr, ch 1 ] repeat 2 more times and finish sl st.
4. Ch 5, 2 quadruple tr, ch 4 - ch 5 picot - ch 4, 3 quad tr (into the middle of 6 tr st), ch 4 - ch 5 picot - ch 4, [3 quad tr, ch 4 - ch 5 picot - ch 4] five more times (total of 8 three quadruple triple stitches)
5. [ch 10, sc] repeat 7 more times (total of 8)
6. crochet on each ch 10 - [2 sc, 2 dc, 12 tr st, 2 dc, 2 sc] repeat seven more times (8 in total)
7. 10 slip stitches to be at the top of arch, ch 3, four dc, ch 8, ch 7 picot (sl st), ch 7 picot (sl st), ch 8, [five dc, ch 8, ch 7 picot (sl st), ch 7 picot (sl st), ch 8] repeat six more times
Wash the snowflake, starch and stretch.
*******
Moje Vlocka #004 byla jedna z prvnich vlocek, ktere jsem uhackovala. V te dobe jsem jeste nepremyslela o tom kolik stran kazda vlocka doopravdy ma. Vlocky, ktere jsem si vyhledala na netu mely kazda ruzny pocet stran. Jednou dne se mi do ruky dostala tato kniha, kterou jsem se chtela inspirovat k hackovani ruznych vlocek. Pri prohlizeni knihy jsem si uvedomeila, ze kazda vlocka ma puze 6 stran z duvodu molekularnihgo usporadani vody (H2O). Pricemz vlhkost a teplota (v tomto pripade zima) vzduchu ovlivnuje, jak vlocka bude vypadat. Cim studenejsi vzduch tim slozitejsi tvary vlocek.
Zde je postup na Vlocku # 004:
1. Zacneme na 8 ocek.
2. Uhackujeme 12 kr. sloupku
3. Uhackujeme 3 ocka a do stejneho mista uhackujeme pet 3x nahazovanych dl sl., 1 ret. ocko [do tretiho ocka uhackujeme sest 3x nahazovanych dl sl, 1 retiz. ocko] opakovar jeste 2x a spojime ret.ockem
4. 5 retiz ok , dva 4x nahaz dl sl, 4 ret. ocka - 5 ret. ok spojit - 4 ret ocka, tri 4x nahaz dl sl (do stredu 6ti sloupku v predchazejici rade), 4 ret. ocka - 5 ret. ok spojit - 4 ret ocka, [tri 4x nahaz dl sl , 4 ret. ocka - 5 ret. ok spojit - 4 ret ocka,] jeste 5x (celkem 8 tri-ctyrikrat nahaz dl sl)
5. [10 ret ok, krat sl] opakovat jeste 7x (celkovy pocet 8)
6. Na kazdem retisku z deseti ocek uhackovat [2 krat sl, 2 dl sl, dvanact 3x nahazovanych dl sl, 2 dl sl, 2 krat sl] opakovat jeste 7x (celkem 8)
7. uhackovat po obvodu predesle rady 10 spojovacich ocek aby jste se dostaly na vrch obloucku, uhackovat 3 ret oka, 4 dl sl, 8 retizkovych ok, pak 7 ret ok - spojit, 7 ret ok - spojit, 8 retizkovych ok, [pet dl sl, 8 retizkovych ok, pak 7 ret ok - spojit, 7 ret ok - spojit, 8 retizkovych ok] opakovat jeste 6x
After few of my old hand made items, such as tea pot cover and crochet belt , I think it is time to add another crocheted snowflake. This is a variation on a classic snowflake that I found on the internet. It has three extra rows, two extra rows in the middle and one extra last row with a small variation in the tips.
Step-by-Step:
1. ch 10 2. sc 18 3. ch 4 - every 3 stiches - you will create in total 6 loop 4. You will create in the loops: ch 4 + 3x tr st, ch 4, [4x tr st, ch 4] rep 4 more times 5. You will create in 4 chain loops: ch 4 + 2x tr st, ch 4, 3x tr st, ch 5, [3x tr st, ch 4, 3x tr st, ch 5] rep 4 more times 6. You will create in 4 chain loops: ch 4 + 2x tr st, ch 4, 3x tr st, ch 3, sc, ch 3, [3x tr st, ch 4, 3x tr st, ch 3, sc, ch 3] rep 4 more times 7. You will create in 4 chain loops: ch 4 + 2x tr st, ch 4, 3x tr st, ch 7, sc, ch 7, [3x tr st, ch 4, 3x tr st, ch 7, sc, ch 7] rep 4 more times 8. You will create in 4 chain loops: ch 4 + 2x tr st, ch 7, sl st, 3x tr st, ch 10, sc, ch 10, [3x tr st, ch 7, sl st, 3x tr st, ch 10, sc, ch 10] rep 4 more times
Do not forget to starch and stretch. I do have to take a better image for that page, when I starch my next snowflake.
1. Zacneme na 10 ocek 2. 18 kratkych sloupku 3. 4 retizkove oka do kazdeho tretiho oka – vytvorite celkove tak 6 obloucku 4. V oblocukach hackujete: 4 ret. oka + tri 2x nahazovane dl. sl., 4 ret oka, ctyri 2x nahazovane dl. sl., [ctyri 2x nahaz. Dl sl, 4 ret oka] opakujeme jeste 4x 5. V oblocukach hackujete: 4 ret. oka + dva 2x nahazovane dl. sl., 4 ret oka, tri 2x nahazovane dl. sl., 5 ret ok, [tri 2x nahaz. dl sl, 4 ret oka, tri 2x nah dl sl, 5 ret ok] opakujeme jeste 4x 6. V oblocukach hackujete: 4 ret. oka + dva 2x nahazovane dl. sl., 4 ret oka, tri 2x nahazovane dl. sl., 3 ret oka, kr sl, 3 ret oka, [tri 2x nahaz. dl sl, 4 ret oka, tri 2x nah dl sl, 3 ret oka, kr sl, 3 ret oka] opakujeme jeste 4x 7. V oblocukach hackujete: 4 ret. oka + dva 2x nahazovane dl. sl., 4 ret oka, tri 2x nahazovane dl. sl., 7 ret ok, kr sl, 7 ret ok, [tri 2x nahaz. dl sl, 4 ret oka, tri 2x nah dl sl, 7 ret ok, kr sl, 7 ret ok] opakujeme jeste 4x 8. V oblocukach hackujete: 4 ret. oka + dva 2x nahazovane dl. sl., 7 ret ok, utvorime „oko” spojenim, tri 2x nahazovane dl. sl., 10 ret ok, kr sl, 10 ret ok, [tri 2x nahaz. dl sl, 7 ret ok, utvorime „oko” spojenim, tri 2x nah dl sl, 10 ret ok, kr sl, 10 ret ok] opakujeme jeste 4x
1. rada - uhackujeme retizek na 10 ok 2. rada - uhackujeme 20 kratkych sloupku 3. rada - 2 dlouhe sloupky 5x nahazovane, pak 4 retizkove oka - toto opakujeme jeste 9x 4. rada - 1 dlouhy sloupek (1x nahazovany) do 5x nahazovaneho sloupku, 1 dlouhy sloupek (1x nahazovany) + 2 dlouhe sloupky (2x nahazovane) + 1 dlouhy sloupek (1x nahazovany) tam kde jsou 4 retizkova oka, dale 1 dlouhy sloupek (1x nahazovany) do 5x nahazovaneho sloupku. Toto opakujeme jeste 9x 5. rada - v miste kde se vidime pod ctvrtou radou dva 5x nahazovane sloupky uhackujeme 15 retizkovych ok, ktere spojime do "oka (kruhu) v osmem retizkovem oku, pak uhackujeme 5x nahazovany dlouhy sloupek (ktery pichneme mezi dva 2x nahazovane dlouhe sloupky), pak 8 retizkovych ok ktere pichneme do mista, kde se vidime pod ctvrtou radou dva 5x nahazovane sloupky - toto opakujeme dokola. 6. rada - 10 - 12 retiskovych ok - pichneme do toho uhackovaneho "oka" (kruhu), 10 retizkovych ok, znovu picneme do "oka", jeste jednou 10-12 retizkovych ok a pichneme do mista nad dvojici 5x nahazovanych dlouhych sloupku... Toto opakujeme dokola jeste 9x.
Zacistime konecky, naskrobime a radujeme se z krasne vlocky, popripade darujeme.
1. uhackovat retizek z 10 ocek a spojit do krouzku 2. uhackovat 16 kratkych sloupku 3. uhackovat 3retiskove ocka + 1 retizkove ocko, pak pichneme hackem vzdy do kratkeho sloupku 1 dl. sloupek, a uhackujeme1 retizkove ocko - toto opakovat - celkem dohromady, aby to tvorilo 16 dl. sloupku (vcetne 3 uvodnich ocek) 4.uhackovat 3 ocka (toto je prvni sloupek) + 2 ocka, pak pichnout do dalsiho dl. sloupku a uhackovat ve stejnem miste 3 dlouhe sloupky, 2 ocka, 1 dl. sloupek, 2 ocka - toto opakovat dokola = celkem 8 troj-dlouhych sloupku a 8 jedno-dlouhych sloupku 5.tvorime kratke a dlouhe "spicky":
kratka "spicka" - uhackovat 17 - 20 ocek (jak dlouhy to chcete) a vpichnout do troj-sloupku.
dlouha "spicka" - uhackovat 13 retizkovych ok - vpichnout do osmeho odspodu (tj. 5 ocek jakoby zpet a udelat tu smycku), uhackovat 7 retiskovych ok a vpichnout do druheho ( tj. 5 ocek zase jakoby zpatky a udelat druhou smycku), znovu 7 retizkovych ok a vpichnout zase zpet do druheho a udelat treti smycku, uhackovat 15 ok a vpichnout do desateho ocka (tj. 5 ocek zpet) - ctvrta smycka, uhackovat 7 retiskovych ok a vpichnout do druheho ( tj. 5 ocek zase jakoby zpatky a udelat patou smycku), znovu 7 retizkovych ok a vpichnout zase zpet do druheho a udelat sestou smycku, a konecne uhackovat 8 retizkovych ok a vpichnout do konce trojsloupku
toto opakujeme: uhackujeme 17-20 retizkovych ok a pichneme do jednoslouku, znovu 17-20 ok a pichneme do pocatku troj-sloupku = uhackujeme kratke "spicky" 2x, a zase pokracujeme s dlouhou "spickou", kterou vystridame dvemi kratkymi "spickami" - a tak pokracujeme dokola az dokoncime posledni kratkou "spicku" (hned vedle prvni kratke "spicky")... zacistime konecky..




 and
and  and started creating. My husband made us fire, and that made me feel kind of festive and creative. These snowflakes I made out of my head - perhaps there are some like these elsewhere on the net, or maybe similar ones, but I assure you that these I created with my own imagination listening to cracking of our fire sipping my favorite tea. Hopefully these images will inspire you and unleash your creativity, too. Happy snowflake making!


 about snowflakes for my inspiration on crocheting different shapes, and I realized that snowflakes are only six sided due to the water molecules and how they attach themselves to each other. The shape of each snowflake is determined by temperature and by humidity. The most intricate snowflakes come from very cold environment (high clouds). On the other hand plate like looking snowflakes come from low clouds, where it is not so cold.


